Creating and Managing Templates
Create a new template
From the Manifest Web Application:
- From the left side Main Menu, select Templates
- Select ‘+ Template’
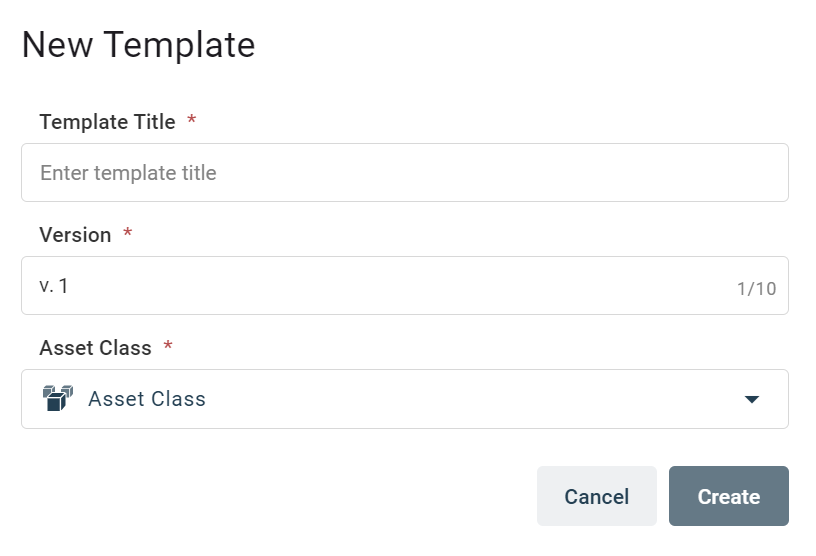
- A New Template modal will appear
- Enter in the Template Title
- Enter in the Version
- Assign the template to an Asset Class by selecting from the Asset Class dropdown
- Hit Create
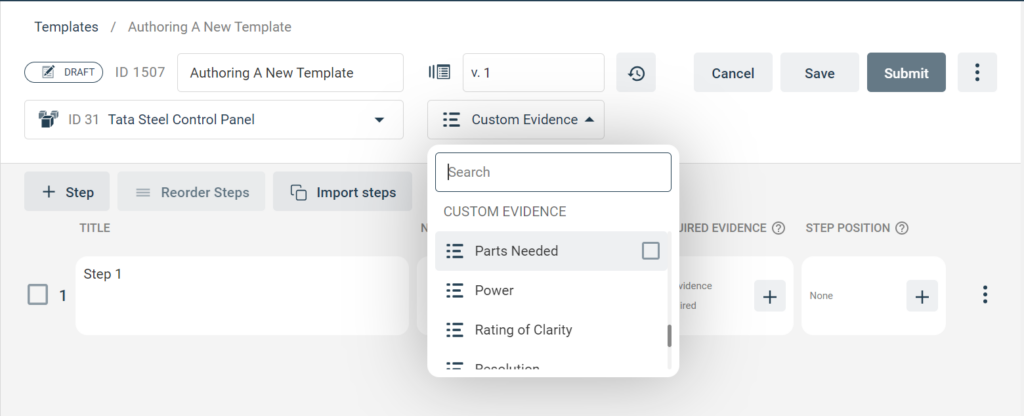
- The Template will be created and marked as ‘Draft’
- User will be automatically dropped into ‘Edit Mode’
- If appropriate, you may also add a ‘Custom Evidence Type’ for the template. A custom evidence type will display a predefined value list (created under ‘Value Lists’ for your tenant) to the operator as an evidence note type for all steps in this template. This is optional.
- Select ‘+ Step’ to begin adding steps
- When complete, select ‘Save’ and the ‘Draft’ of the Template will be saved.
Import a template from ZIP
The import a template from a ZIP file functionality within the Web Application allows an Author to upload an entire procedure via ZIP file that might have been exported from another Manifest domain.
- From the template page select ‘Import from ZIP’
- From your computer files, select the ZIP file you would like to import
- User will be prompted with an ‘Import Template’ modal that will show the file uploading process and percentage complete.

Edit a template
- Select Templates on the main menu
- By default the Templates page shows all Published templates. To locate the ‘Draft’ template, toggle over to the ‘Draft’ area.
- Locate the template you would like to edit
- Edit the Template using one of two options:
- Select the 3 dots to the left of the templates listing to open up a list of actions
- Select the 3 dots to the left of the templates listing to open up a list of actions
- When editing a template, the below options are available:
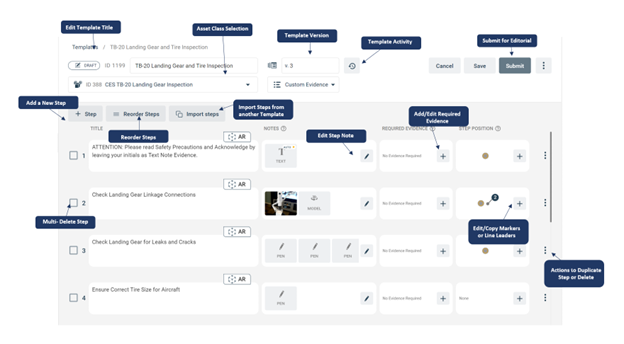
- Edit template title: select edit template and update the template title
- Re-order steps: select the ‘Reorder Steps’ button, select the three-lines on the step you want to reorder and drag it to its new order location
- Edit a step: edit step title field or select the ‘x’ to the right of the step title box to clear content
- Delete a step: click on the three dots next to the step and select the trash can
- Duplicate a Step: click on the three dots next to the step andselect the duplicate step icon above the trash can to duplicate the step already authored
- Add a new step: select ‘+ step’
- Delete template: select the trash can icon from the template listing page. Note: Templates with jobs associated cannot be deleted. Only admin roles have the permissions to delete templates.
- Multi-Step Delete: select the checkbox to the left of the step title, select the steps you want to delete and then select the Delete Button
- Import steps from another Template: select the Import steps button and select an Asset Class and then Template when prompted then hit ‘Next.‘ The steps of that template will appear in a modal window. Select those steps you would like to import and select ‘Import’
Authoring a step
When authoring a step, the Step title is the primary text that displays on the step. There is no character limit as the step marker height will expand to fit the full step title, but it is recommended to keep this instruction concise and easy for an Operator to follow. Manifest provides an array of tools to provide Operators additional guidance.
Below are the step authoring options:
- Edit / enter step title: by default, all steps will generate with the step title ‘Step 1’, ‘Step 2’, etc. To input the step title, select this field and edit this default text or select the ‘x’ to clear.
- Add Step Notes: to add a step note, select ‘+’ or pencil icon to open the ‘Manage Notes’ window
- Required Evidence: under the ‘Required Evidence’ column, select the ‘+’ or pencil icon to open the Required Evidence window. Select any evidence types required for Operators to submit at this step. If any evidence type is acceptable, select ‘Any’. Note: if evidence is required, the Operator will be unable to complete this job step until the required note is added
- Step Position: Spatially placed step markers and leader lines are best authored using the Manifest 3D or iPadOS application; however, coordinates may be manually inputted (if known) or copied from other step markers using the Manifest Web application. Where no positional data exists, the step marker is treated as a ‘Head Space’ marker and will follow the user as they work, rather than being anchored to a set position
Creating and Managing Step Notes
Adding a Step Note
- From the step, select ‘+’ or pencil icon to open the ‘Manage Notes’ window
- The list of note types that can be added from the Manifest Web application will display on the left-hand menu
- Hover over the desired note type until a ‘+’ option appears
- Select the ‘+’ button
- The instructions and required data fields will open to the right
- Complete the required data and associate the file (as appropriate)
- To cancel out of a note type, select ‘Cancel’
- Once complete, select ‘Save’
- The ‘Manage Notes’ window will automatically close
- To add another note, repeat
Managing a Step Note
To edit or delete a Step Note
- From the step, select ‘+’ or pencil icon to open the ‘Manage Notes’ window
- The list of note types that can be added from the Manifest Web application will display on the left-hand menu. A superscript number will display next to the Note Type to indicate how many of that note type are added to this step
- To edit a note, select the appropriate note type label
- The note details will open to the right presenting the options for each note. Options may include any of the following:
- Auto-play: turning this toggle on will make the note auto-play for an operator so they do not need to manually select the note to open it during a job
- This is only an option in the 3D application
- Edit: selecting the note will expand the note details for editing
- Delete: if a note can be deleted, a trash can icon will display. Selecting this will delete the note from the step permanently
Authoring Step Notes
Below are some additional instructions for authoring each type of step note.
Video Note
- From the ‘Manage Notes’ window, select the ‘+’ button next to the Video Notes menu label
- Enter in the note title (this is not currently displayed on the applications)
- Associate the appropriate file by choosing ‘Select existing file’ or to ‘Upload’ to upload a new file
- If the note should auto-play for the operator, turn the ‘Auto-play” toggle on.
- To add another text note, repeat from step 1
- To re-order the notes, hover over the note you’d like to move until the dots appear on the left of the note name. Select and then hold and drag to the desired location
- Once done, select the “Save” button
** If you would like to download a video, select the download arrow and the file .mp4 will save to your computers download folder
Text Note
- From the ‘Manage Notes’ window, select the ‘+’ button next to the Text Notes menu label
- Enter the note title (this is not currently displayed on the applications)
- Enter the text note content into the primary text box
- Use the available html tools to format or change the size of the text as desired
- If the note should auto-play for the operator, turn the ‘Auto-play” toggle on
- To add another text note, repeat from step 1
- To re-order the notes, hover over the note you’d like to move until the dots appear on the left of the note name. Select and then hold and drag to the desired location
- Once done, select the “Save” button
Audio
- From the ‘Manage Notes’ window, select the ‘+’ button next to the Audio Notes menu label
- Enter the note title (this is not currently displayed on the applications)
- Associate the appropriate file by choosing ‘Select existing file’ or to ‘Upload’ to upload a new file
- If the note should auto-play for the operator, turn the ‘Auto-play” toggle on.
- To add another audio note, repeat from step 1
- To re-order the notes, hover over the note you’d like to move until the dots appear on the left of the note name. Select and then hold and drag to the desired location
- Once done, select the “Save” button
Photo
- From the ‘Manage Notes’ window, select the ‘+’ button next to the Photo Notes menu label
- Enter the note title (this is not currently displayed on the applications)
- Associate the appropriate file by choosing ‘Select existing file’ or to ‘Upload’ to upload a new file
- If the note should auto-play for the operator, turn the ‘Auto-play” toggle on.
- To add another photo note, repeat from step 1
- To re-order the notes, hover over the note you’d like to move until the dots appear on the left of the note name. Select and then hold and drag to the desired location.
- Once done, select the “Save” button
Bookmark
- First, be sure the document you wish to bookmark is already uploaded for the asset class on which you are authoring a template
- From the ‘Manage Notes’ window, select the ‘+’ button next to the Bookmark Notes menu label
- Open the ‘Select Existing File’ dropdown menu to find the appropriate document and select
- Enter the page number that should be bookmarked for this step
- To add another bookmark note, repeat from step 1
- To re-order the notes, hover over the note you’d like to move until the dots appear on the left of the note name. Select and then hold and drag to the desired location.
- Once done, select the “Save” button
AR Notes
- AR Notes are available for authoring on the 3D device or iPad
- Admin and Author roles can download an existing AR note into a .txt file and then re-upload that same note in another template. This re-uploaded pen note will hold the same parameters (shape, color and coordinates) of the original downloaded AR notes.
- To download and re-upload an AR note within a step note of templates please follow the instructions below:
- Locate the AR note you would like to download in the step note management tool
- On the right-hand side of the AR note, locate the arrows that indicate the download and upload functionalities
- Download the AR note and noticed that it downloads as a .txt file to your computer
- To re-upload, select to add a new AR note
- Select the upload arrow to the right of the AR note and upload the AR note you downloaded
- Hit save
Meter Note
- Select the desired Meter
- To add requirements for this meter, select ‘+Add Requirements’ (‘Meter requirements’ allow an author or admin to require the selected meter to meet specified requirements for an operator to continue to the next step.)
- Select the requirement type (LessThan, EqualTo, GreaterThan)
- Select the requirement type (LessThan, EqualTo, GreaterThan)
- To add another meter action note, repeat.
- Once done, select the “Save” button
3D Model Action Note
- Select whether this action should ‘Show Model’ or ‘Hide Model’
- If ‘Show Model’ is selected, select the desired Model from the dropdown menu
- If ‘Show Model’ is selected, select the desired Model from the dropdown menu
- There is a limit of one (1) 3D model action note per step
Alignment Note
- Select the desired Meter
Template
- From the ‘Manage Notes’ window, select the ‘+’ button next to the Template Note menu label
- Select the Asset Class for the template you are linking to this step
- Select the desired Template. (You cannot link to the parent template so this option will be excluded)
- Once done, select the “Save” button
*Only (1) one template note or choice note may be authored for a step
Choice
- From the ‘Manage Notes’ window, select the ‘+’ button next to the Choice Note menu label
- After selecting “Choice Note” the window will open prompting you to configure the choice note
- Input the title for the ‘Choice Note’, this will serve as instructions for the operator that will display above the choices. By default, the title is populated as ‘Choose from the below’
- Add an Option Description for each choice
- Then for each choice, indicate if this option will “Proceed to the NEXT step” or select an asset and template the Operator should be directed to do
- Select ‘+ Add Option’ to add more options (it will default to the minimum 2). The maximum number of options is 5
- To delete an option, select the trash can icon next to the option
- By default, all options will be labeled as A, B, C…etc.
- Once complete, select ‘Save’
The Editorial Process
Editorial controlled workflows are now available for managing and publishing Templates before they can be used or accessed by Operators. Below outlines how the editorial process workflow works:
- Author captures and completes the SOP or procedure
- Reference: Creating a Template outlined above
- Save the template at the top right side of the template ‘Edit state’ and the template will be saved as ‘Draft’
- The Author hits “Submit” which submits the template for either Approval or Rejection by the Role = Approver
- The template on the Web Application now lives under the ‘Submitted’ tab on the Template page
- A user with the Role = Approver, locate the submitted template and either:
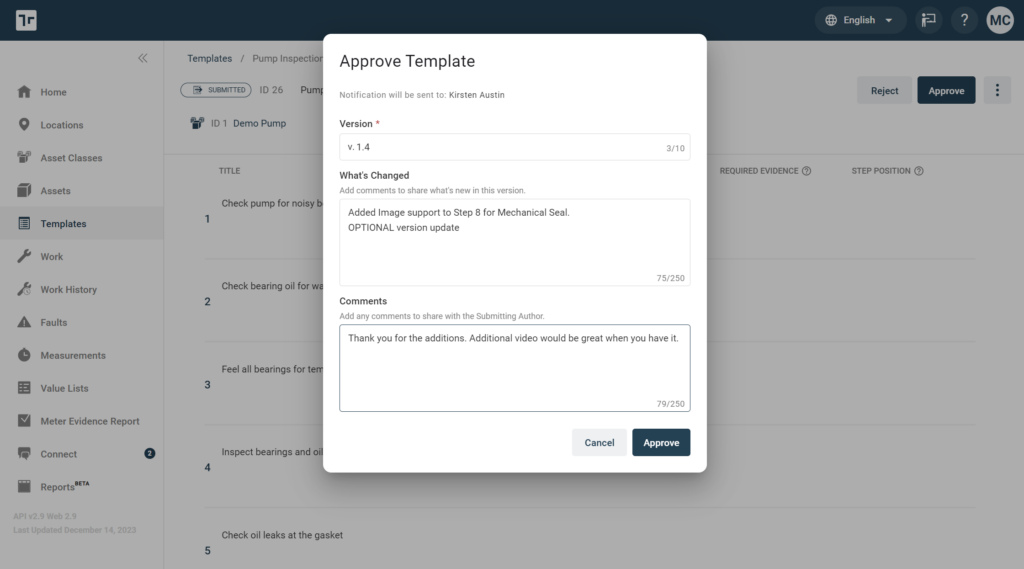
- Approve Template:
- Update with a new version (if applicable – not required)
- Add comments in the Comments field that will be shared via a Connect message to the Submitting Author
- Reject Template
- Add comments to the Comments field that will be shared via a Connect message to the Submitted Author
- Any rejected template will be sent back to ‘Draft’ status
- Approve Template:
- A user with Role = Publisher can locate the Approved template and either:
- Publish Template:
- Update the Version number (if applicable – not required)
- Archive Template:
- If you archive a template you will not able to create jobs from this template any longer
- Restore Template:
- Publisher can Restore an Archived template back to Published and the published version available in archived in it’s place.
- Publish Template:
Additional Template Actions available
The Manifest Web Application provides several additional tools for managing templates via ‘Actions’. To access the ‘Actions’ options:
- Select Templates on the main menu
- Locate the template you would like to edit
- Select the ‘Actions’ button (three dots on the far right of any existing template)
Actions show based on specific role
Draft Template
| Admin | Author | Approver | Publisher | |
| Edit |  |  | ||
| Archive | ||||
| Copy Link |  |  |  |  |
| Duplicate |  |  | ||
| Delete |  |  | ||
| Export to (PDF, Excel, ZIP) |  |  |  |  |
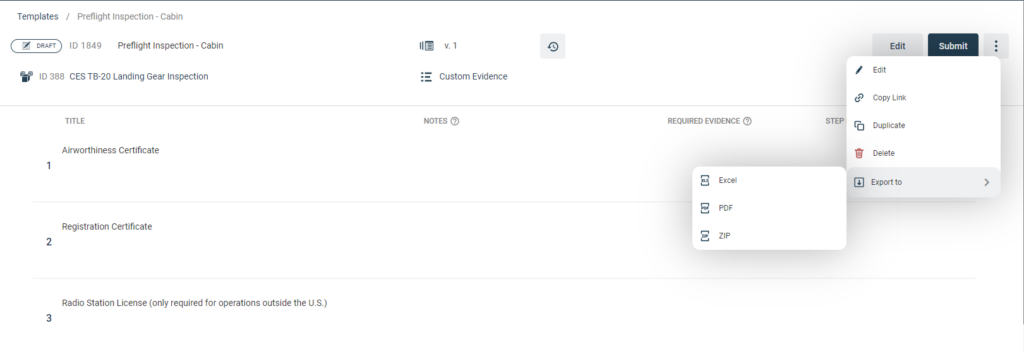
Submitted Template
| Admin | Author | Approver | Publisher | |
| Edit |  |  | ||
| Archive | ||||
| Copy Link |  |  |  |  |
| Duplicate |  |  | ||
| Delete | ||||
| Export to (PDF, Excel, ZIP) |  |  |  |  |
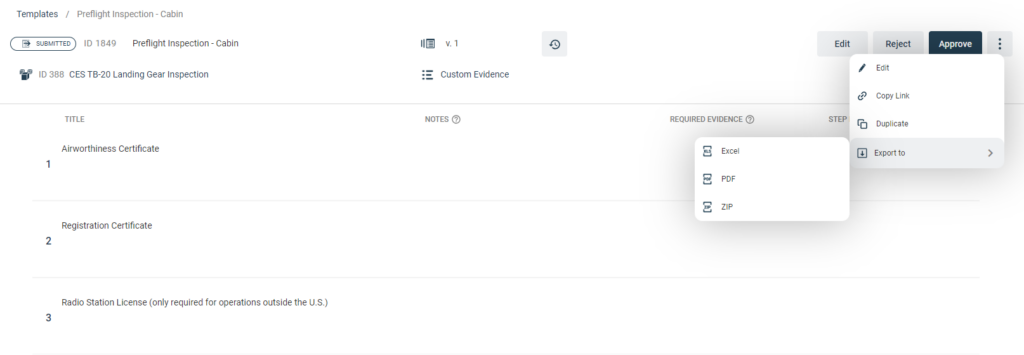
Approved Template
| Admin | Author | Approver | Publisher | |
| Edit |  |  | ||
| Archive |  |  | ||
| Copy Link |  |  |  |  |
| Duplicate |  |  | ||
| Delete | ||||
| Export to (PDF, Excel, ZIP) |  |  |  |  |
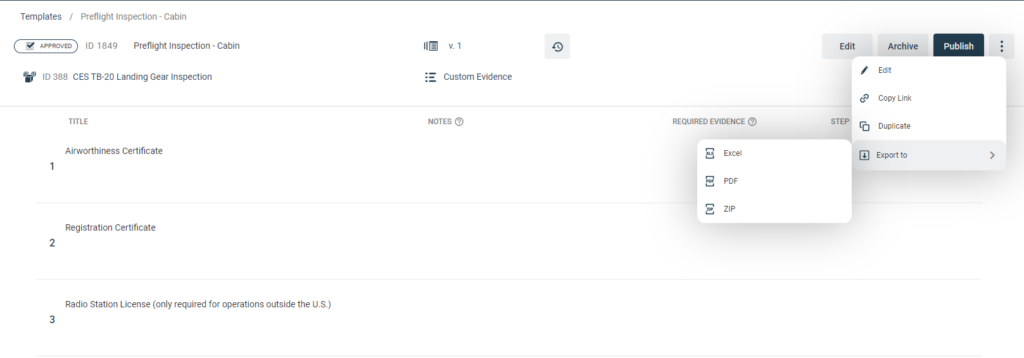
Published Template
| Admin | Author | Approver | Publisher | |
| Create New Draft |  |  | ||
| Edit | ||||
| Archive |  |  | ||
| Copy Link |  |  |  |  |
| Duplicate |  |  | ||
| Delete | ||||
| Export to (PDF, Excel, ZIP) |  |  |  |  |

Archived Templates
| Admin | Author | Approver | Publisher | |
| Restore as Published |  |  | ||
| Create New Draft |  |  | ||
| Edit | ||||
| Archive | ||||
| Copy Link |  |  |  |  |
| Duplicate |  |  | ||
| Delete | ||||
| Export to (PDF, Excel, ZIP) |  |  |  |  |
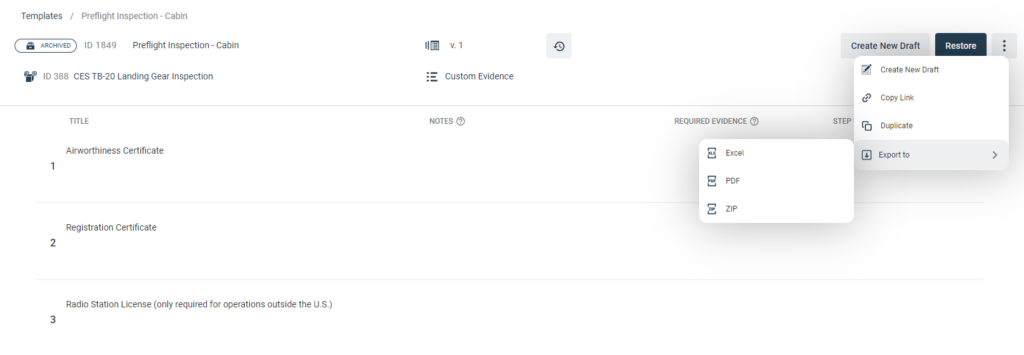
Restore as Published
A function of the Admin or Publisher Role to access an Archived template and Restore the archived template back to the Published state. This will archive any published version when this template is Restored.
- From the Action menu, Select ‘Restore as Published’
- A modal prompt will appear outlining what template will be archived then this template is restored.
- Select ‘Restore as Published’ OR ‘Cancel’ if you don’t want to restore this template to published
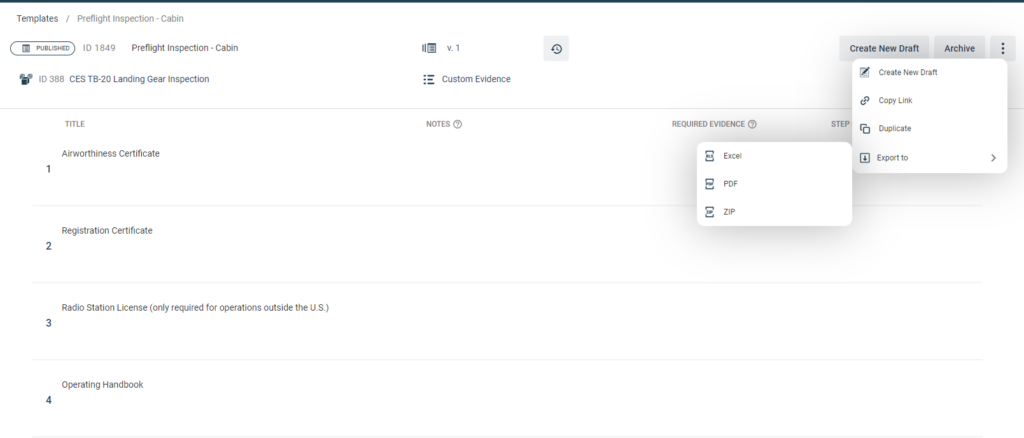
Create New Draft
A function of the Admin or Publisher Role to ‘Create a New Draft’ from either a Published or Archived Template.
- From the Action menu with the Published or Archived template state, Select ‘Create New Draft’
- A modal prompt will appear where an updated version number must be entered prior to the ‘Create Draft’ button is enabled and a new draft can be created
- Enter in a new version number and hit Create Draft
- A new draft of the template will be created and the user will be dropped into the ‘Edit’ mode to begin updating the template
IMPORTANT NOTE: There is only able to be (1) DRAFT Template available. If a user chooses to Create New Draft that already has a draft available, the user will be prompted with a message stating that a ‘New version exists’ with a button that directs to the ‘Review Version’
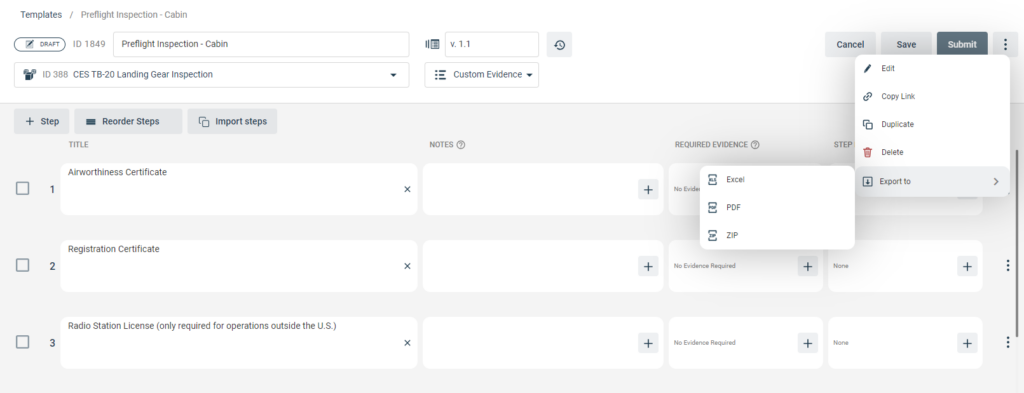
Edit
A function of the Admin or Author role that can ‘Edit’ a template that is in ‘Draft’, ‘Submitted’ and ‘Approved’ states.
- From the Action menu with the ‘Draft, Submitted or Approved state, select ‘Edit’
- Draft state – User will be dropped into the ‘Edit’ mode of the template
- Submitted state – User will be prompted with a pop-up modal that indicates that editing the submitted template will revert the template back to Draft state where it will need to be submitted again.
- Approved state – User will be prompted with a pop-up modal that indicates that editing the submitted template will revert the template back to Draft state where it will need to be submitted again.
Archive
A function of the Admin or Publisher that can ‘Archive’ templates that are in Approved or Published states.
- From the Action menu with ‘Approved’ or ‘Published’ state, select ‘Archive’
- Approved state – User will be prompted with a pop-up modal that indicates that the template will be archived and jobs can no longer be created from it.
- Published state – User will be prompted with a pop-up modal that indicates that the template will be archived and jobs can no longer be created from it.
Copy Link
A function of any role and any state to utilize this capability to copy the template link and share with other team members via Connect or across Manifest platforms.
- From Actions, select ‘Copy Link’
- Select ‘Copy Link’
- This will copy the template link that can then be used to paste into a Connect session (as an example)
Duplicate a template
A function of Admin or Author role where they can duplicate any template in any state (Published, Approved, Submitted, Archived or in Draft)
- From Actions, select ‘Duplicate’
- A pop-up modal prompt will appear where an updated version number is required to be entered
- Enter in a new version number
- Select ‘Create’
- The template you duplicated will open automatically with “Copy of” before the original template title name and will be dropped into ‘Draft’ mode regardless of the templates original state. (ie: if you duplicate a published template it will be duplicated and updated to state = Draft with a new version number attached to it)
- User will be dropped into ‘Edit’ mode to start editing the template and the template title will be appended with ‘COPY OF’ in front of the template title.
Delete
A function of Admin or Author role to be able to ‘Delete’ templates that are in ‘Draft’ state only. Users are not able to delete template that are in any other state.
Export to ZIP, PDF or XLS
Users may wish to share a template outside of the Manifest application – to export your template along with all it’s content (ie: image, video, etc) as a ZIP file, follow the below instructions.
- From Action, select ‘Export to”
- Select the format to which you would like to export the template (ZIP, PDF or XLS)
- The template and all associated content and assets will download based on the selection above.
- ZIP Export – This function will zip up all the template and all associated template content (photos, videos, 3D models, etc)
- PDF Export – This function will export the template into PDF format showing the steps and step content
- XLS Export – This function will export the template into Excel format and will only show the Step number and title.
How useful was this post?
Average rating 5 / 5. Vote count: 1


