About the Manifest Web Application
The Manifest Web Application is the key to get users started and using Manifest. Each Manifest instance has an assigned and unique domain that is individualized for each client. The Web Application is where data is configured including the creation of users and permissions, setting up locations, creating asset classes, uploading 3D models and documents (if applicable), as well as the registration of assets and downloading of asset tags.
To get started, review the below Web Application Basics to gain the knowledge needed to start using Manifest.
Software Recommendations
The Manifest Web Application is optimized for use in Google Chrome.
Navigation
Main Menu
The Manifest Web Application features a collapsible Main Menu bar which provides access to all the navigation tools in Manifest. You’ll find the menu bar to the left-hand side of the app window.
Glossary
*Note: Roles and Permissions affect which navigation options are displayed.
- Home – The Manifest Web Application dashboard (or Home) is a centralized place that provides a snapshot of specific user activity and the overall activity within the domain
- Locations – The Locations Window displays all locations on your domain
- Asset Classes – This Menu Item opens the Asset Classes Window which displays an interactable list of all Asset Classes on your domain. It also allows you to create or edit Asset Classes
- Assets – This selection displays a list of Assets similar to the Asset Classes Window, in that it allows interaction, creation, and management of the Assets on your domain
- Templates – The Templates Window displays all templates currently created in your domain and tools to manage them. It also allows the creation and import of new templates
- Work – The Work Window shows all Work (Jobs & Tasks) available on your domain, and provides tools to edit, manage, and complete Jobs and Tasks
- Work History – Selecting this item displays a log of all completed Work on your domain with tools to view, share, and export Work items
- Faults – This window displays all open Faults on your domain, and provides tools and information to manage and resolve faults, as well as create and complete Work associated with a Fault
- Value Lists – Select this Menu item to display a list of all current Value Lists that have been created and stored in your domain
- Measurements – Selecting Measurements will display all meter readings on your domain as well as provide tools to enter new measurements and manage existing ones. Each reading is attached to an Asset in your domain
- Meter Evidence Report – Lists all Meter Evidence reports on your domain and the associated Job from which the contained reading(s) were taken
- Connect – This will display the Manifest Connect interface, and a list of all users on your domain able to open a chat with as well as the ability to create a Group Chat
- Marketplace – This displays a list of Templates available for import to your domain
- User Guides – An in-app portal to the Taqtile Community User Guides site
Manifest Header

Located across the top header of the Manifest Web Application are additional tools that include:
Search
The left side of the Header contains the Search tool. Search provides the ability to search based on various criteria, which will change based which menu item was used to access the field.

Search criteria are as follows:
- Locations – Location ID, Name or Address
- Asset Classes – ID, Name, All Fields
- Assets – ID, Location Name, Serial Number, Department, Internal ID, Asset Tag ID, Asset Class, All Fields
- Templates – ID, Title, Asset Class, All Fields
- Work – ID, Title, Asset Class, Asset ID, Location, Asset Tag ID, Assigned User, All Fields
- Work History – ID, Title, Asset Class, Asset ID, Location, Asset Tag ID, Assigned User, All Fields
- Faults – All Fields, Fault ID, Job ID, Asset, Location
- Value Lists – Search by ID, Name, All Fields
- Measurements – Search by ID, Meter, Asset, Value, All Fields
- Meter Evidence Report – Search by User, Location, Asset Class, Asset ID, Job ID, Meter Name, Operator Meter Reading, Sensor Meter Reading, All Fields
- Connect – Search by User, Chat Title
- *Note: The search bar is moved below the Header in the Connect Window
- Marketplace – Search by ID, Template Owner, Title, All Fields
Other Tools
To the right-hand side of the Manifest Header is a host of tools to aid in utilizing Manifest.
These tools and their functions are explained below:
Translation Dropdown
Use the translation dropdown  to automatically translate the Manifest Web Application into French or Japanese.
*Note: This only translates the site itself. Not user-created content.
Account
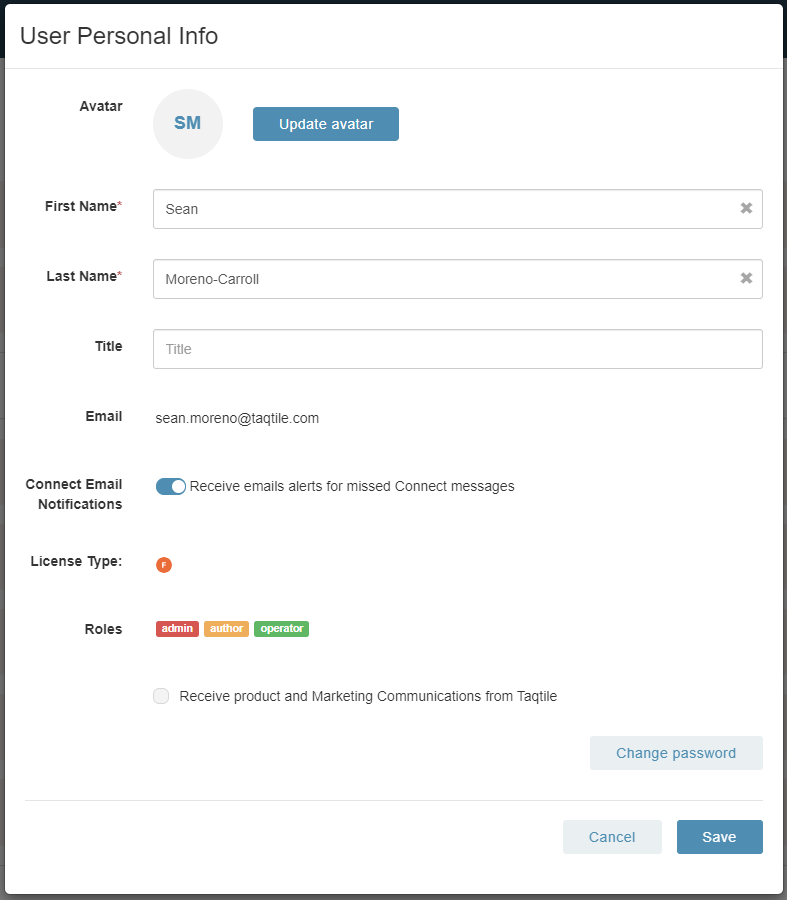
The Account page must be configured upon the first log into the Manifest Web Application, can be accessed in the top right-hand corner by tapping on your avatar  .
.

- Avatar – Update, replace or delete your Avatar
- *Note: Your default avatar is set to your First and Last initials.
- First Name – Enter your first name (*required)
- Last Name – Enter your last name (*required)
- Title – Your title within your organization
- Email – View your email address
- *Note: Permanently set to the email used in account setup.
- Notification – Toggle ON/OFF if you would like to receive notifications via email that another user is trying to reach you via Manifest Connect
- Roles – View of the Manifest roles you are assigned
- Receive product and Marketing Communication from Taqtile – Opt-in or opt-out of receiving Marketing Communications from Taqtile
- Change Password – Click on the button to change your Manifest password
To discard or keep changes, select the Cancel or Save buttons in the lower right-hand corner of the Account Page
Tutorial
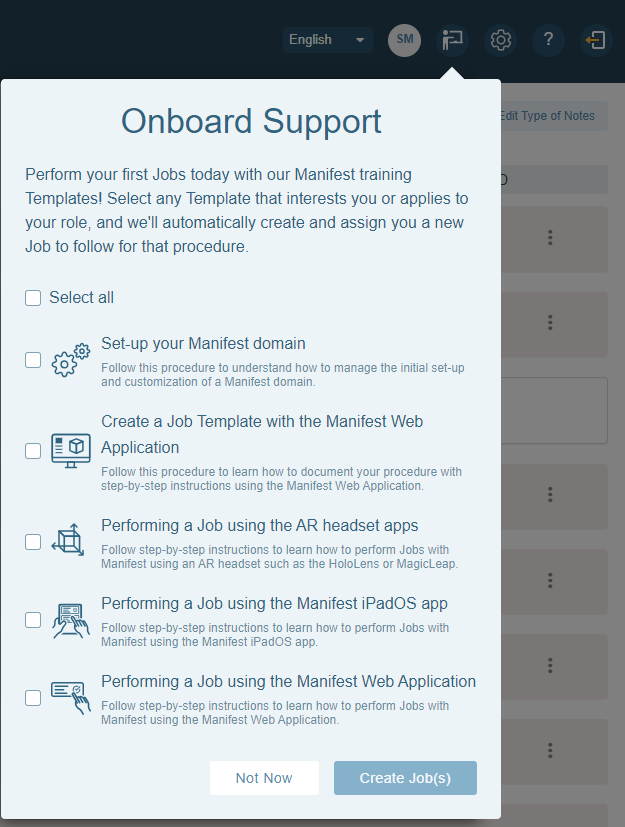
The Tutorial button ![]() opens a pop-up titled ‘Onboard Support’ with a list of pre-set templates within Manifest that guide you through Manifest by using the Step-by-Step Job function in Manifest itself.
opens a pop-up titled ‘Onboard Support’ with a list of pre-set templates within Manifest that guide you through Manifest by using the Step-by-Step Job function in Manifest itself.
Available options are:
- Select All
- Set-up your Manifest Domain
- Create a Job Template with the Manifest Web Application
- Performing a Job using the AR Headset apps
- Performing a Job using the Manifest iPadOS app
- Performing a Job using the Manifest Web Application
Once you’ve selected the Template(s) you want to create a Job(s) for, select Create Job(s). Otherwise, select Not Now or tap anywhere outside the pop-up to close it.
Settings
Client Settings in the Manifest Web Application is located in the top right-hand corner, represented by the gear icon ![]() . Select it to open the Settings page.
. Select it to open the Settings page.
Based on the role(s) assigned to you within the Manifest Web Application, different settings will be available be viewed and configured accordingly.
For more information on Client Setting please select this link.
Help
Access the Help menu by selecting the Help icon ![]() in the upper right-hand corner of the Header.
in the upper right-hand corner of the Header.
Selecting the Help icon will open a translucent, blue, dropdown menu with the following options:
- Support – Click on ‘Email Support’ and send an email to manifestsupport@taqtile.com
- Submit a Bug Report – Click on ‘Submit a Bug Report’ and enter details and questions along with optional videos and images. Attach as many files as needed. Each file cannot exceed 60MB For more information on submitting a Bug Report please visit here.
Logout
Use the logout button ![]() to log out of the Manifest Web Application and terminate the session.
to log out of the Manifest Web Application and terminate the session.
How useful was this post?
Average rating 0 / 5. Vote count: 0


