A lot of customers have been asking how they can get their IoT data into Manifest so that users can visualize the data while they are performing jobs. Here’s a quick and dirty guide to get your data ready to go.
The first step is to make sure that you have appropriate buckets to save your data in Manifest. There are other guides about how to do that, so I’ll just summarize:
Steps for IoT Integration
- Define the data type you are wanting to save and create a Meter Unit for it
- Go to the Asset Class that you are concerned with and Add a Meter to that Asset Class
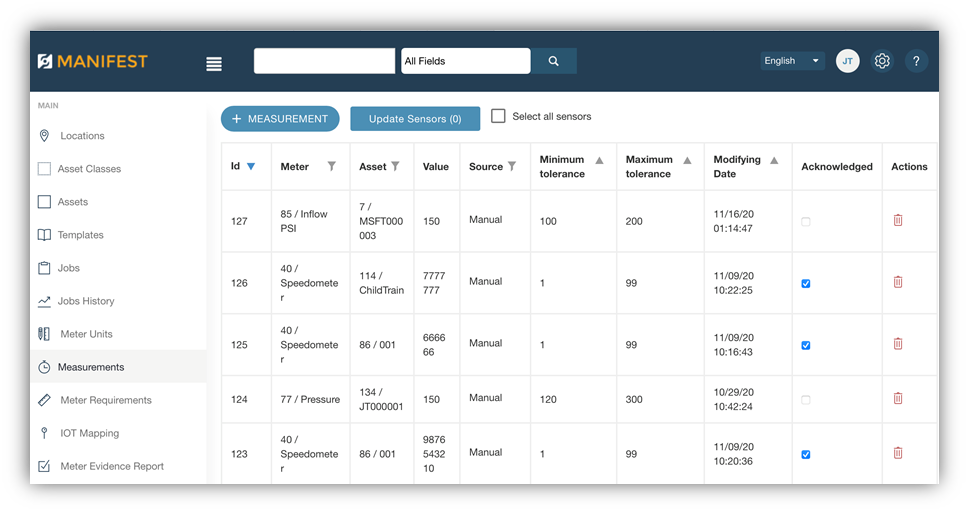
- Enter a Manual test Measurement using the portal as seen below:

Look for the measurement combination that you are going to update using the script. In the case above:
Meter: 85 “inflow PSI”
Asset ID: 7
Value: 150
Source: Manual
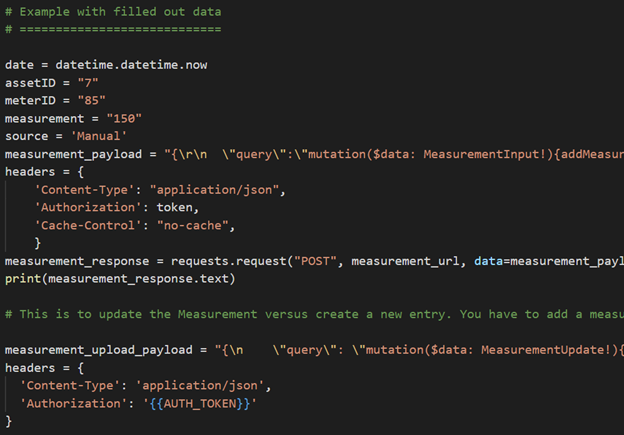
Now that you have the appropriate ID’s, you can fill out your script.

Running this script will result in updated values in the Measurements table:

This will create a new entry every time you run this script. That can quickly overload the data in the table if you use addMeasurement every time you call. On subsequent calls, you should use the updateMeasurement method to only update the value and the timestamp of the entry. That way you will not create a lot of historical data in Manifest.
In the later part of the script is the code to update the measurement versus add a new measurement.

After the update script, the same Measurement ID “129” is updated with a new value and timestamp without creating a new entry.

Example Script
Forgot to include the whole script:
#!/usr/bin/python
# ============================================================
# Read a CSV file and output the measurement columns into manifest API
# Taqtile 2025
# Author: John Tomizuka
# ===============================================

import requests
import json
import datetime
import time
import os

# Authentication
# ===============

# auth_url = “https://[domain].taqmanifest.com/rest/signin/v2”
# login = “[manifest login]”
# password = “[manifest password]”

auth_payload = “{\r\n \”email\” : \”” + login + “\”,\r\n \”password\” : \”” + password + “\”\r\n}”

headers = {

‘Content-Type’: “application/json”,

‘Cache-Control’: “no-cache”

}

auth_response = requests.request(“POST”, auth_url, data=auth_payload, headers=headers)

# Uncomment to see response codes
# print(auth_response.text)
# print(json.dumps(auth_response.json(), sort_keys=True, indent=4))

json_data = json.loads(auth_response.text)
token = (json_data[‘user’][‘token’])

#print(“token equals ” + token)

measurement_url = “https://[domain].taqmanifest.com/graphql/v2”
# date = datetime.datetime.now
# assetID = [asset ID]
# meterID = [meter ID]
# measurement = “[value]”
# source = ‘[Manual or Sensor]’
# measurement_payload = json.dumps({
#   "query": "mutation($data: MeasurementInput!){addMeasurement(data: $data)}",
#    "variables": {
#        "data": {
#             "meterId": meterID,
#             "assetId": assetID,
#             "value": measurement,
#             "source": source
#         }
#    }
# })

# headers = {
# ‘Content-Type’: “application/json”,
# ‘Authorization’: token,
# ‘Cache-Control’: “no-cache”,
# }
# measurement_response = requests.request(“POST”, measurement_url, data=measurement_payload, headers=headers)
# print(measurement_response.text)
Example Script with Data Filled Out
date = datetime.datetime.now
assetID = 61
meterID = 586
measurement = "23"
source = "Manual"
measurement_payload = json.dumps({
    "query": "mutation($data: MeasurementInput!){addMeasurement(data: $data)}",
    "variables": {
         "data": {
             "meterId": meterID,
             "assetId": assetID,
             "value": measurement,
             "source": source
         }
    }
})

headers = {
    'Content-Type': "application/json",
    'Authorization': token,
    'Cache-Control': "no-cache",
    }
measurement_response = requests.request("POST", measurement_url, data=measurement_payload, headers=headers)
print(measurement_response.text)


