Orgs Setup & Configuration
User Access
Once it’s determined that Orgs will be configured within a domain, it’s the responsibility of the Admin to add Orgs. The Admin is the only role that can add Orgs to a domain.
Adding Orgs
Using Orgs is optional. If the Admin does not configure it, users will not see it. As soon as the 1st Org is created the user will notice the default Root Org which is always at the top level and then any orgs that are created will cascade from the Root Org.
Note: Root org can be renamed and any content created before using Org will be stored in the Root Org.
The Admin is the ONLY user role that permission to add Orgs to a domain. Orgs can only be created using the Manifest Web application.
An unlimited number of Orgs can be created from Root Level. Child Orgs can be created from any Parent Org and can go up to 7 levels deep (in which the “Root” level = Level 1).
Creating the first Org
- In the Manifest Web application, select Orgs from the menu
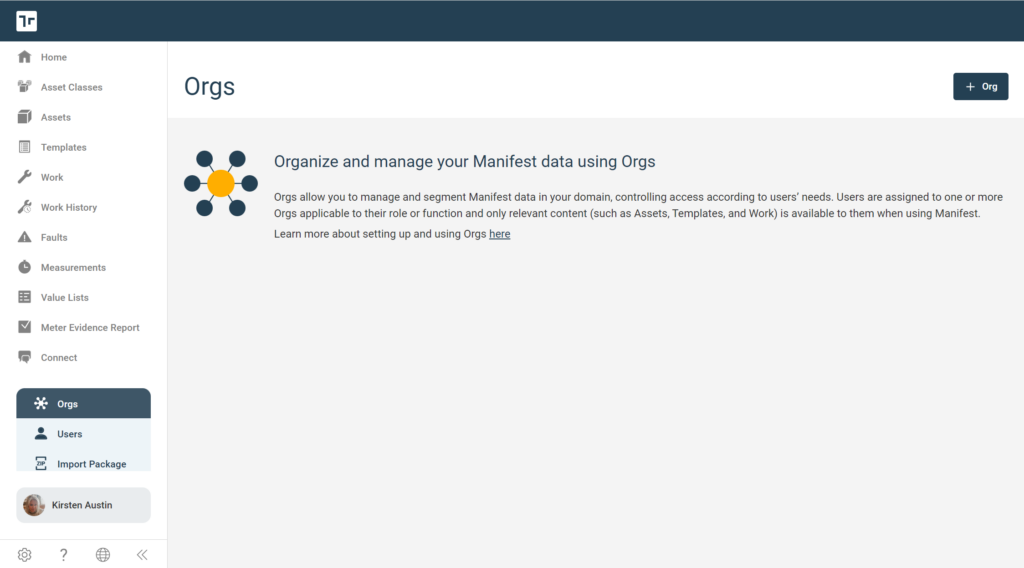
- Select + Org in the top right-hand corner of the window
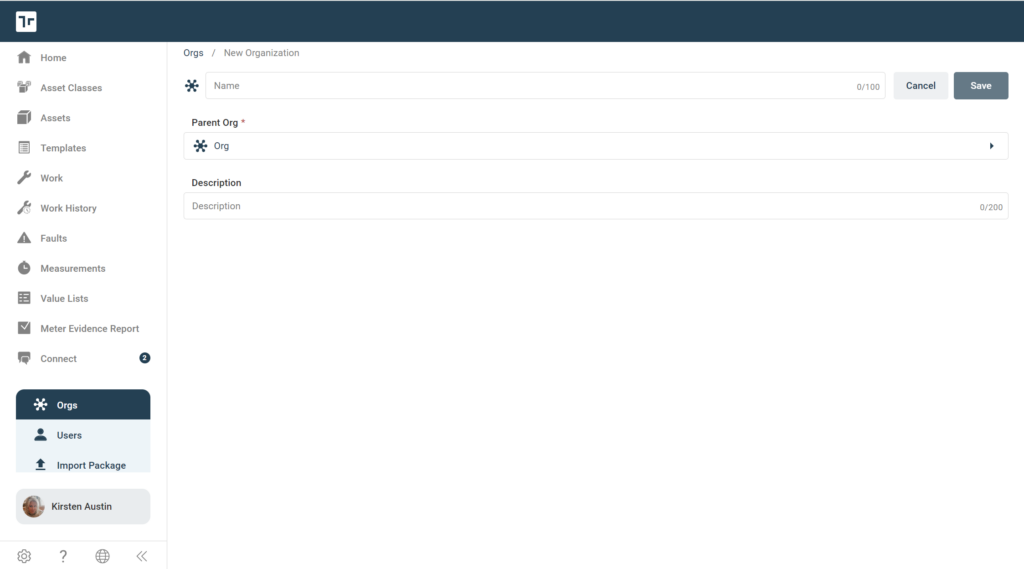
- Upon returning to the main Orgs page, you will see the root level Org, named “root” and the second level child Org that you just created
- Continue creating Orgs based on the organizational structure needed
Edit an Org
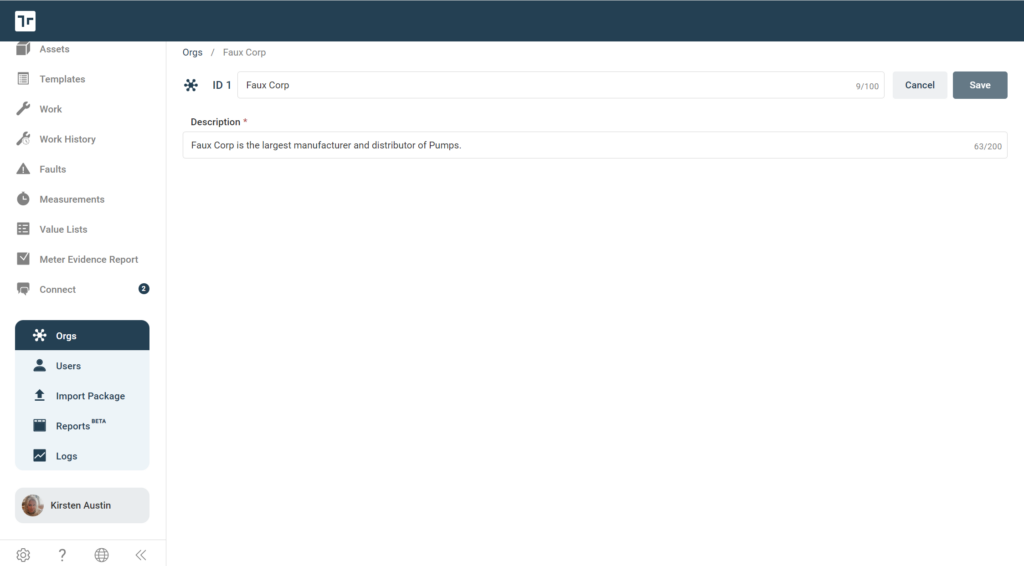
- From the Org listing page select the Org to edit
- Select Edit in the top right-hand corner
- Fields available for update include:
- Org name
- Description
- Save changes
User Management with Orgs
Adding Users to Orgs
Security Admin is the ONLY user role who can add Users to a domain and assign them to Orgs.
The Security Admin can add Users to an Org in two ways:
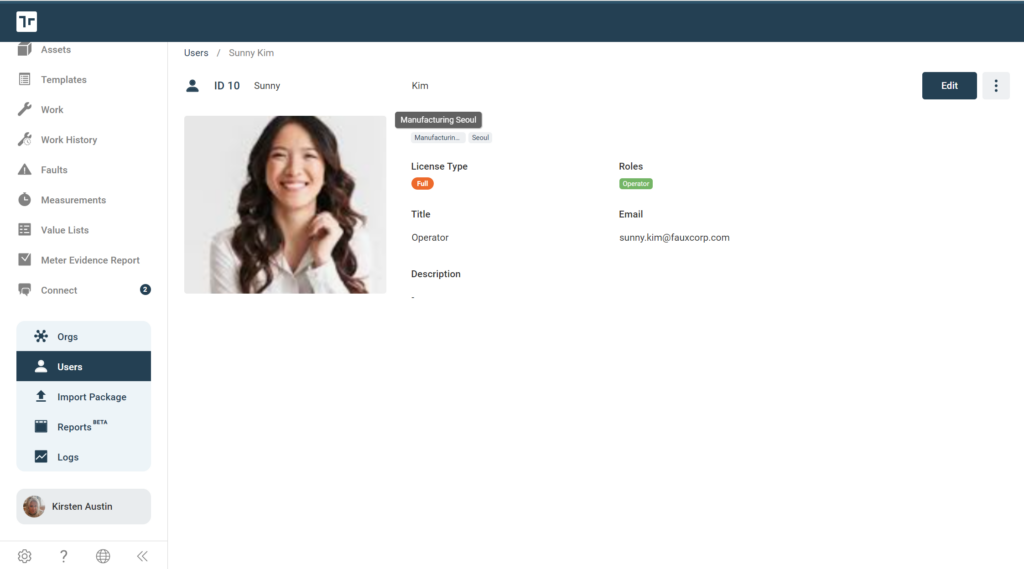
Via the User tab
- In the Manifest Web application, select Users from the menu
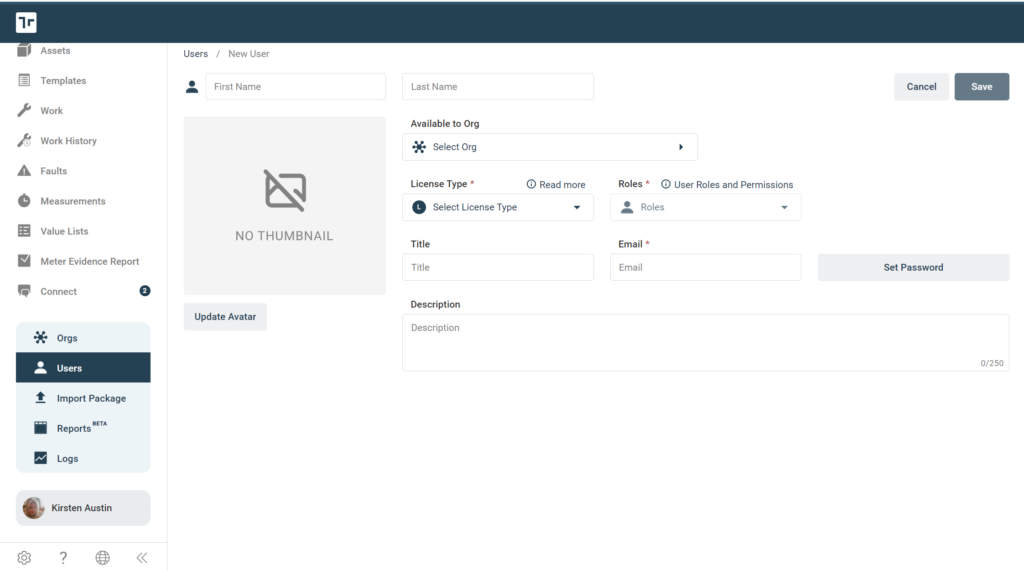
- Select + User
- A window will open and prompt you for the user details:
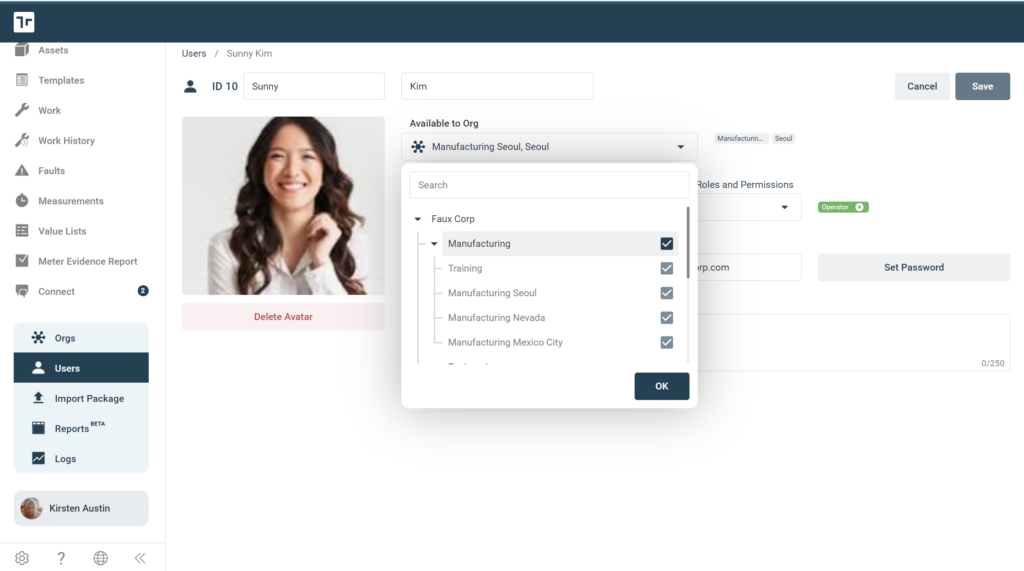
- If the domain has Orgs setup, the form will include an “Available to Org” section.
- Use the Select Org dropdown to select the Orgs that the new user should have access to. Note that selecting a parent Org will automatically select all the associated child Orgs.
Via the Orgs tab
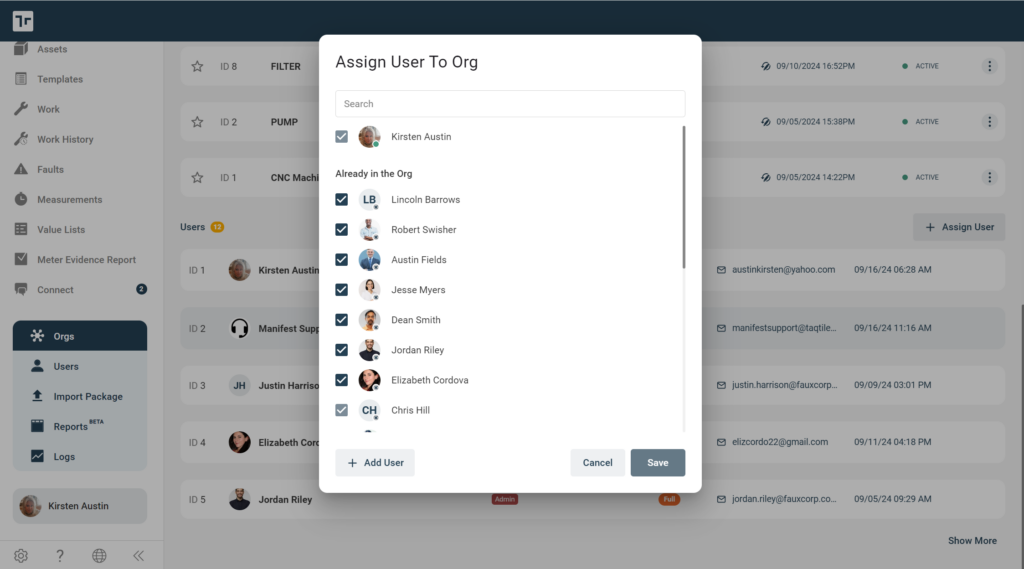
- In the Manifest Web application, select Orgs from the menu
- Select an Org to add the new User to
- An Org detail page will open
- Select + Assign User
- A window will open and prompt the Security Admin to “Assign User to Org”. Check all the existing Users to be added. The pop-up modal will separate Users that are:
- “Already in the Org” section which displays all User that are already assigned to the Org
- Note: Grayed out Users live at the Parent Org and cannot be unselected
- “Not in the Org” section which displays all the Users that aren’t currently part of the Org
- “Already in the Org” section which displays all User that are already assigned to the Org
- Add the Users you see available
- If the User does not exist, select + Add User, which will redirect the Security Admin to the new user form.
- Note: The “Available to Org” dropdown selector will already default to the Org the User will be assigned and all Child Orgs below the Parent Org.
Asset Class Management with Orgs
Users with an assigned Admin or Author role can add Asset Classes.
The ability to see what Asset Classes exist is dependent on the Orgs to which each Admin or Author role has access. Admin and Author roles will only see Asset Class(es) within their assigned Parent Orgs and the associated Child Orgs. Admins and Authors will NOT see Orgs that are at a higher level.
Adding Asset Class(es)
With the introduction of Orgs, the Asset Class management window will include not only the + Asset Class button but will also include a + Asset Class From Existing button. ONLY Admins are enabled to add Asset Classes to Orgs from the Orgs detail page. All (3) scenarios are outlined below:
Add Asset Class from the Asset Class page
- Select + Asset Class
- A window will open and prompt you for the Org details (those with an asterisk are required):
- Name: Used as the listing and searchable name for your asset class
- Name IS a required field although it does not include an asterisk. All ‘First’ fields are required throughout the application.
- Make*: Typically, the company or manufacturer
- Model*: Typically, the product name/number or product line
- Type: Describes the type of equipment
- Thumbnail: Serves as a visual aid for users when working with new Assets; if a thumbnail is not uploaded, a placeholder image will display
- Website: Links to a web page for any related information
- Description*: Displayed to users to provide additional details about this Asset Class type
- Name: Used as the listing and searchable name for your asset class
- Once complete, select Save
- A system check will run to determine if the inputs for MAKE and MODEL are valid.
- If Make / Model does not match any other Asset Class in the domain, the Asset Class will be created and saved
- If Make / Model does match and exists within the Org the Admin or Author is adding the Asset Class, creation of the Asset Class will be blocked (Image 1)
- If Make / Model does match but exists in another Org the Admin or Author has access to, then the user will be prompted to assign that Asset Class to the current Org (Image 2)
- If Make / Model does match and the Admin or Author does NOT have access to the Org where the match exists, then the Admin or Author will be prompted with a message: “There’s already an Asset Class with the same Make/Model. Check with the domain owner before creating a possible duplicate Asset Class or update the Make or Model name.” (Image 3)
- A system check will run to determine if the inputs for MAKE and MODEL are valid.
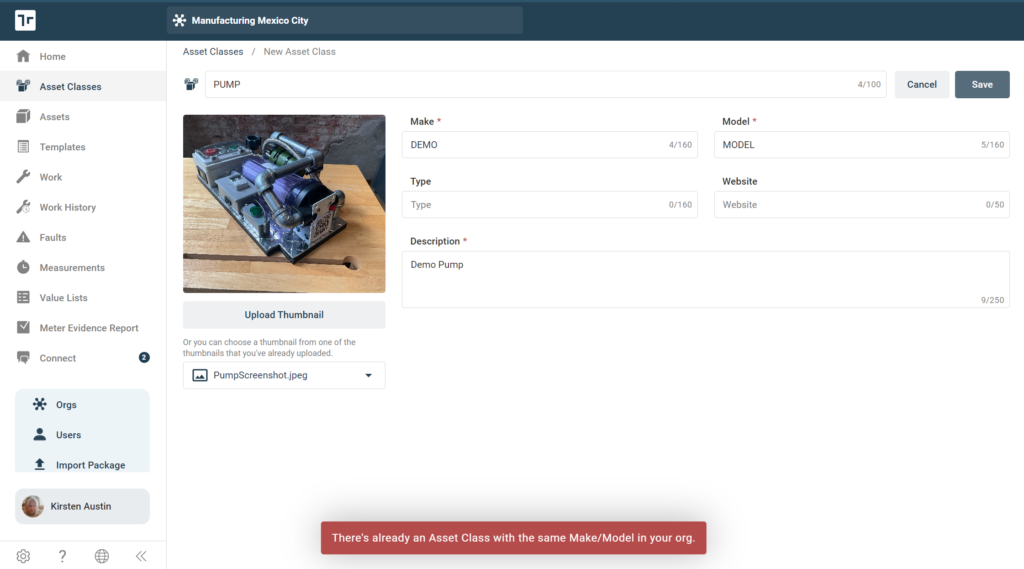
Image 1
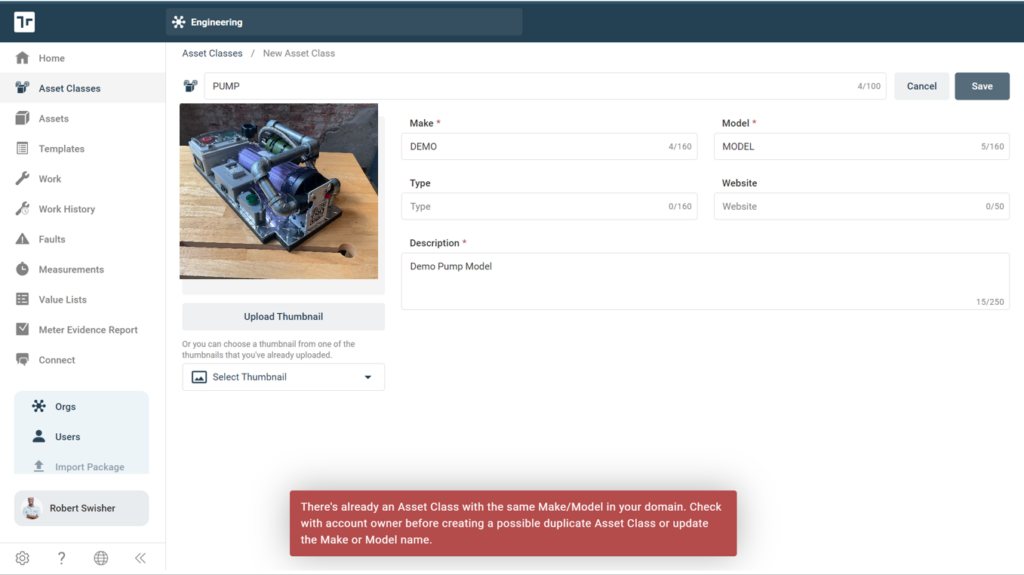
Image 2

Image 3
- The newly created Asset Class will now appear in the list of Asset Classes
- By selecting the name, the Asset Class can be expanded to display details and access additional tools for configuration
Add Asset Class From Existing
- Select + Asset Class from Existing
- A modal prompt will appear with a download list of available Asset Classes
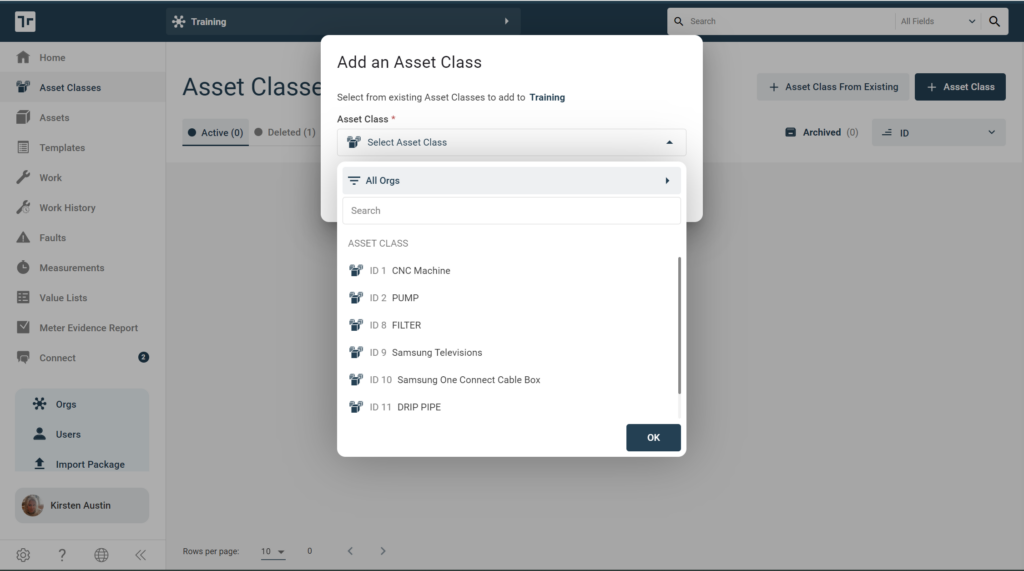
- Select all the Asset Classes in the dropdown menu to be added to the current Org
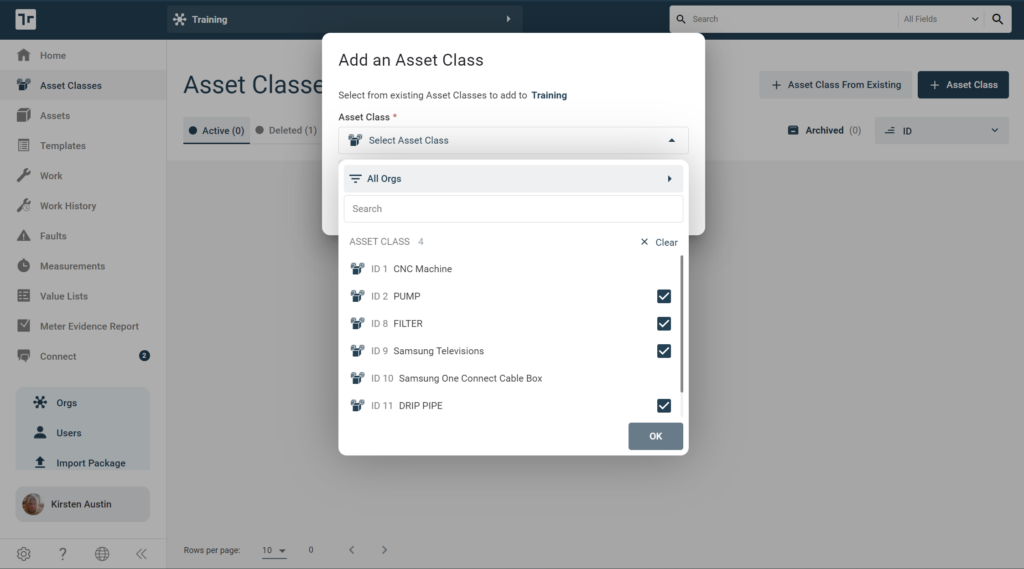
- Select OK
- Select Save
- Asset Class will be added successfully
**Note: An Admin or Author *might* encounter a situation when a User is in an Org, they select + Asset Class From Existing and there are no Asset Classes to be added. In this case, the Admin or Author will be presented with a message that says “No Asset Class(es) to add. Please create a new Asset Class.” Follow steps for ‘Add Asset Class’ as outlined above.
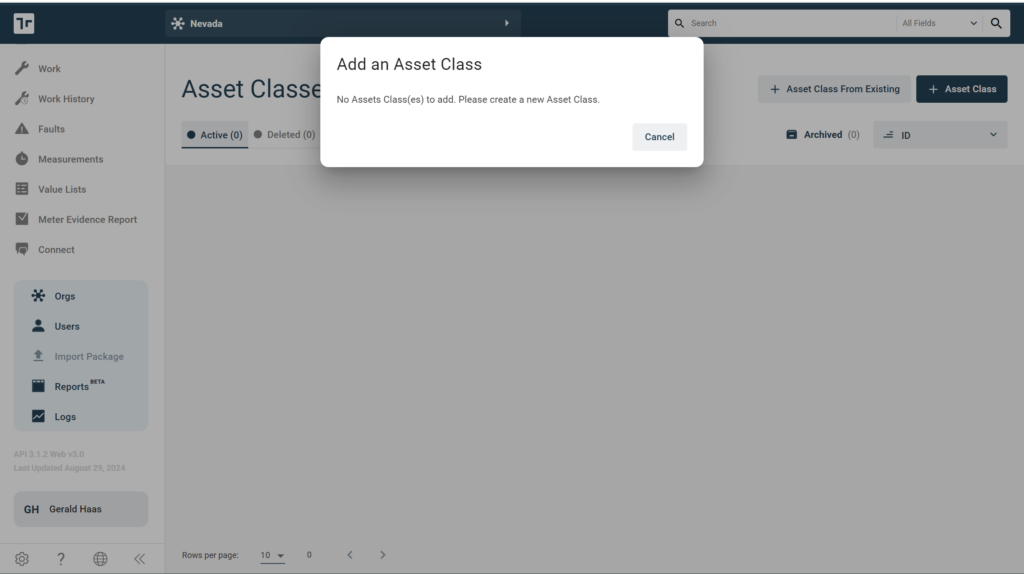
Add Asset Class from Org Detail
As an Admin role, an Asset Class can also be added to an Org from the Org detail page.
- Select Orgs from the menu
- Locate the Org in which to add the Asset Class
- Select the Org to open the Org detail page
- Select + Asset Class
- Admin will be prompted with a “Add an Asset Class” modal where the User can:
- Select from an existing Asset Class
- Note: Admin will only see Asset Classes associated with that Org or below. Admin will NOT see Orgs that are above them
- Select + Create Asset Class which will redirect the Admin to the new asset class form.
- Once the Admin is redirected to the asset class form the same (4) scenarios apply as outlined in the ‘Add Asset Class from Asset Class page’ section outlined above
- Select from an existing Asset Class
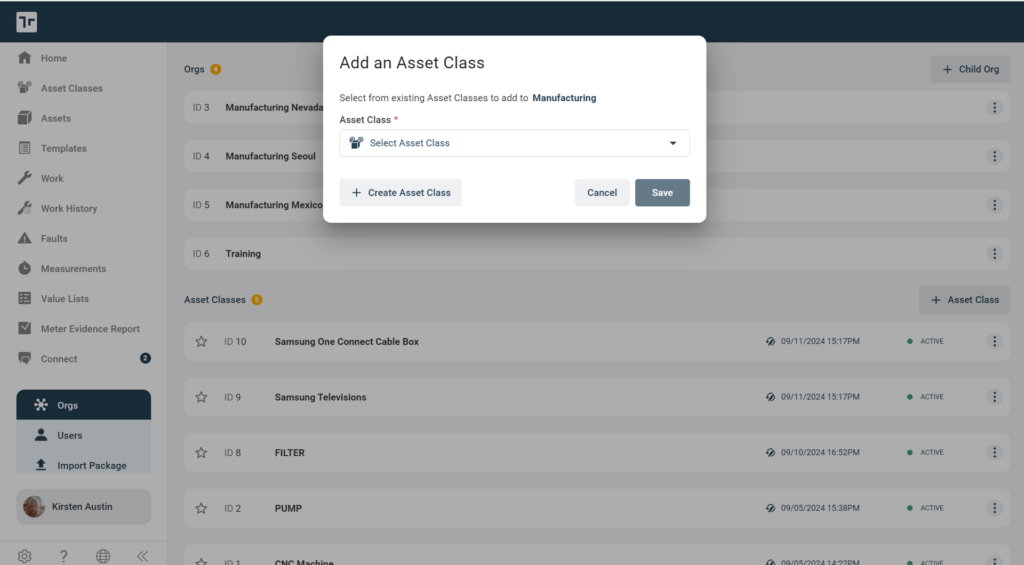
If an Admin or Author has access to only one Org that has NO associated Asset Classes, that Admin or Author will be redirected to the ‘+Asset Class’ page to create a new Asset Class.
Delete Asset Class(es)
An Asset Class can be deleted IF:
- A User has the Admin or Author role AND;
- The Asset Class has no associated Templates or Assets
- If an Asset Class has associated Templates or Assets, the User will be prompted with an error message
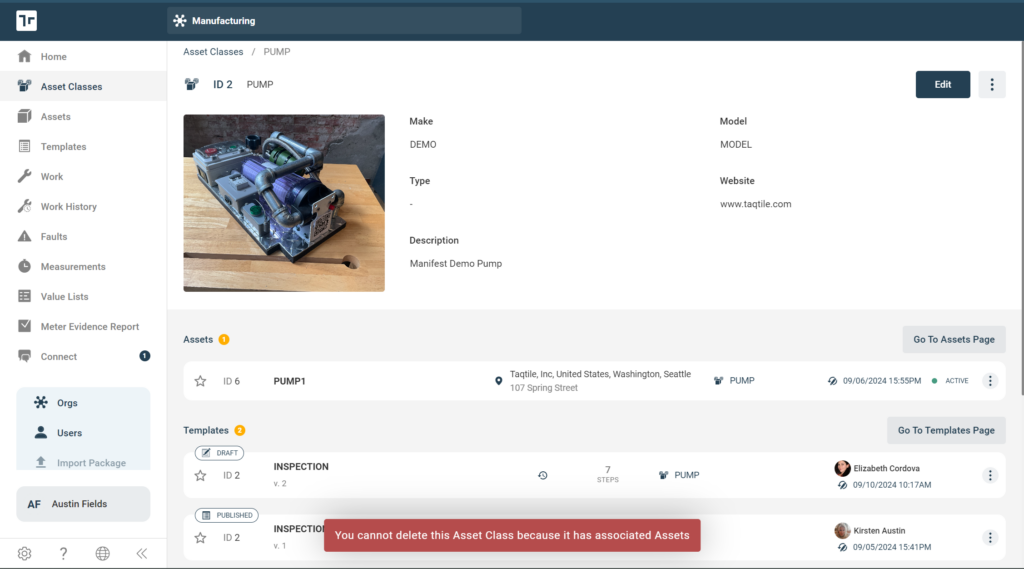
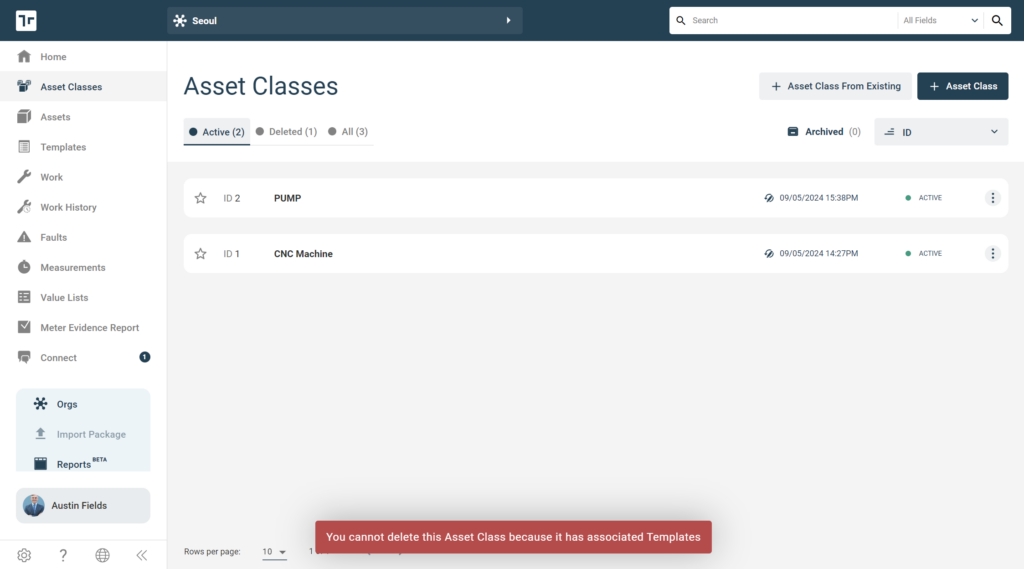
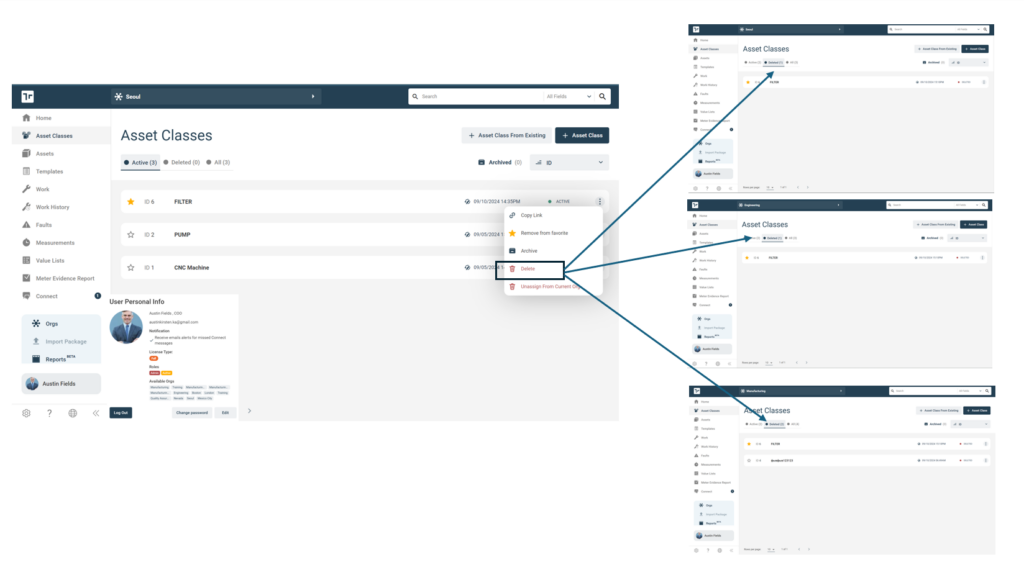
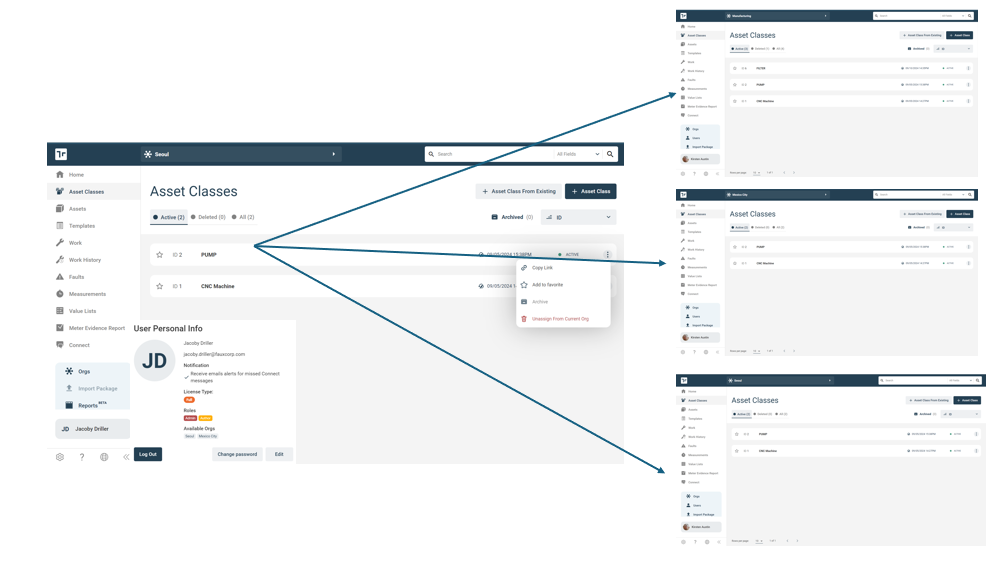
- The Admin or Author has access to ALL Orgs where the Asset Class is assigned
The image below indicates that the Admin and Author has access to the Org and all the child Orgs, therefore, this User is able to delete the Asset class.
The below image indicates that an Admin and Author has access to one Org where the Asset Class exists but does not have access to the other Orgs where the Asset Class exists, therefore, this User is not able to delete and does not even have the option from the Actions menu.
Restoring an Asset Class from Deleted
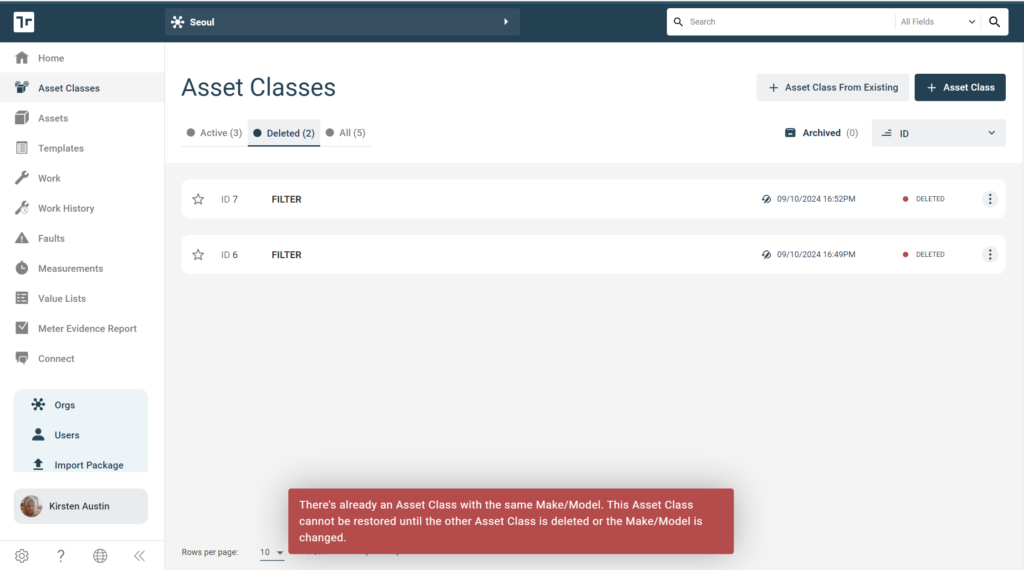
An Asset Class can be restored from deleted status only if there is not a newly created Asset Class that matches the same Make/Model as the Asset Class to be restored.
If an Asset Class is attempted to be restored and the Make/Model matches, the Asset Class will NOT be restored and the User will be presented with the following message:
Archiving Asset Class(es)
The archiving of Asset Class(es) is available within the Manifest Web Application and is a helpful feature if you want to remove Template(s), Asset(s) and completed work from view without completely removing it all together. By archiving an Asset Class(es), the Admin is moving the Asset Class(es) along with the associates Asset(s), Template(s) and completed work into an ‘Archived’ statue and canceling all incomplete Work.
An Asset Class can be Archived if:
- User is an Admin;
- Admin has access to all Orgs where the Asset Class is assigned
If the above criteria are met, then steps to Archive an Asset Class are as follows:
- Locate the Asset Class in the Org
- Under the actions menu (three-dots), select Archive
- A pop-up warning message will appear providing data points to the User that shows what will happen when/if the Asset Class is Archived, including:
- Associate Template(s) and Asset(s) will be Archived
- Incomplete Work will be cancelled (this includes Unassigned, Assigned and In Progress Work)
Unassign Asset Class From Current Org
An Asset Class can be removed (‘Unassigned From Current Org’) only IF:
- User is an Admin or Author;
- Asset Class has no related Assets in that Org;
- Asset Class is not associated to Templates from other Asset Class(es)
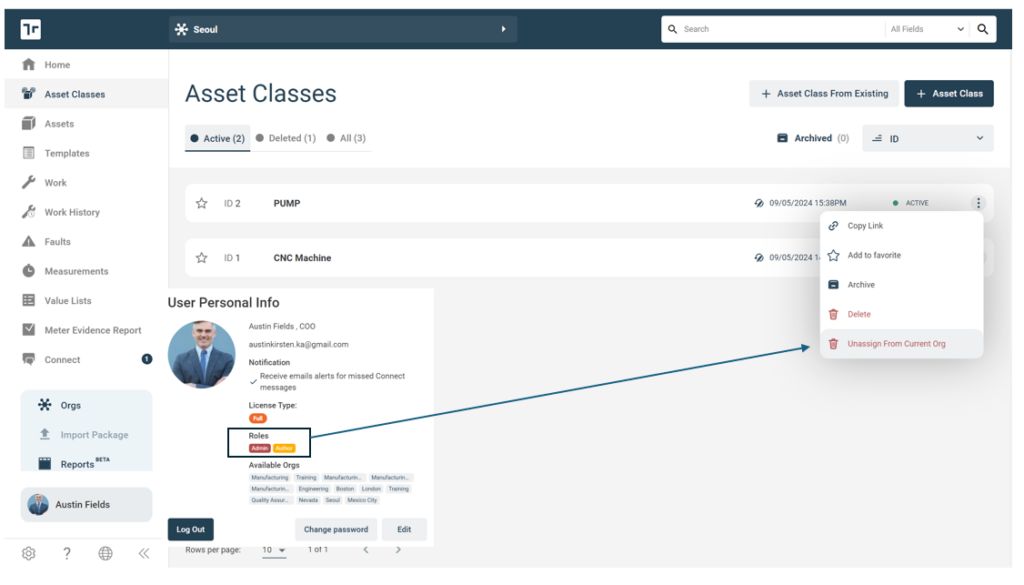
If the above criteria are met, then steps to ‘Unassign Asset Class From Current Org’ is as follows:
- From the Asset Class page, locate the Asset Class in the Org you want to unassign
- Under the actions menu (three-dots), select Unassign From Current Org
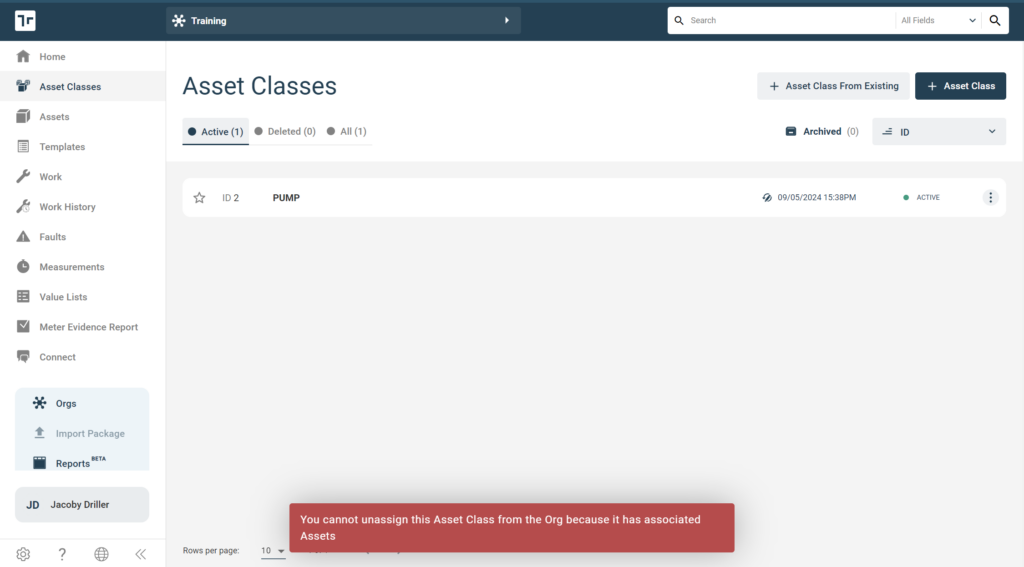
- If there are no related Assets or Templates associated to that Asset Class then the Asset Class will be unassigned from that Org successfully
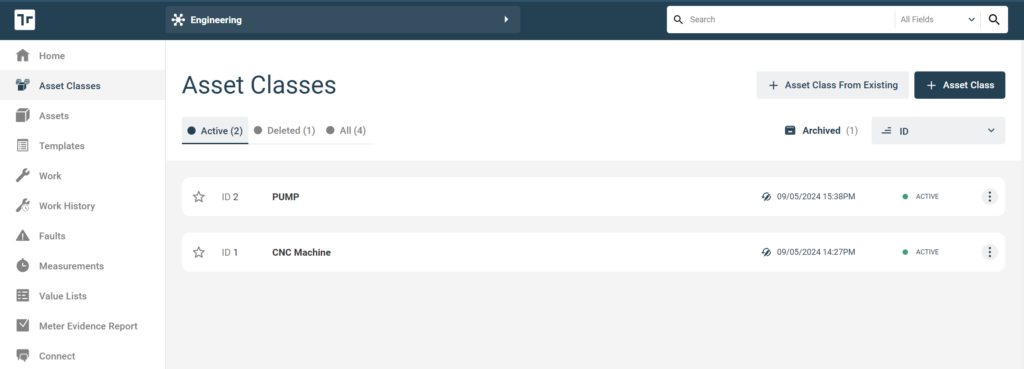
- If there are related Assets or Templates associated to that Asset Class then the Admin or Author will see the following error messages:
Asset Management with Orgs
Users with an assigned Admin or Author role can add Assets.
The ability to see what Asset(s) exist is dependent on the Orgs to which each Admin or Author has access. Admins and Authors will only see Assets within their assigned Parent Orgs and the associated Child Orgs. Admins and Authors will NOT see Orgs that are at a higher level.
Adding Asset(s)
With the introduction of Orgs within a domain, adding an Asset(s) includes specific logic to avoid duplication of an Asset Tag ID within Orgs to which an Admin and Author has access and outside of an Org to which an Admin or Author may or may not have access.
There are four ways the Admin and Author can be blocked from creating an Asset. They are outlined below:
- The Asset Tag ID matches that of an Asset already in the Org

- The Asset Tag ID matches that of an Asset that is Archived and already in the Org

- The Asset Tag ID matches that of an Asset that exists in another Org

- The Asset Tag ID matches an that of an Asset that is Archived and that exists in another Org

To add an Asset:
- Select + Asset
- A window will open and prompt you for the Org details (those with an asterisk are required):
- Serial Number: A unique items serial number
- Note: Name IS a required field although it does not include an asterisk. All ‘First’ fields are required throughout the application.
- Internal ID: Optional field to associate an internal reference identifier
- Asset Tag ID*: A unique identifier assigned to generate the QR code (can be an arbitrary number system or a specific asset tagging system that may already be used internally)
- Location (optional): Location where the asset exists
- Asset Class*: the associated Asset Class
- Serial Number: A unique items serial number
- Select Save
- With the introduction of Orgs within a domain, adding an Asset(s) includes specific logic to avoid duplication of an Asset Tag ID within Orgs to which an Admin and Author has access and outside of an Org to which an Admin or Author may or may not have access.
Adding a Location to an Asset
With the introduction of Orgs, Location has been moved to the Asset level and has become an optional field to associate to the Asset. Locations are no longer required.
To create a Location within an Asset:
- From within the Asset creation module, select the Location dropdown
- The Admin or Author role can either:
- Select an existing Location from the dropdown
- Create a new Location by selecting + Location
- This will open a new modal window
- Enter in Location details and select Create
- A new Location will appear in the dropdown and either the Admin or Author can now associate the newly created Location to the Asset
Edit Asset(s)
To edit an existing Asset:
- Select the Asset to open the Asset detail
- Make edits to the Asset
- Select Save
Delete Asset(s)
Assets are not able to be deleted if there is Work that is ‘Assigned’, ‘In Progress’ or ‘Completed’.
- Select Assets from the menu
- Select an Asset
- Under the actions menu (three-dots), select Delete
- If the Asset can be deleted, the Admin or Author will be prompted with a message confirming they want to delete the Asset
- Select Delete
- The Asset will successfully be deleted
Archiving Asset(s)
Assets can be Archived. When an Asset is archived, any associated Work will also be archived and any incomplete Work will be canceled.
- Select Assets from the menu
- Select an Asset
- Under the actions menu (three-dots), select Archive
- If there is associated Work, a Warning message will appear listing all Work that will either be archived or canceled based on the Work status (‘Assigned’, ‘In Progress’, ‘Completed’)
- Select Continue
- When the success message appears, the Asset will successfully be archived
Note: Assets can be ‘Unarchived’ using the same actions. Work will not revert to it’s original status and new Work needs to be created against this Asset.
Moving Asset(s) to another Org
An Admin ONLY Role can move Assets to another Org.
Moving an Asset to another Org will move all related Assets, Faults, Work and Measurements and also add the associated Asset Class(es) and Users to the selected Org (if applicable). To move an Asset between Orgs:
- Select Assets from the menu
- Select an Asset
- Under the actions menu (three-dots), select Move to another Org
- The Admin will be prompted with a modal window with a list of Orgs the Asset can be moved to
- Note: Moving an Asset will move all related Assets, Work, Faults and Measurements and add the associated Asset Class(es) to the selected Org
- Select an Org (single option)
- When the success message appears, the Asset will successfully be moved
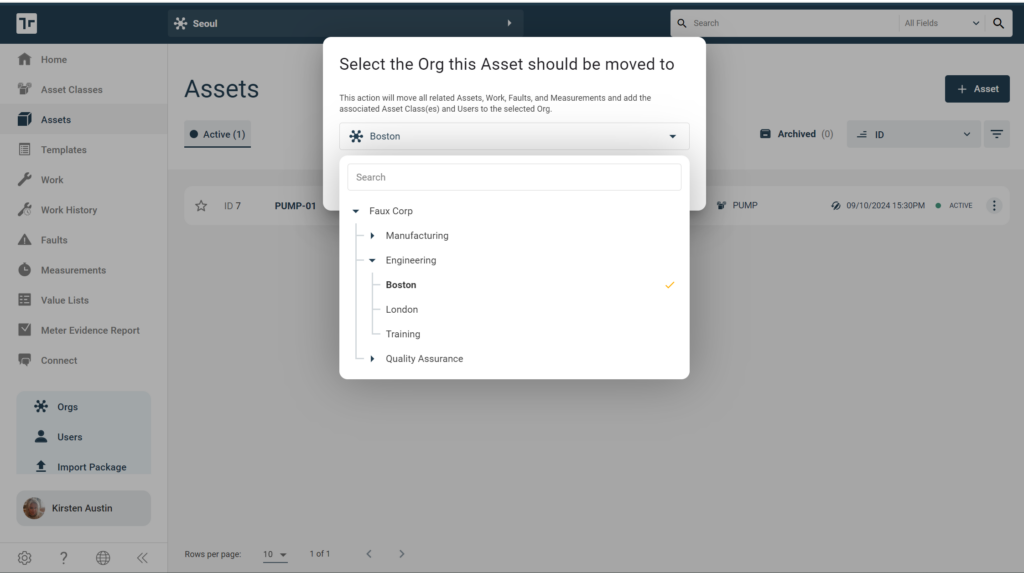
- If there are associated Asset Class(es) that need to be moved, the Admin will be prompted with a modal window outlining which other Asset Class(es) will be moved to the Org
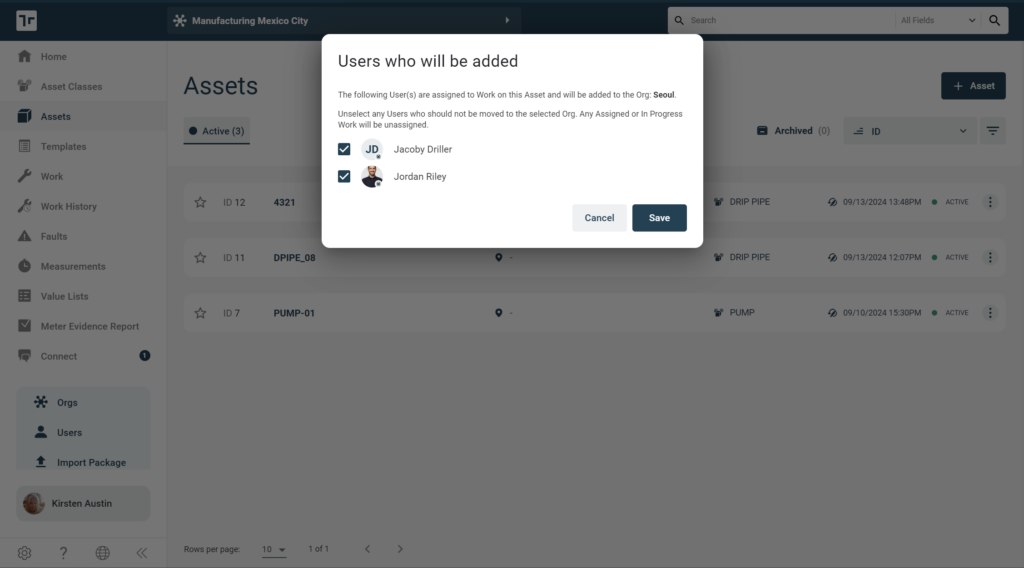
- If there are associated Users that have assigned Work associated with this Asset, the Admin will be prompted with another modal window outlining the Users who will be moved to this Org and give the Admin the ability to ‘unselect’ any User who should NOT be moved to the selected Org.
- Note: Any ‘Assigned ‘or ‘In Progress’ work will become ‘Unassigned’ if a User is unselected
Editorial Management with Orgs
With the introduction of Orgs, when authoring a Template within an Org, there might be an instance where there are Choice Notes or embedded templates that link out to other Asset Class(es) that aren’t currently in the Org in with which the Author is working. In these cases, all the associated Asset Class(es) should be added to the Org associated with the Parent Template.
If this situation arises, the Author will be prompted with a modal message stating that the specific Asset Class(es) must also be added to the specific Org where the authoring is being done because of the links to existing Templates.
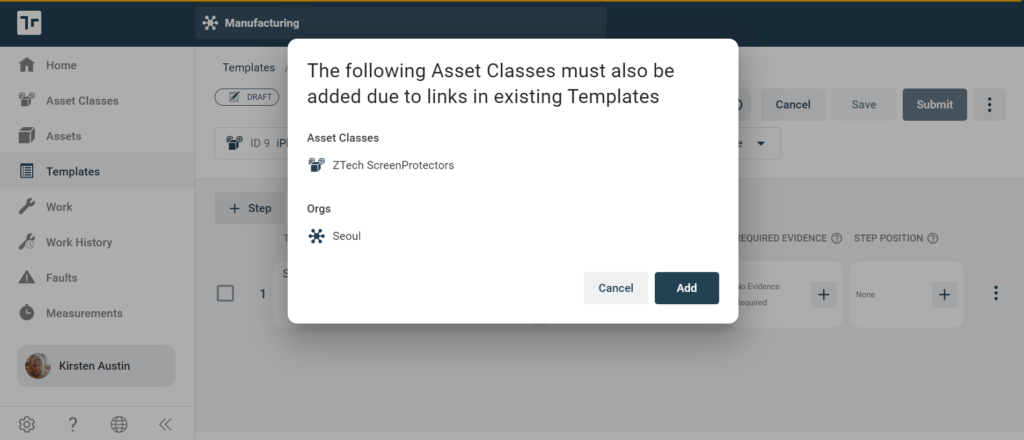
The specific steps are:
- At the modal prompt, select ‘Add’
- Template will save successfully
- The Author will now see that the Template and Asset Class has been moved over to the additional Org it was linked.

