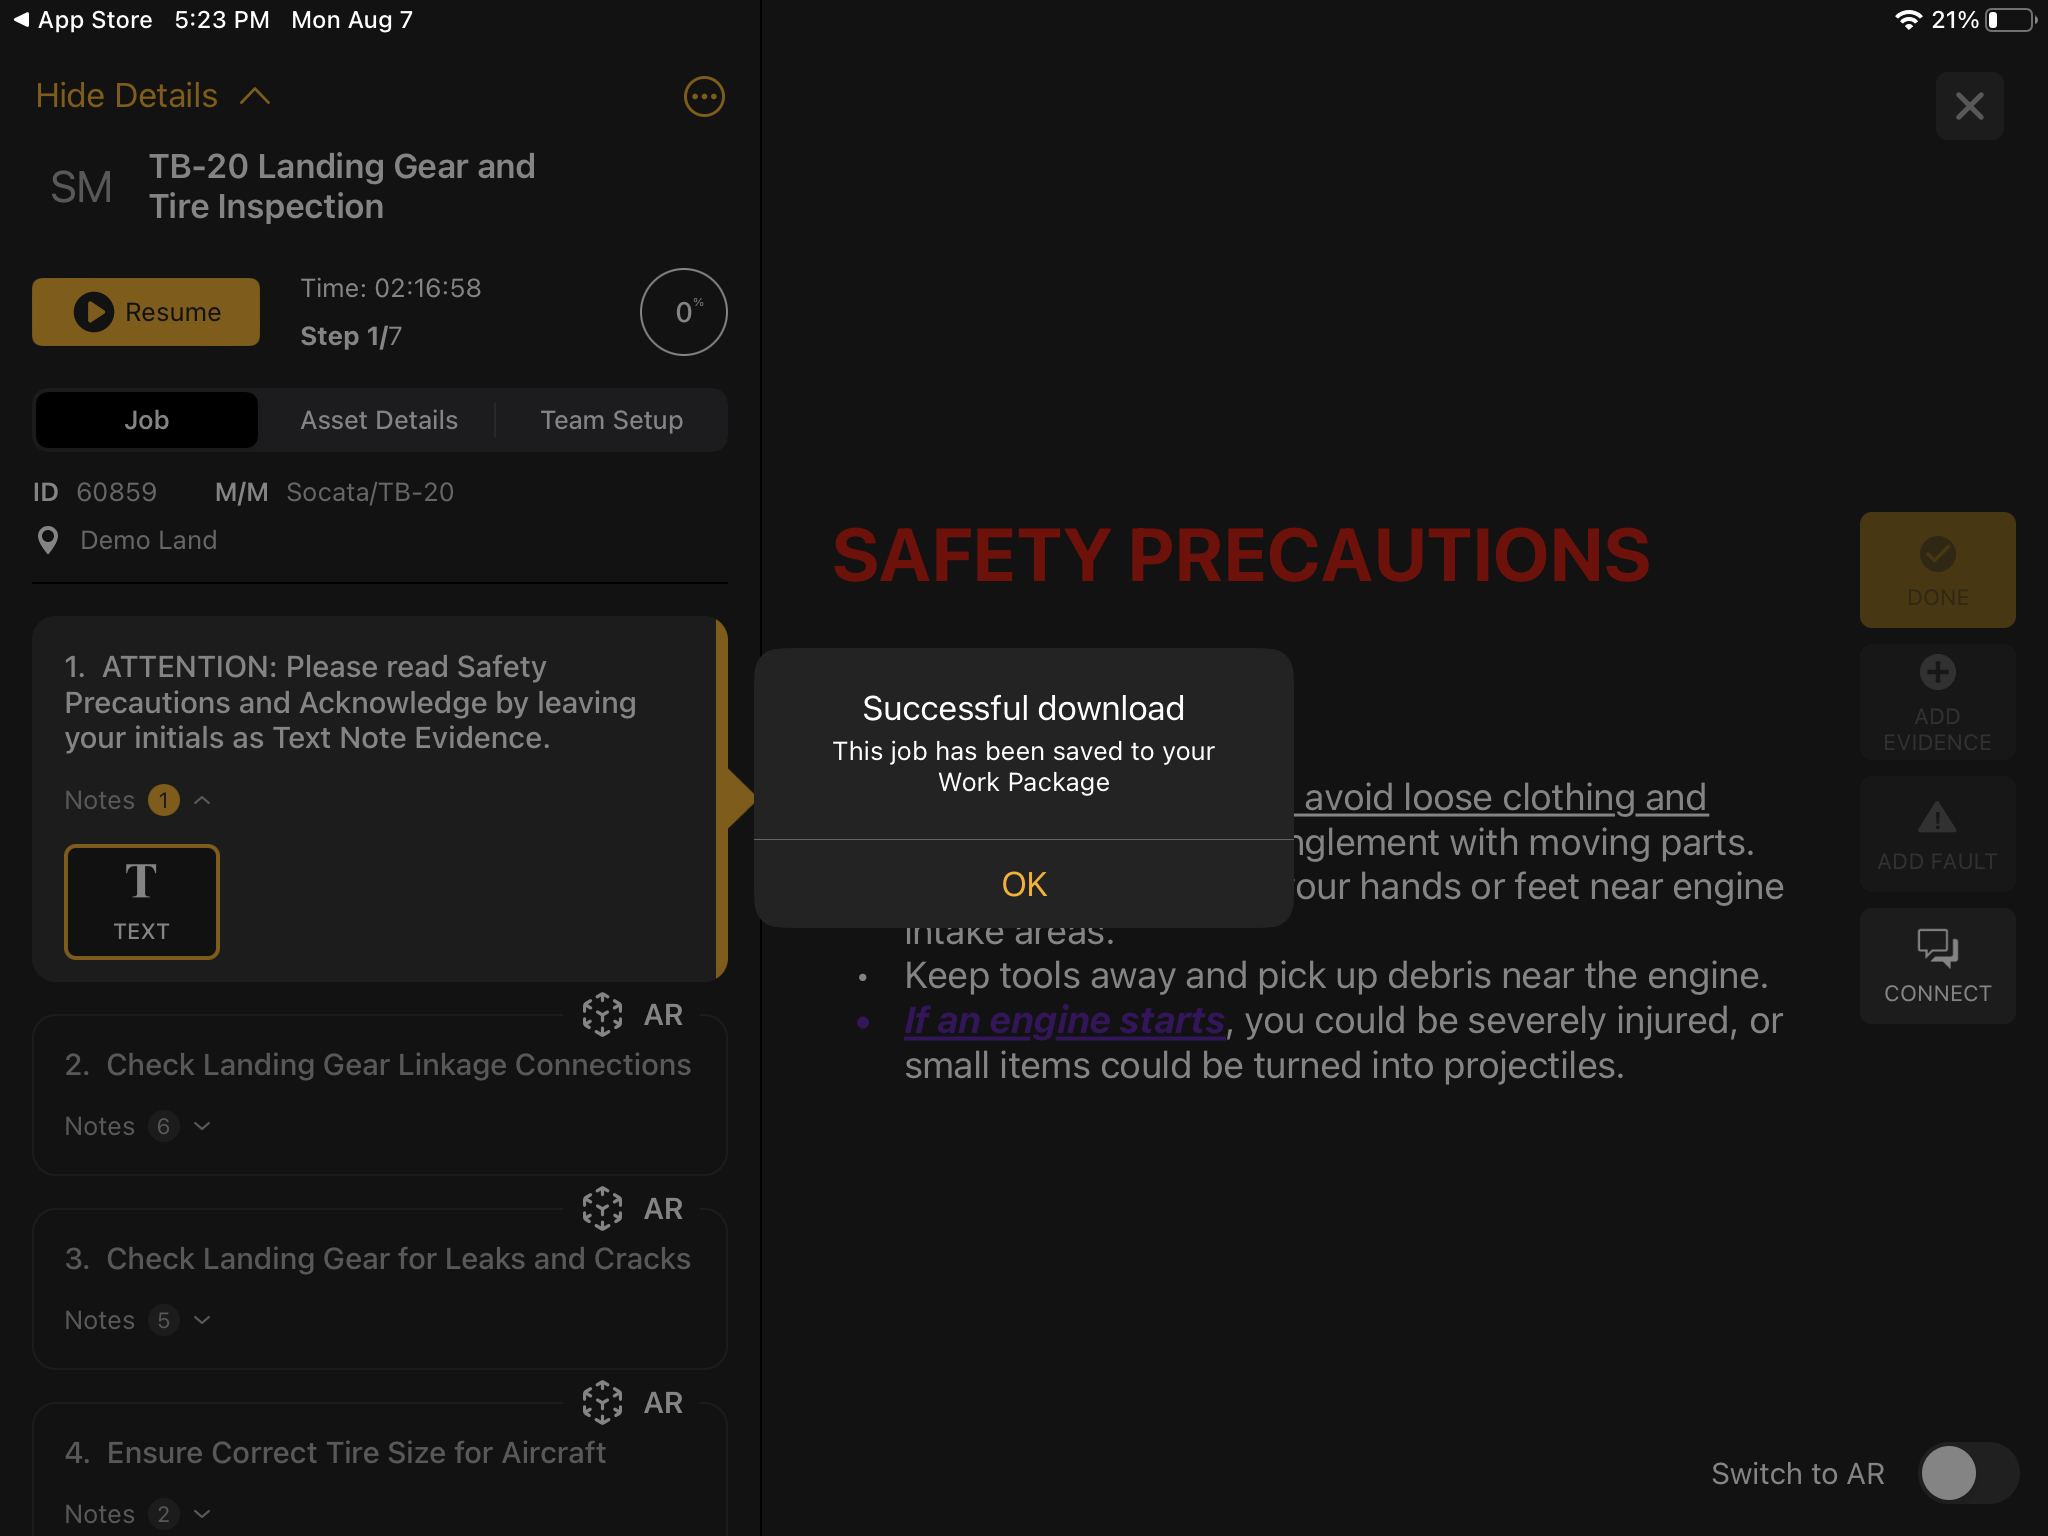
Create New Work
Creating Work using the iPad Application is possible through multiple paths.
From Asset Management
- Select the desired Asset
- Select the wrench icon in the upper right-hand corner
- Select + Add Work from the upper right-hand corner
- Select the desired Work Type
- Task:
- Non-procedural Work items requiring only Task Description and an associated Location.
- Job:
- A procedure generated from a Manifest Template
- Task:
- Enter the required information
- Template
- *Note: Job only
- Task Description
- *Note: Task only
- Priority
- *Note: Priority will always default to Medium
- After completing the required fields, select Add
- “Task was Created!” message upon successful creation
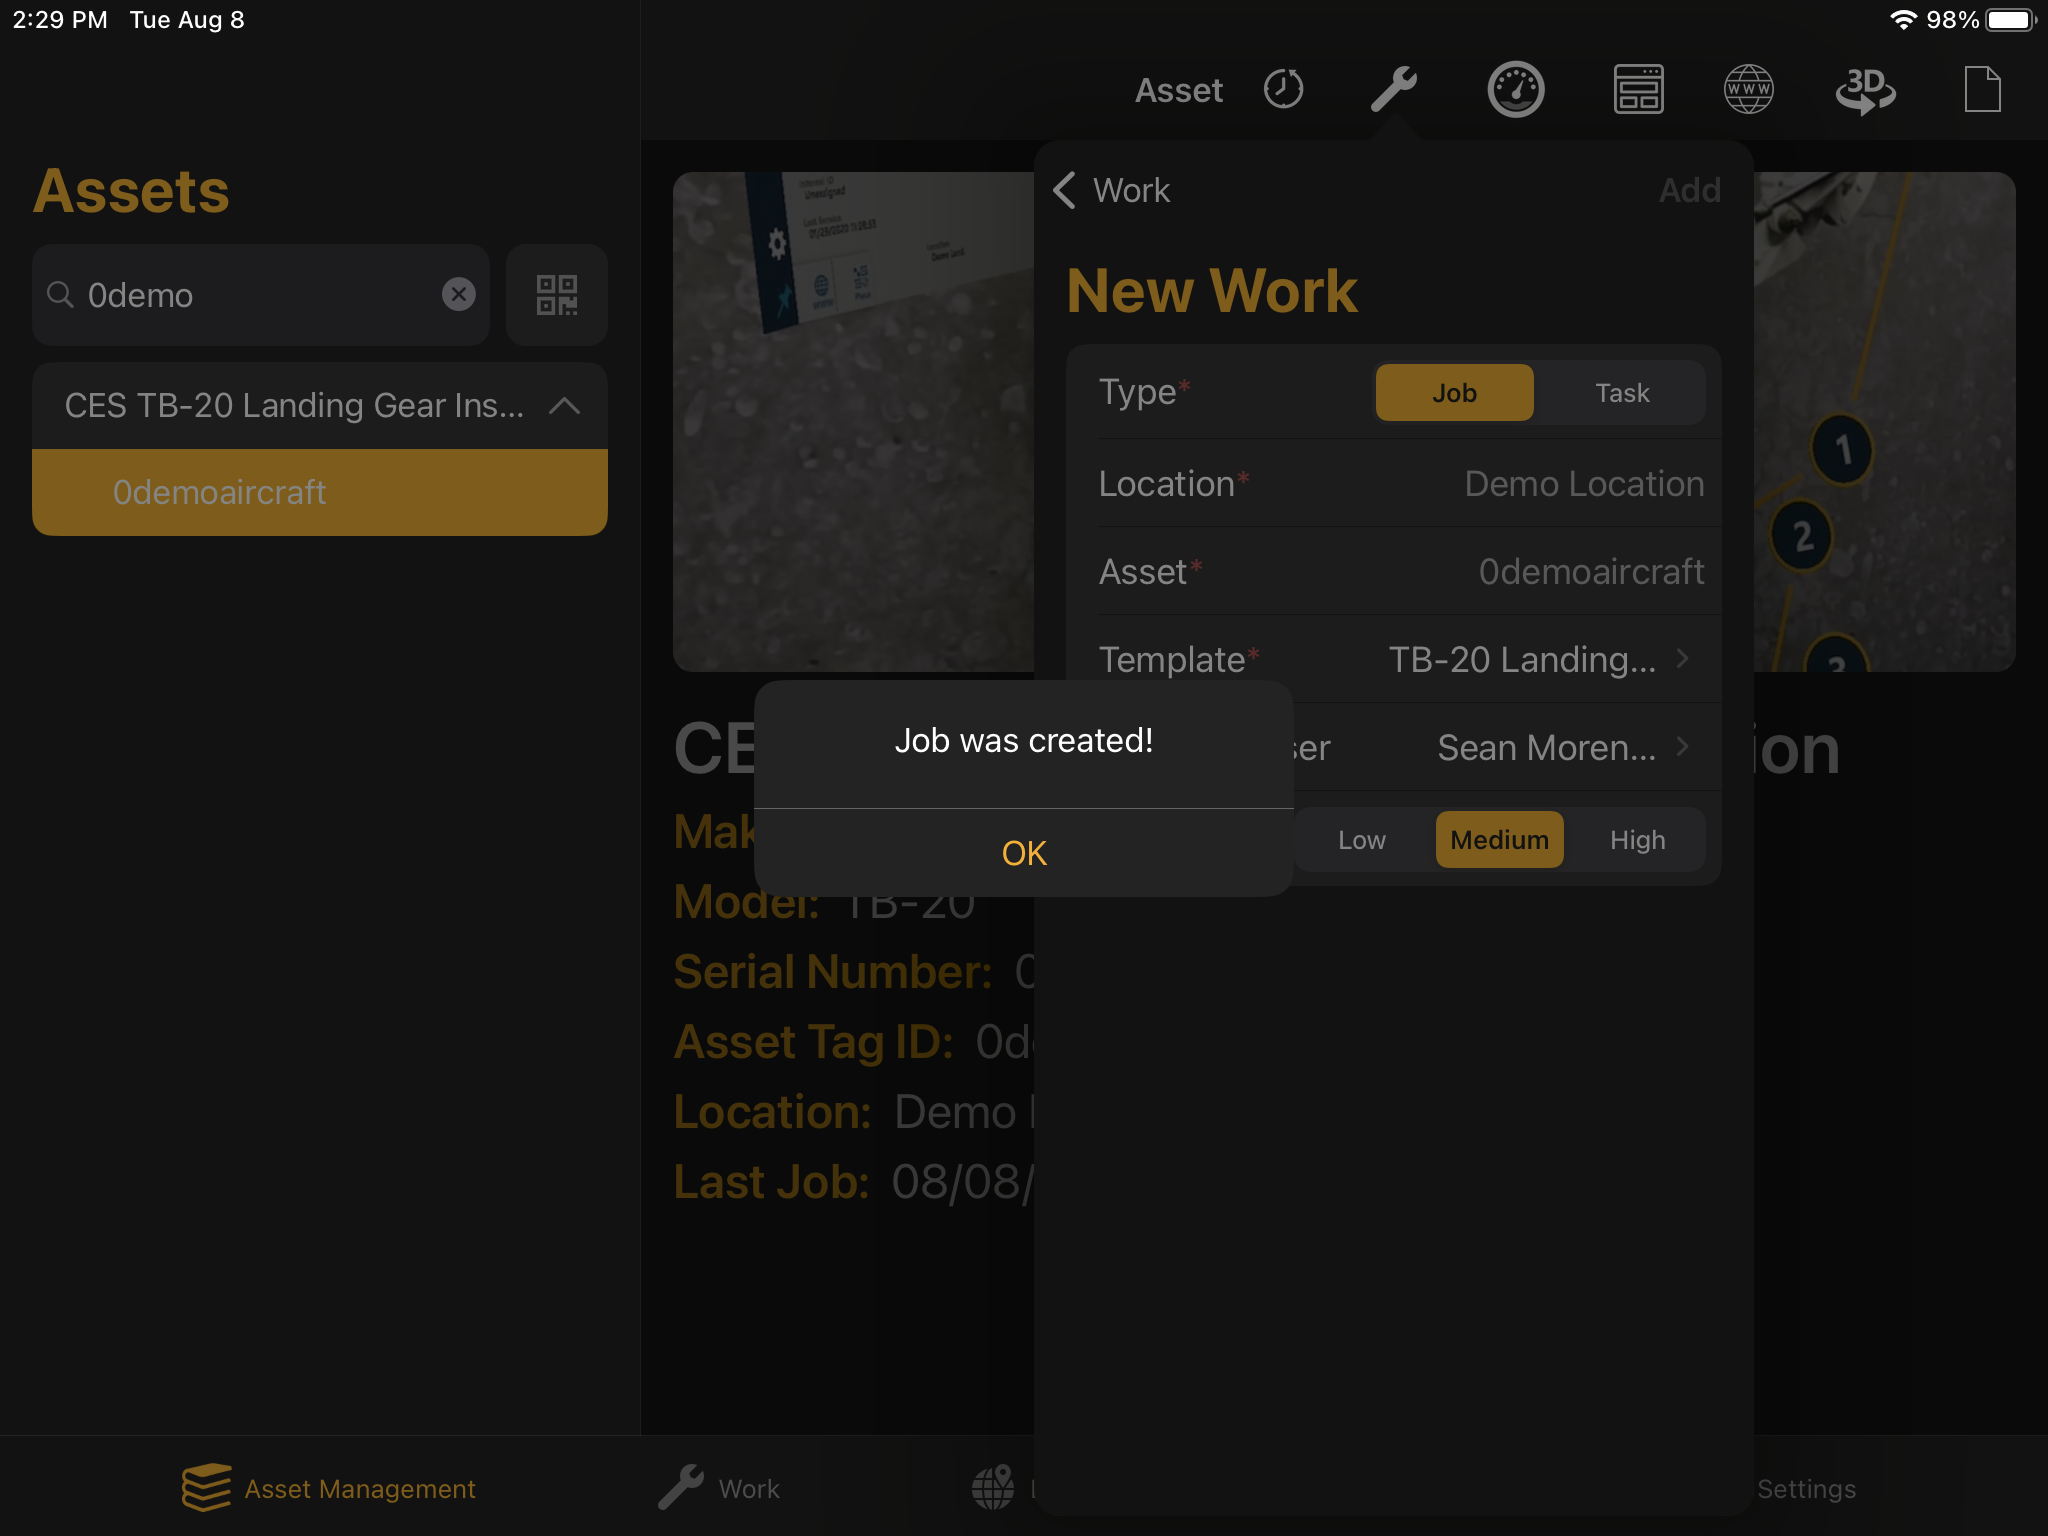
From the Work Board
- *Note: Users should select the desired Location from the Location dropdown before creating Work
- Select + Add Work in the upper right-hand corner
- Select the desired Work Type
- Task:
- Non-procedural Work items requiring only Task Description and an associated Location.
- Job:
- A procedure generated from a Manifest Template
- Task:
- Enter the required information
- Asset
- Template
- *Note: Job only
- Task Description
- *Note: Task only
- Priority
- *Note: Priority will always default to Medium
- After completing the required fields, select Add
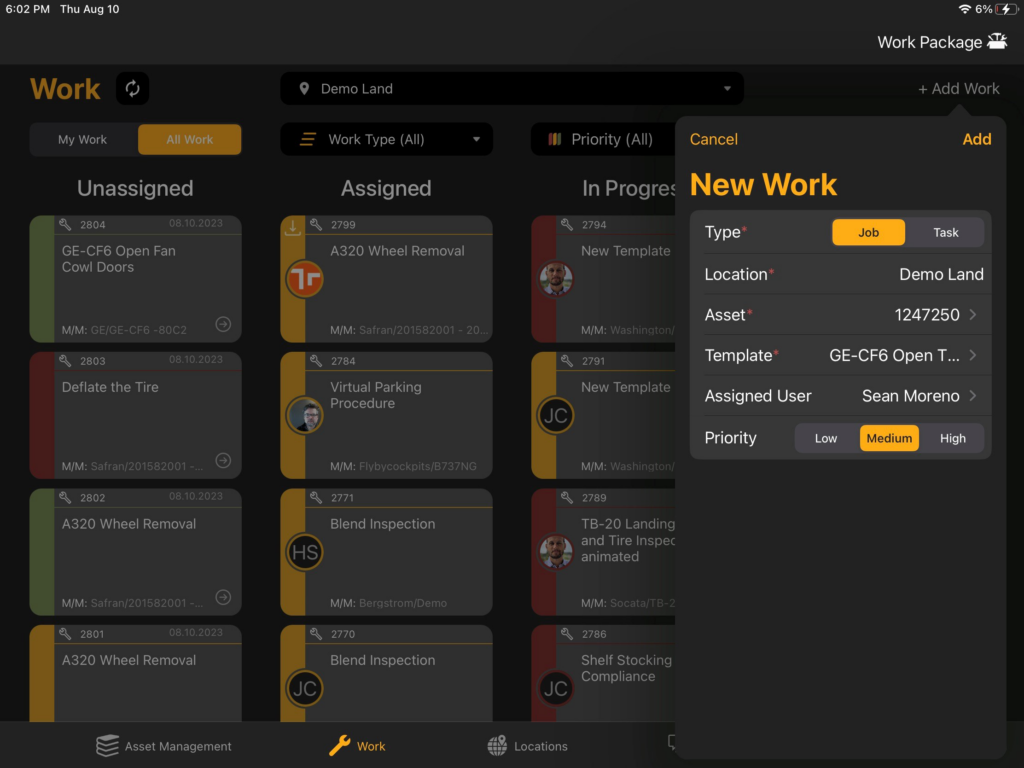
Find Work
From Asset Management
- Find and select the desired Asset using one of the following methods to open Asset Detail view:
- Search Tool
- *Note: When using the search tool, Users can search by the Asset Class or Asset Name and ID, serial number, Asset Tag ID, or Internal ID.
- Scan the Asset Tag
- Select the QR code icon to activate the scan function
- From the Asset Detail Menu, select the wrench icon (in the upper right-hand corner of the screen) to open the Work List
- Locate the desired Work item in the Work List and select it to open
- Tip: The tabs at the top of the Work List allow users to filter by Work assigned to them or by the status (Unassigned, Assigned, and In Progress)
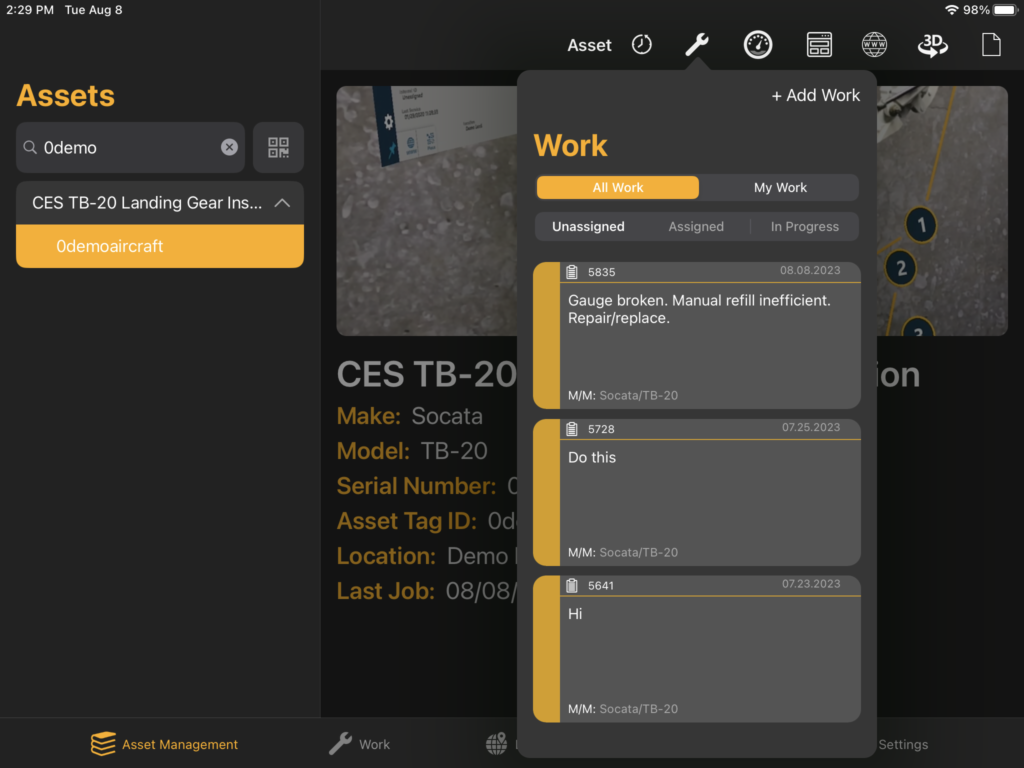
From the Work Board
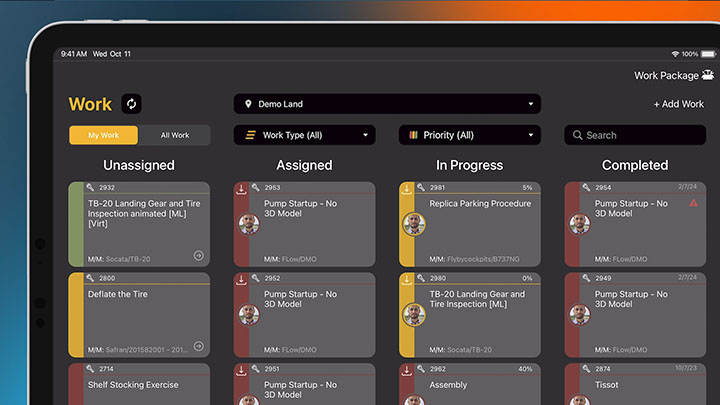
- Select the Location dropdown and choose the desired Location from the list (this will filter the Work Board to show all Work for the chosen Location)
- Locate the desired Work item and select it to open Job view/the Task Detail window
- Tip: The Work Board is organized by Status (Unassigned, Assigned, In Progress, and Complete) with additional filters available so users can filter Work by those items assigned to them or by priority. The search option can be used to find Work by Title, ID, or by Asset Class Make or Model.
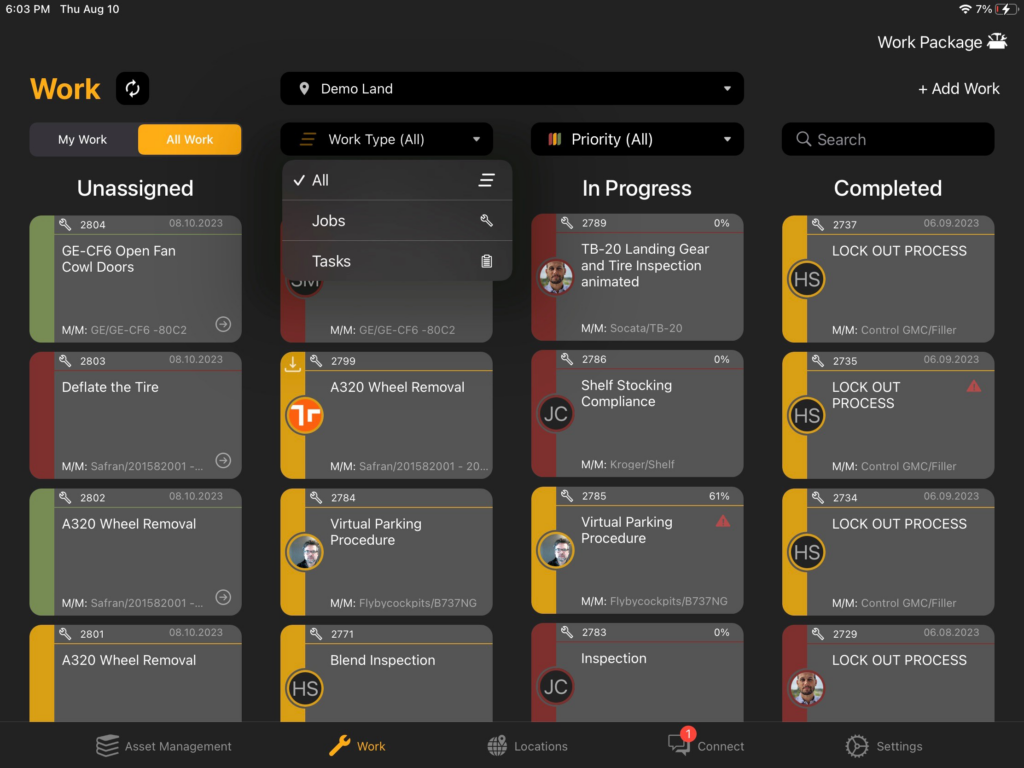
Assign Work
Work must be assigned to a user before that user may start or resume a Work item.
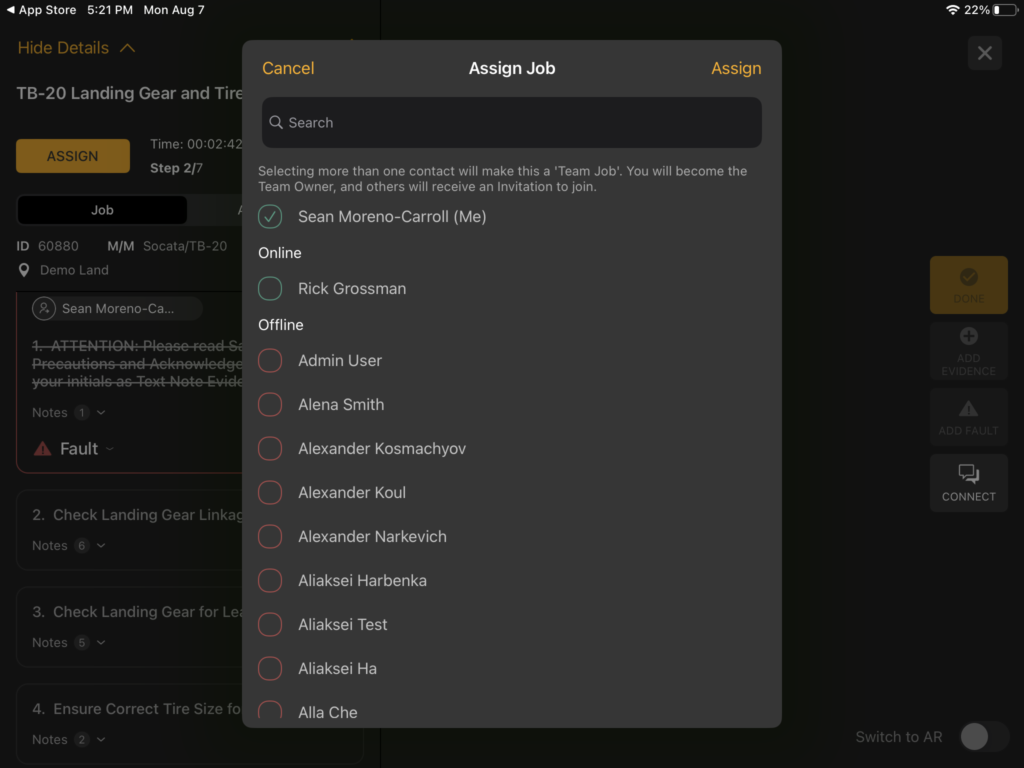
Assigning Jobs from Job view
- In Job View, select the yellow Assign button in the upper left-hand portion of the screen.
- Select the desired user(s)
- *Note: selecting multiple users will create a Team Job, inviting those users to join. See Team Jobs for more information.
- Once completed, select Assign or Invite if assigning multiple users
- If the Job was self-assigned, the Job is now ready to be performed
Assigning Tasks from the Task Detail window
- Select the yellow Assign button on the right-hand side of the Task Detail window.
- Select the desired user
- Select Assign
- If the Task was self-assigned, it is now ready to be completed
Reassign Work
The assigned user for any Work item may reassign that Job or Task to another Operator at any time prior to Work completion. Reassigning Work will assign all remaining incomplete Job Steps and/or the Task selected to the new Operator. This option can be used for on-the-fly handoffs, shift-work transfers, or to recruit help from another Operator.
- *Note: Tasks cannot be reassigned in the current version
From Job view
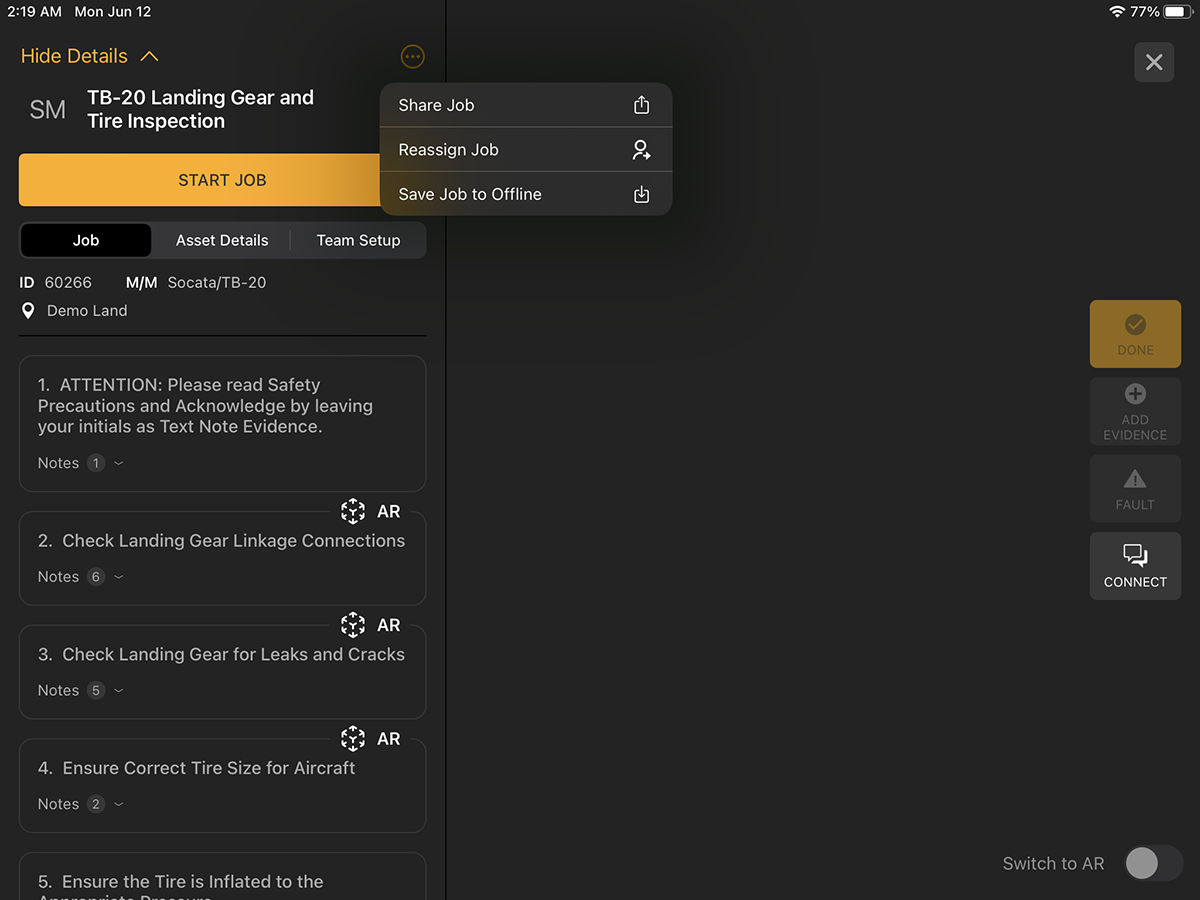
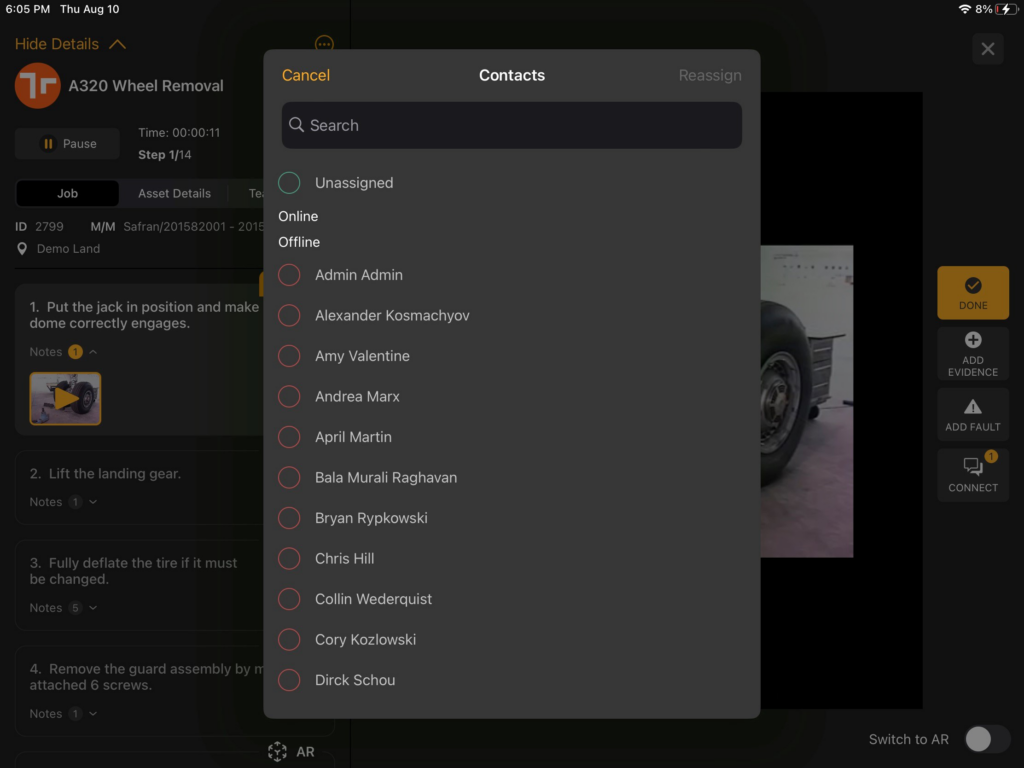
- Select the options menu in the upper left-hand corner of the Job Details (the options menu is an icon of a circle with three dots inside)
- Select Reassign Job to open a list of Operators the Job can be reassigned
- Select the desired contact and then select Assign
- Note: To Unassign the Job, select Unassigned (the first listing in the Contact list)
- Select Reassign from the upper right-hand corner (or Done if unassigning)
- The Resume button will update to show a ‘Pending’ status until the Job assignment is accepted
- To cancel the Reassignment select the ‘Pending’ button and select Cancel Job Assignment
- The assigned Operator will receive an invitation alert via Manifest Connect with the options to either Accept or Decline
- Upon acceptance, the assigning Operator will receive a notification and the Start/Resume button will be disabled
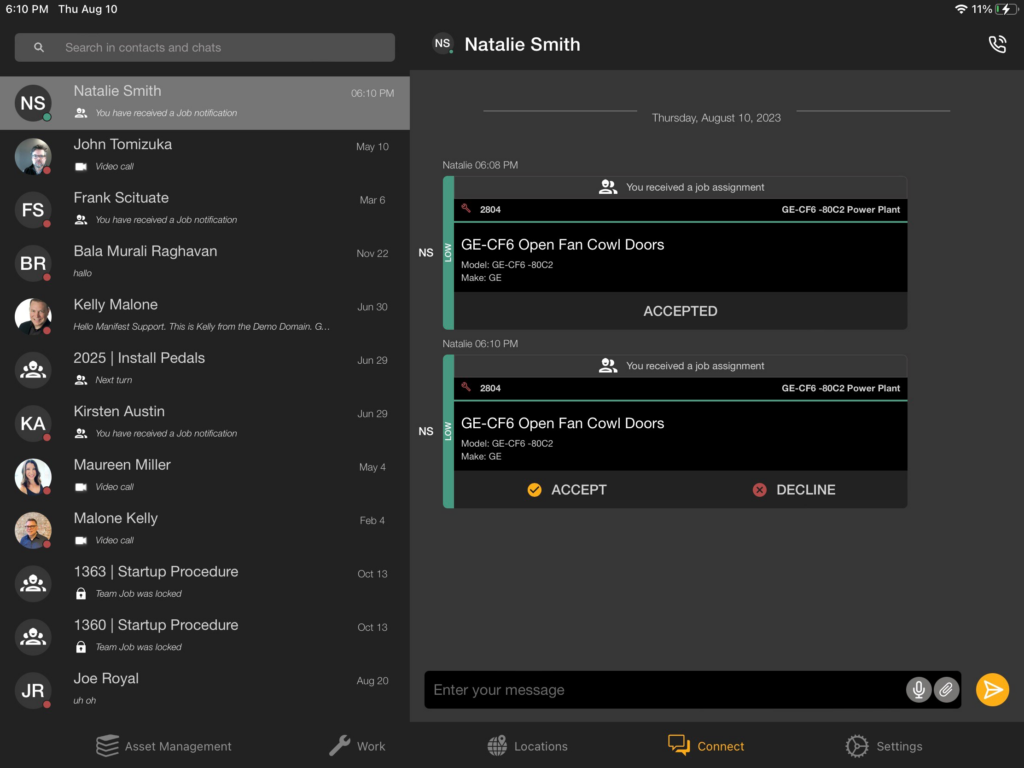
How to accept a Job assignment invite
- When a Job is Reassigned, the assigned Operator will receive an Invitation via Manifest Connect to either Accept or Decline the Job Assignment. The Job invite will update in the Connect Chat as a Job Card with important details about the Job and Step number with the options to Accept or Decline.
- To accept the Job assignment, select Accept
- Once the Job assignment is accepted, select the Job Card to open the Job View and begin the Job
- If the Job assignment is declined, the Job Step will be returned to the originating Operator
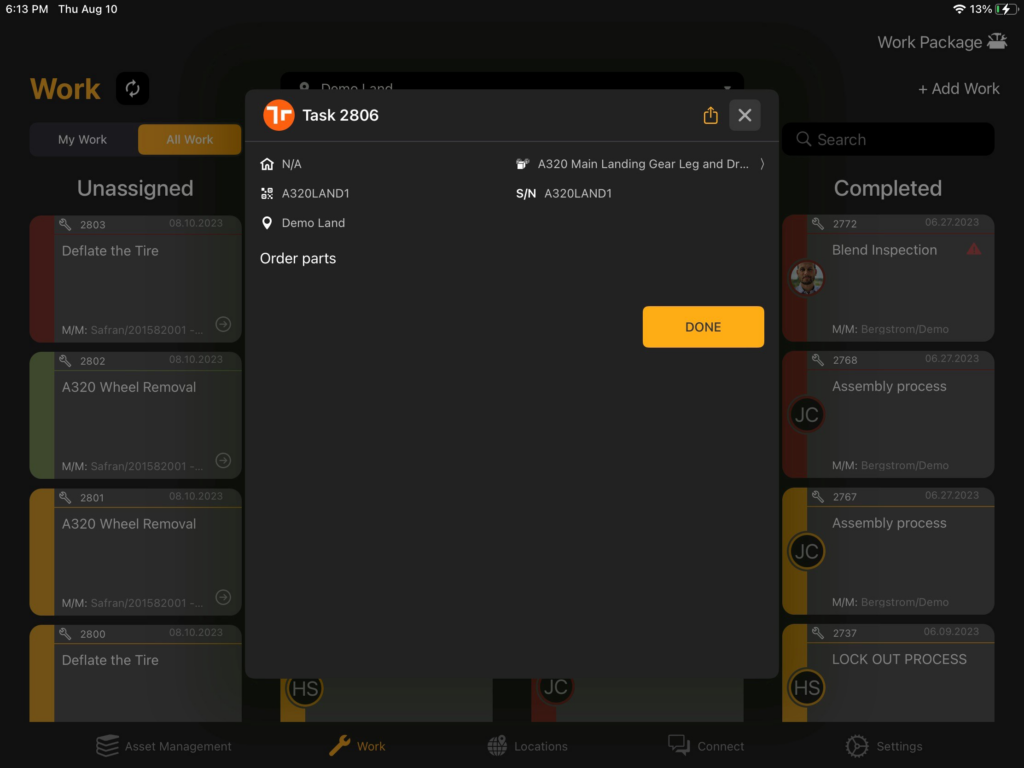
Complete a Task
- Locate the desired Task
- Select to open the Task Detail window
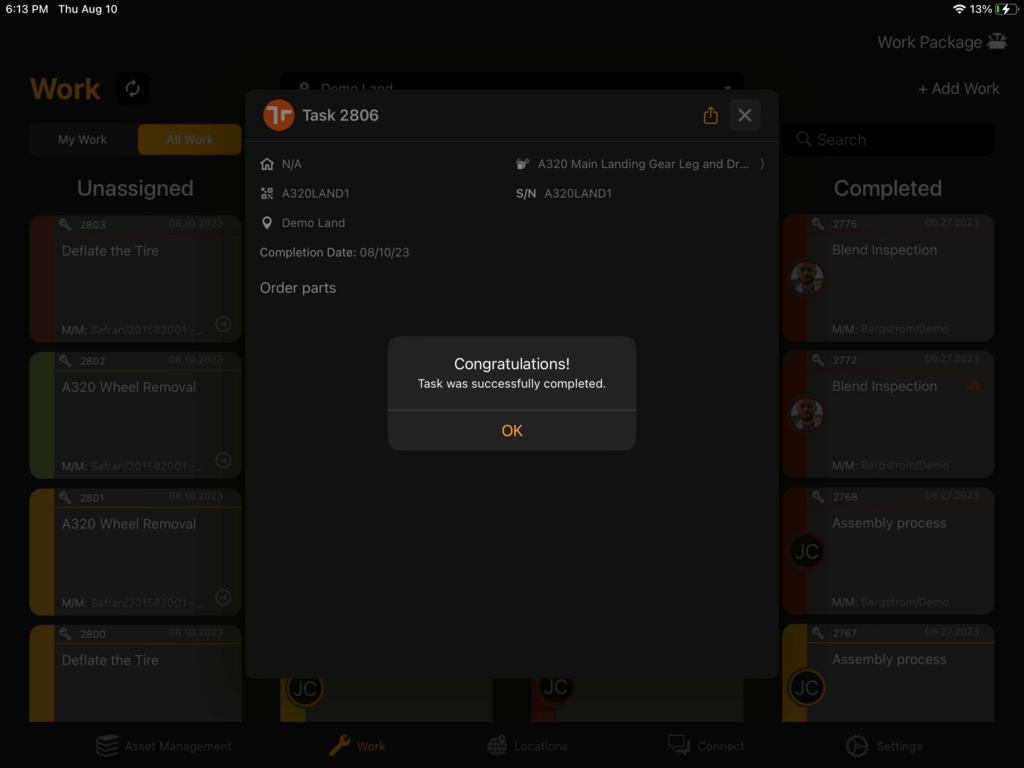
- Once complete, select Done
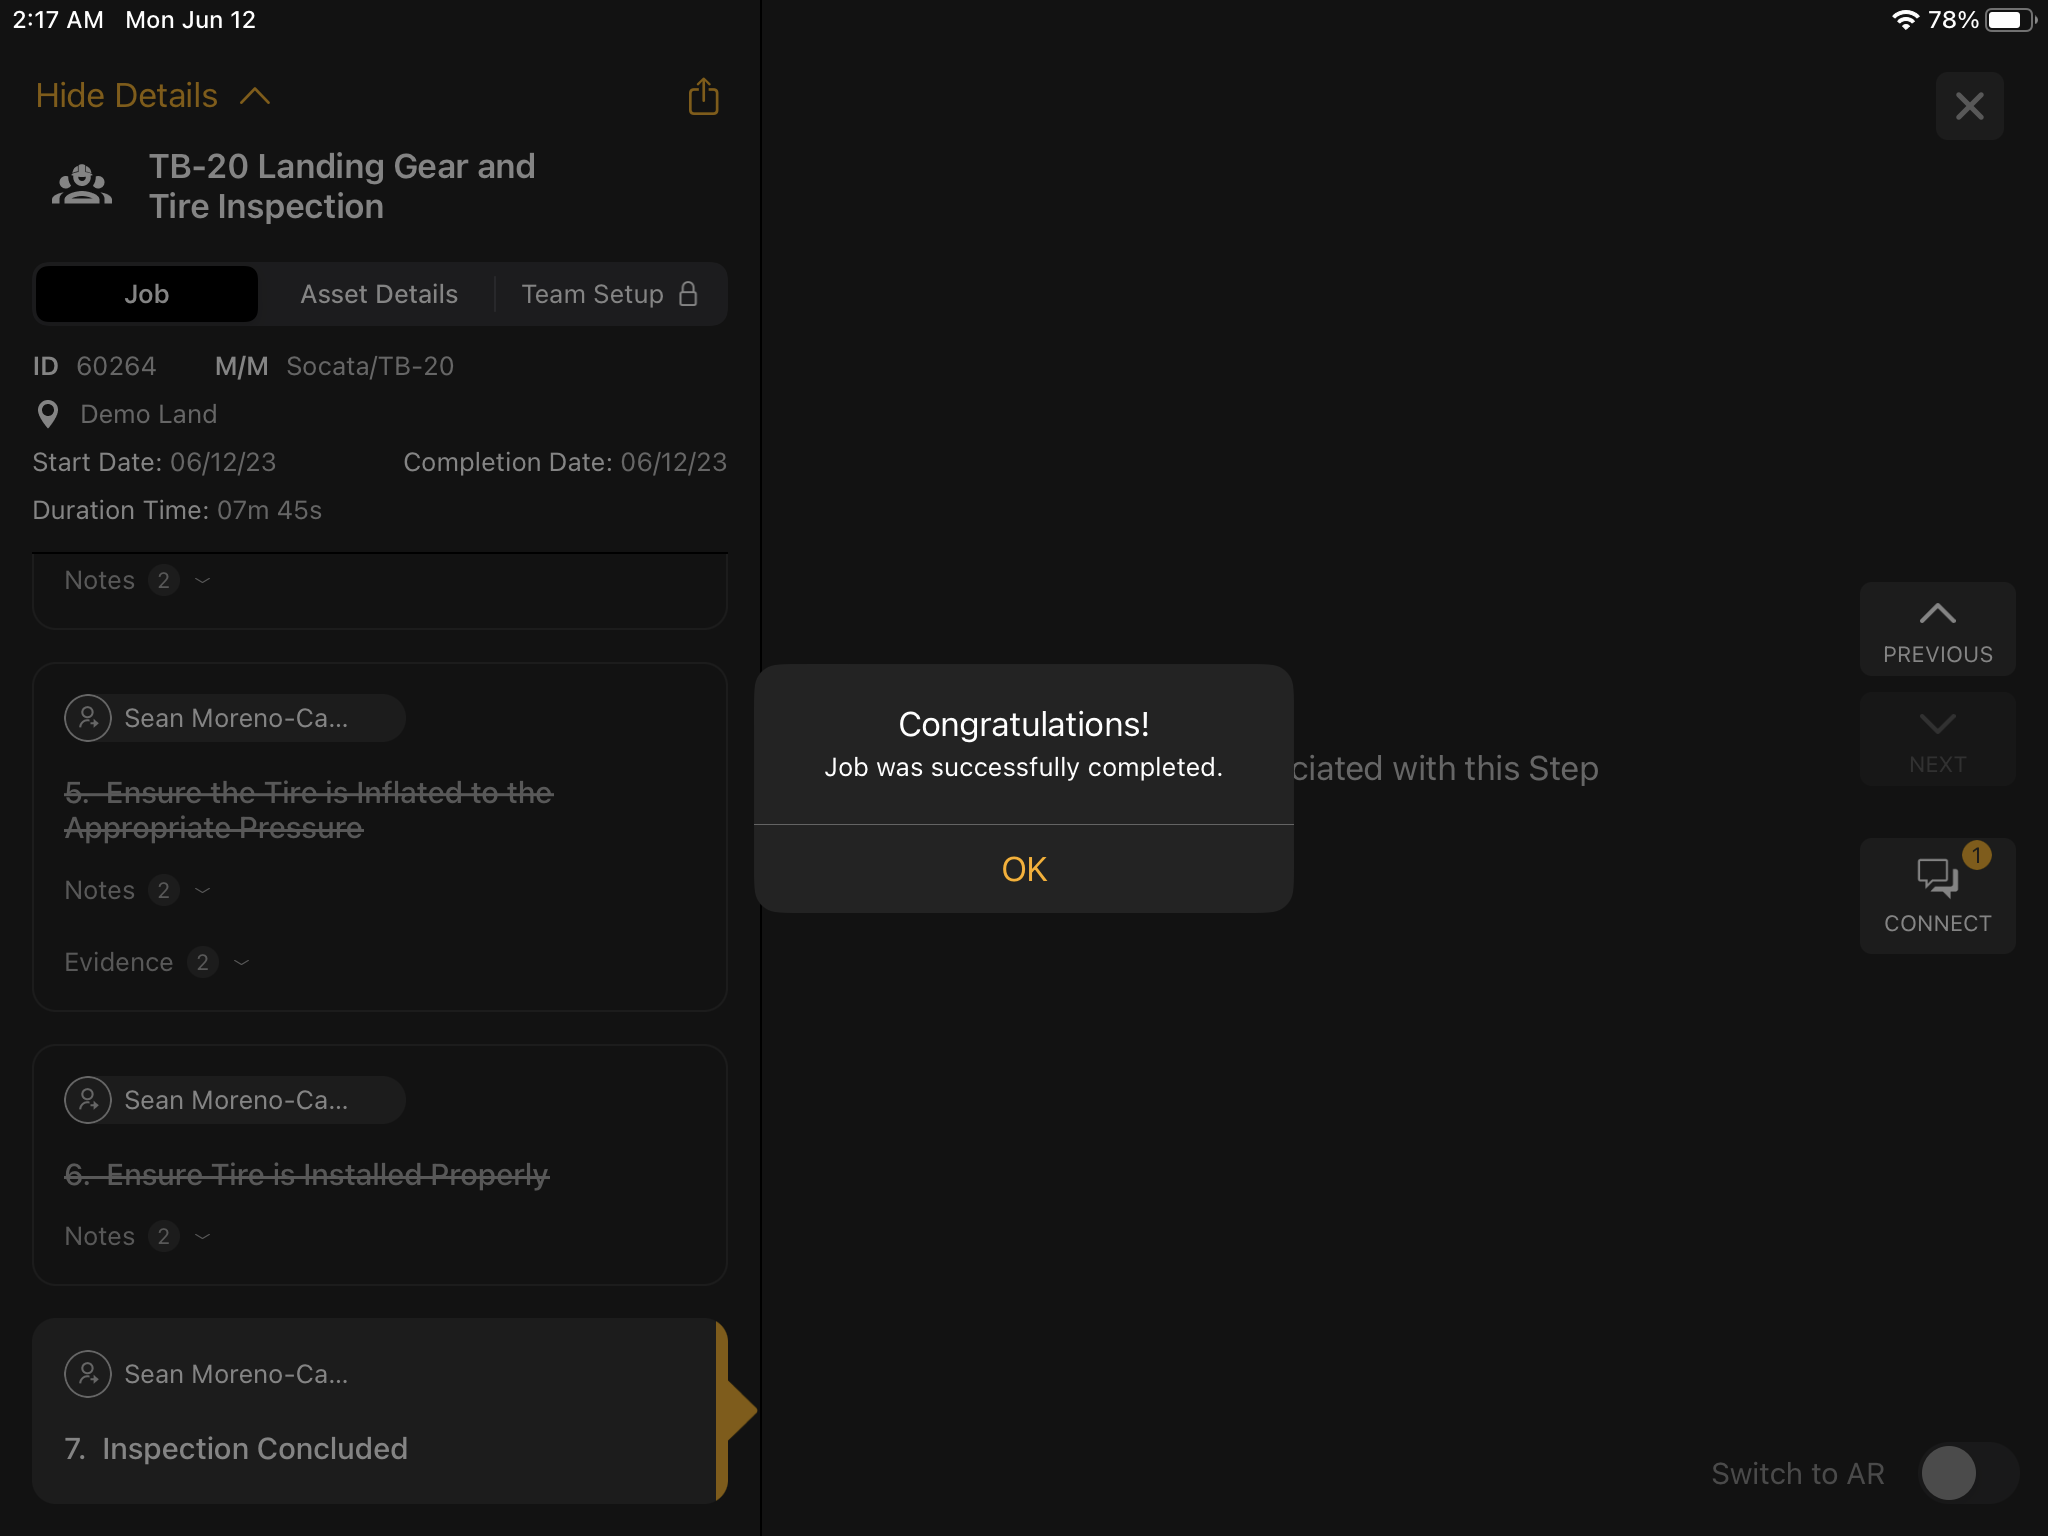
- A “Congratulations!” pop-up will appear, denoting completion of the task.
Perform a Job
To perform a Job using the Manifest iPadOS Application, find and select the desired Job Card to open the Job.
From Job View
- Select the Job Card to open the Job and observe the layout options and available options.
- The Job view will default to the ‘Show Details’ layout with the Job Checklist available in a scrolling list on the left, and the Step Notes displayed in the right-side view pane.
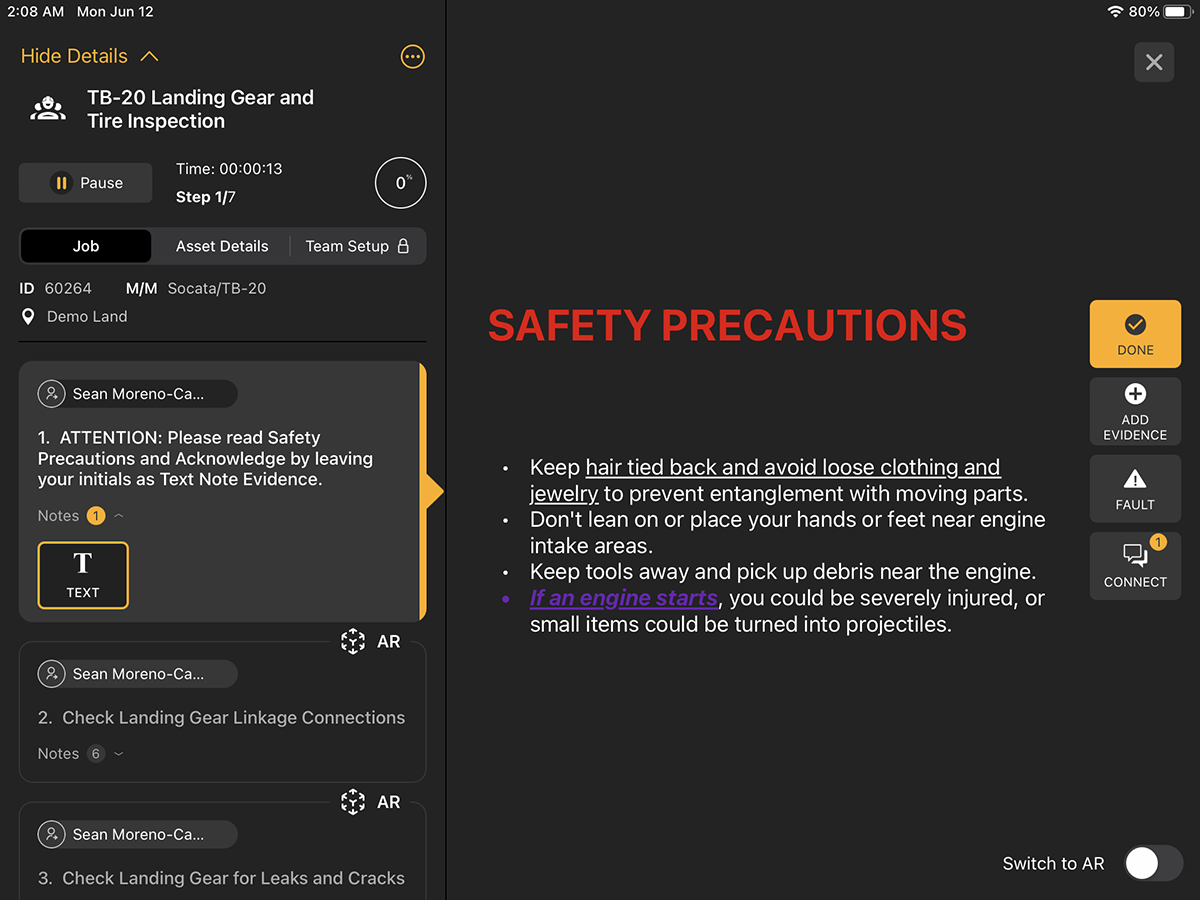
- Job details and available options are in the upper left-hand corner of the Job view. All Step actions, such as buttons to mark a Step ‘Done’ or ‘Add Evidence’ are positioned on the right side of the view (within thumbs reach).
- To transition to a more focused view of the Job, select Hide Details in the upper left-hand corner. In this view, the Step instructions will display in the top header of the screen with any Notes on the left, and the Job will show only one Step at a time.
- Select Start Job to begin (this button will only be enabled if the current User is assigned to the Job). This will begin the Job Timer.
- Review the Step instructions and any available Step Notes
- When using the ‘Show Details’ layout, the active Step instruction will be highlighted in the list
- When using the ‘Hide Details’ layout, the active Step instruction will be displayed in the header
- If Notes are available, the Notes section will automatically expand with the first Note displayed
- Swipe through the available Step Notes or tap the Note button to open an individual Note
- When AR content is available in a Job, an AR icon will be displayed in the upper-right corner of the Step.
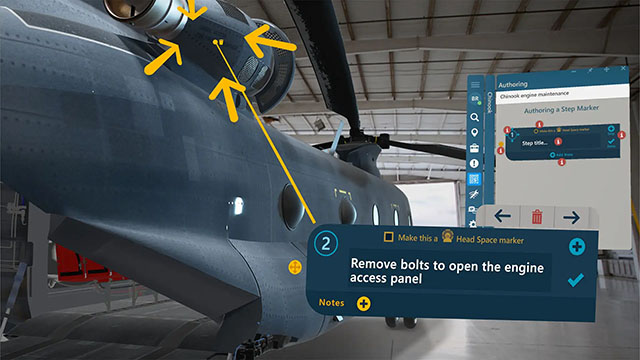
- AR content may be a Step Marker positioned near where the Step instruction is, or lines pointing to a specific piece of equipment. It can also include spatially authored ‘Pen Notes’ such as shapes that point to or circle a specific area.
- To open AR mode, select Switch to AR (a toggle button in the bottom right-hand corner) to open to an AR view.
- Switching to AR mode opens the camera so the user can view the spatial content rendered within their environment or over the equipment itself.
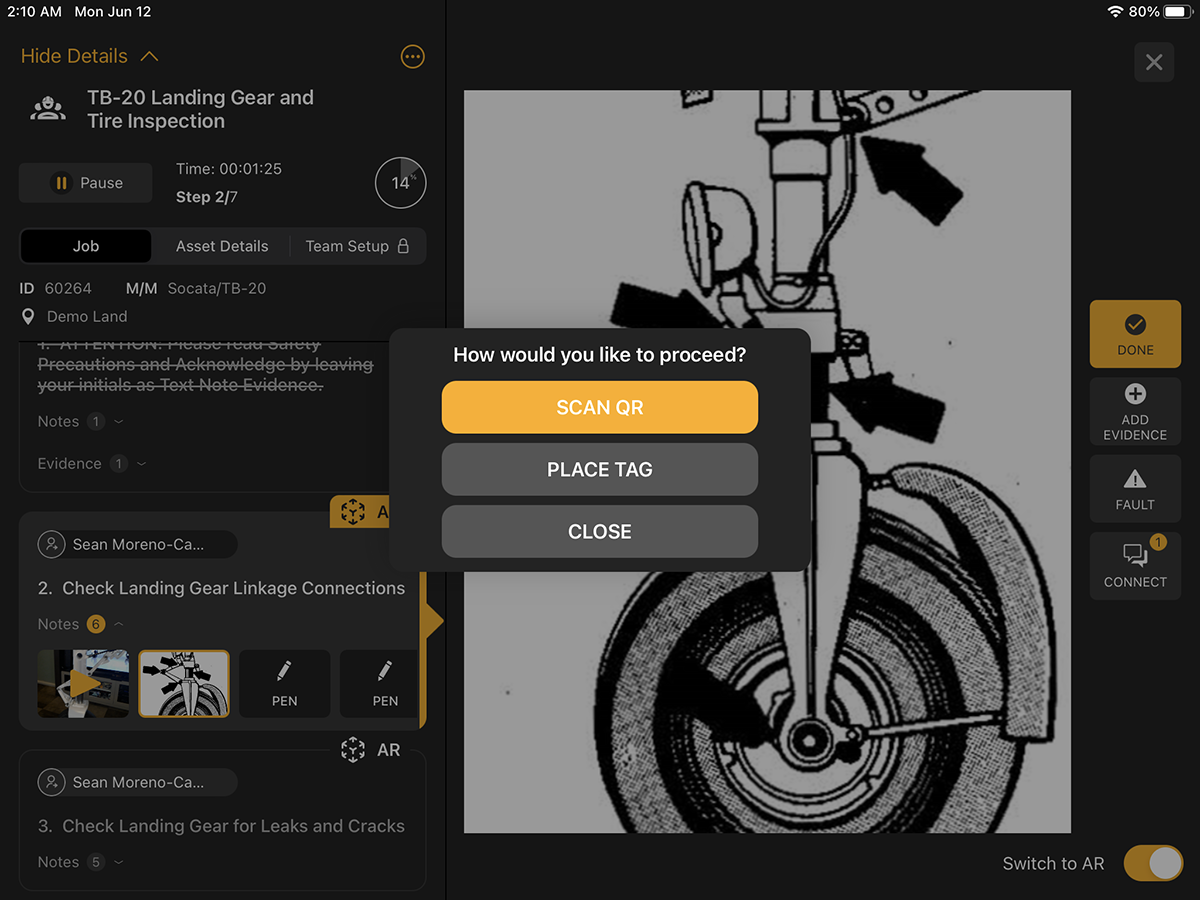
- Selecting Switch to AR will open the device camera and prompt the user to either Scan or Place the Asset Tag to begin the Job. This is required as the device will determine where spatially content renders in relation to the Asset Tag
- Select Add Evidence and select the desired Note type to record any evidence of the Work or observations to the Job Step
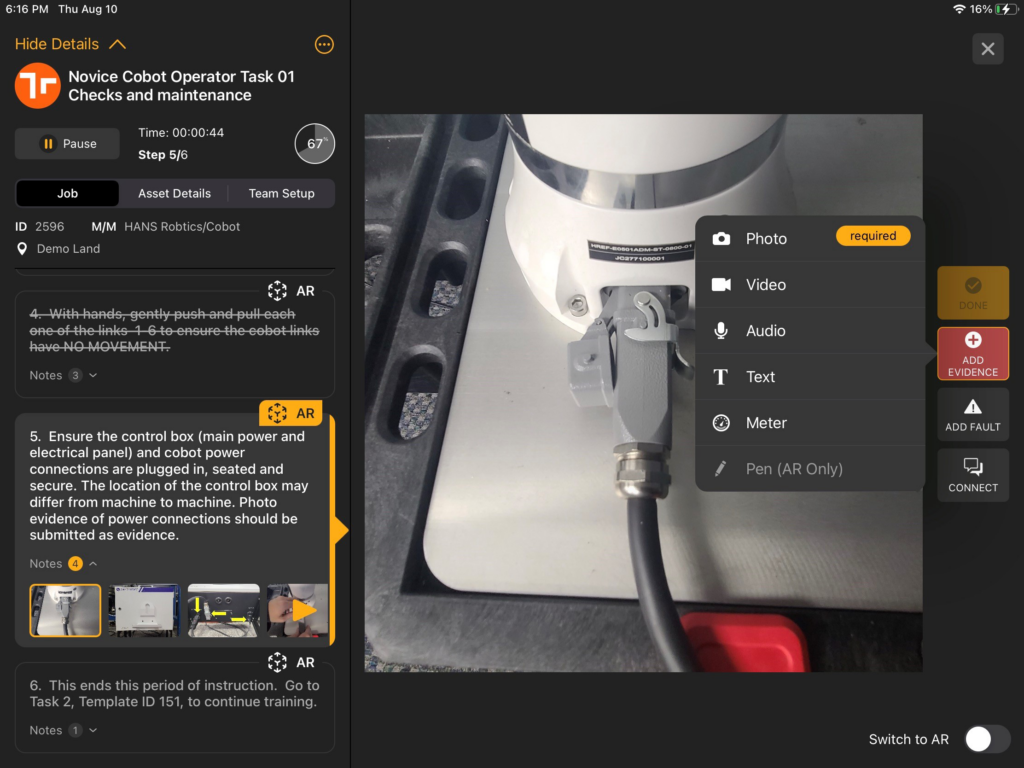
- If a Step was configured to require ‘Evidence’, the Add Evidence button will be red and the required Note Type will be denoted with a yellow ‘Required’ label.
- To markup a Photo Evidence Note, select the pen icon in the bottom righthand corner of the Photo Note. The markup tools allow users to add annotations, symbols, and text to a Photo Note.
- After completing the Step instruction, select Done (this will mark the Step complete and cross out the instruction text)
- Once the last Step is completed, a pop-up message will appear congratulating the User on the completion of the Job
Adding Job Evidence
Operators may optionally (or sometimes as a requirement) leave evidence with a Job Step indicating what was done. To leave Evidence Notes on a Step, follow these steps:
- From the active Step, select Add Evidence (this button is located on the right-hand side of the Job View)
- A list of Evidence Note types will be displayed (any required Evidence will be denoted)
- Select the desired Note type and follow the instructions
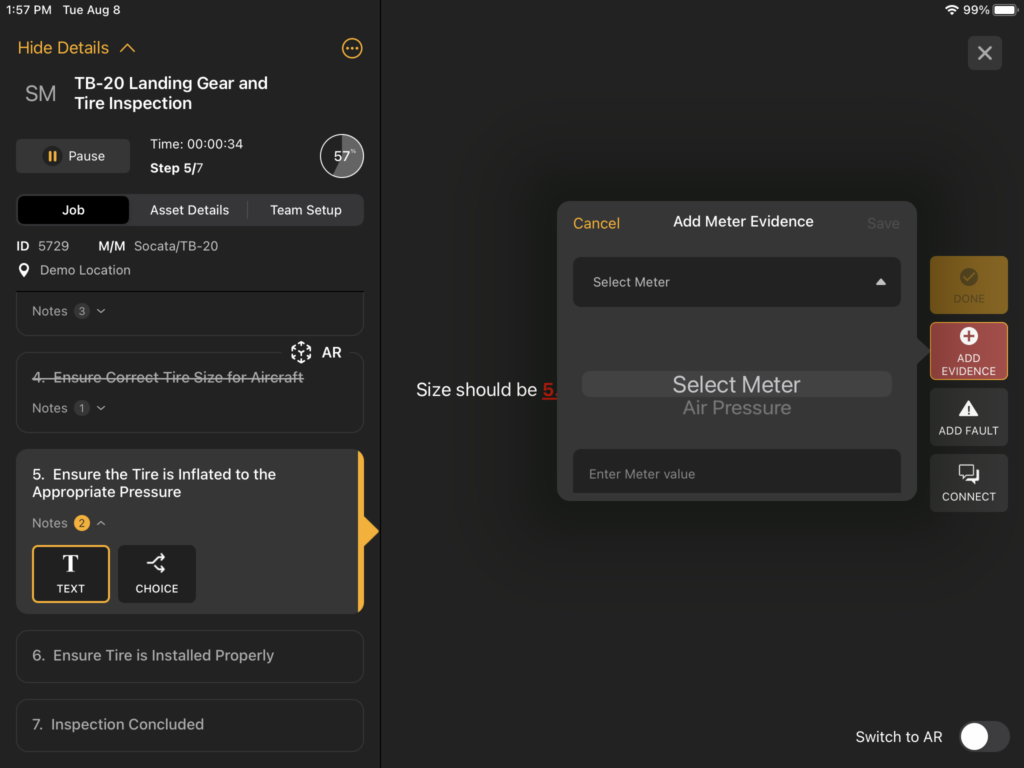
- *Note: When leaving Meter Evidence, a manual recording of a meter reading or measurement can be logged. If there is an issue with the current meter reading, select the checkbox titled ‘Meter Issue’. The Flag and its associated meter reading will be added to the Meter Evidence Report in the Manifest Web Application.
- Once an Evidence Note has been added, the Note will be added to the Step section titled ‘Evidence’ and can be viewed by tapping the Note icon
Job restrictions or requirements
If a Job Step is set to require Evidence Notes, the ‘Add Evidence’ button will be red and the ‘Done’ button will be disabled until the required Evidence as added. Selecting the ‘Add Evidence’ button will open the available Note Type options with a red ‘required’ label denoting which Note Type is required. If the yellow label displays ‘any evidence’, this indicates that any Note Type will suffice. The Operator will not be able to complete the Job Step until the required Evidence Note is added for that Step.
Required Evidence
If a Job Step is set to require Evidence Notes, the ‘Add Evidence’ button will be red and the ‘Done’ button will be disabled until the required Evidence as added. Selecting the ‘Add Evidence’ button will open the available Note Type options with a red ‘required’ label denoting which Note Type is required. If the yellow label displays ‘any evidence’, this indicates that any Note Type will suffice. The Operator will not be able to complete the Job Step until the required Evidence Note is added for that Step.
Meter Requirements
An Author may configure a Job Step to require a specific Asset Meter to meet measurement criteria before allowing the Operator to continue to the next Job Step. This is very useful for procedures with health and safety risks. As an example, an engine may need to be fully powered down before a task can be performed safely and operators will not be able to perform the Job if the Asset Meter is not showing the engine has been powered down.
Custom Evidence
An Author may configure a Custom Evidence Note type for any Template. A Custom Evidence list is a preset value list from which an Operator may select to input an Evidence Note for that Job Step. This is ideal for procedures where a standardized set of data or status definition must be recorded on some or all Job Steps. Custom Evidence lists must be associated to any applicable Template.
Sub-Jobs (Embedded Templates)
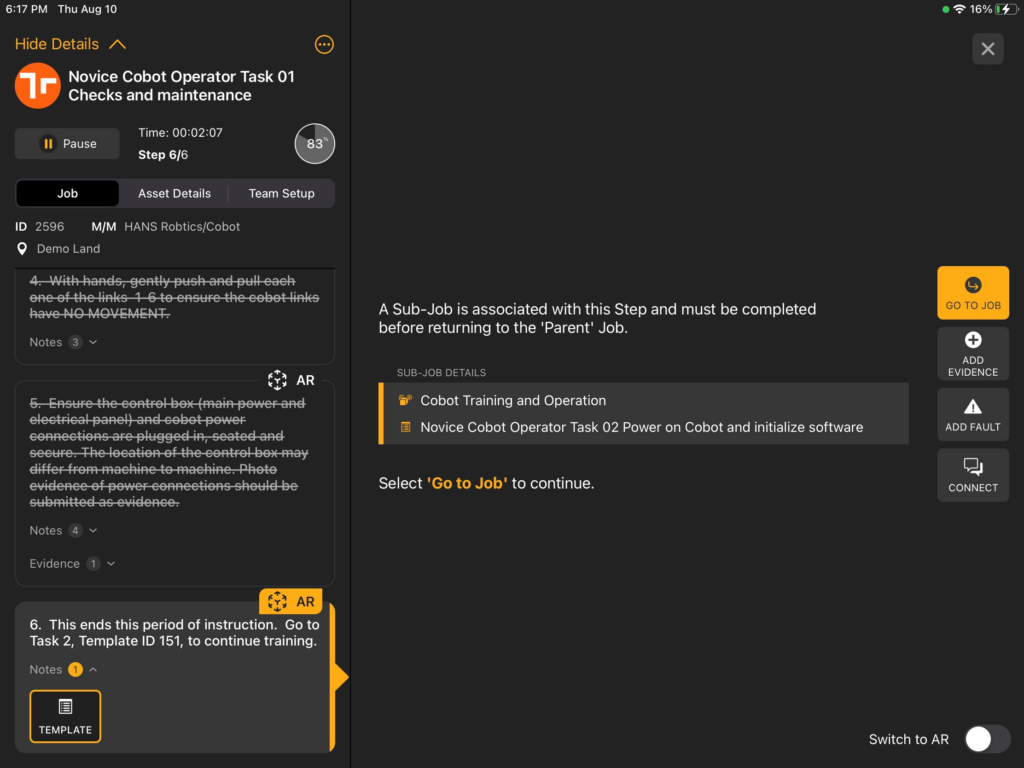
An Author may use an Embedded Template Note to link procedures together. A Job Step with a Template Note will generate a Sub-Job that the Operator must complete before completing that Job Step. Below are a few notes about Sub-Jobs:
- If a Sub-Job is associated with a Step, the Done button will be replaced with a button labeled ‘Go to Job’.
- If the Job Template is for the same Asset as the current Parent Job, the user will be navigated directly into the Sub-Job when selecting Go to Job
- If the Job Template is associated with a different Asset Class from Parent Job, the user will be prompted to identify which Asset the Sub-Job will be performed on before selecting Go to Job. The user may either select from a list of available Assets or scan the Asset Tag for the desired Asset.
- Users may view a Job Map by tapping the blue Template icon next to the Job Title in top of the Job Details to reference where they are in the procedure. This is especially helpful when there may be multiple linked procedures for a Job
- The Sub-Job will open a new Job checklist window which must be completed before the user may return to the Parent Job
- Once the Operator has completed the Sub-Job, the Job checklist will return to the originating Job Step in the Parent Job and the Go to Job button will update to Done
Choice Options
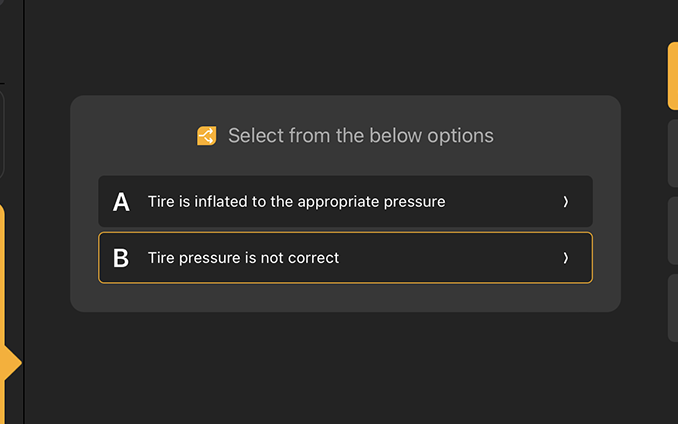
An Author may use a Choice Note to present the Operator with multiple options to select from when working on a Job Step. Choice Note options may link to other Templates, generating a Sub-Job; or simply log a specific selection before the Operator can continue and complete a Job Step. Below are a few notes about Choice Notes:
- A Step authored with a Choice Note may display up to 26 optional paths, labeled alphabetically, that an Operator can select from to continue
- Each option may be either be authored to continue to the next Step or continue to a Sub-Job
- If the option is configured to direct the Operator to a Sub-Job, the Done button will be replaced with a button labeled Go to Job’ and this Job will open in a new Job checklist (see the Sub-Job section for additional information about performing Sub-Jobs)
- There is no limit to the number of times an Operator can select a choice option with a Sub-Job and complete that procedure (consider use-cases where troubleshooting paths may need to be attempted multiple times)
- The Choice Note options selected will be recorded as Step Evidence and can be referred to and viewed during a Job or even after the Job is completed
Job Faults
While performing a Job, an Operator can add a Fault on any Step to quickly indicate an issue. This feature is well suited for inspection procedures or any case where an Operator may need to indicate a Fault in a Template or on an Asset. When Faults are recorded, these will be flagged for the Location, Asset, Job, and Step, allowing viewers to quickly identify and resolve issues.
Add a Fault to a Step
Faults can be added via the following method using the Manifest iPadOS application:
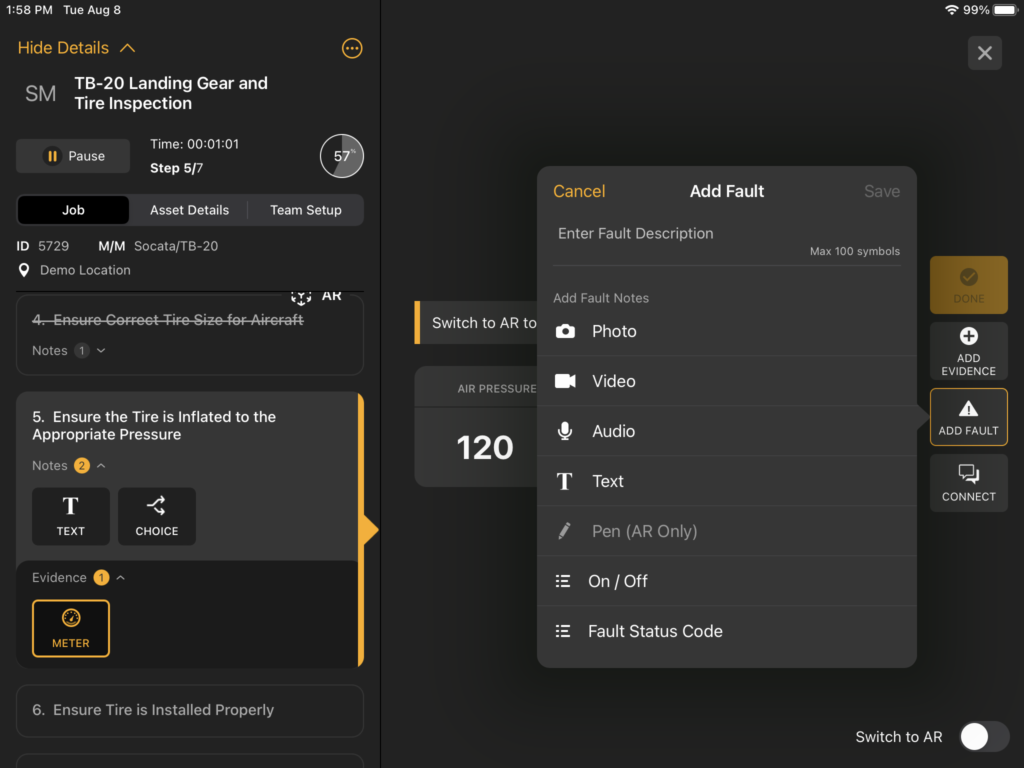
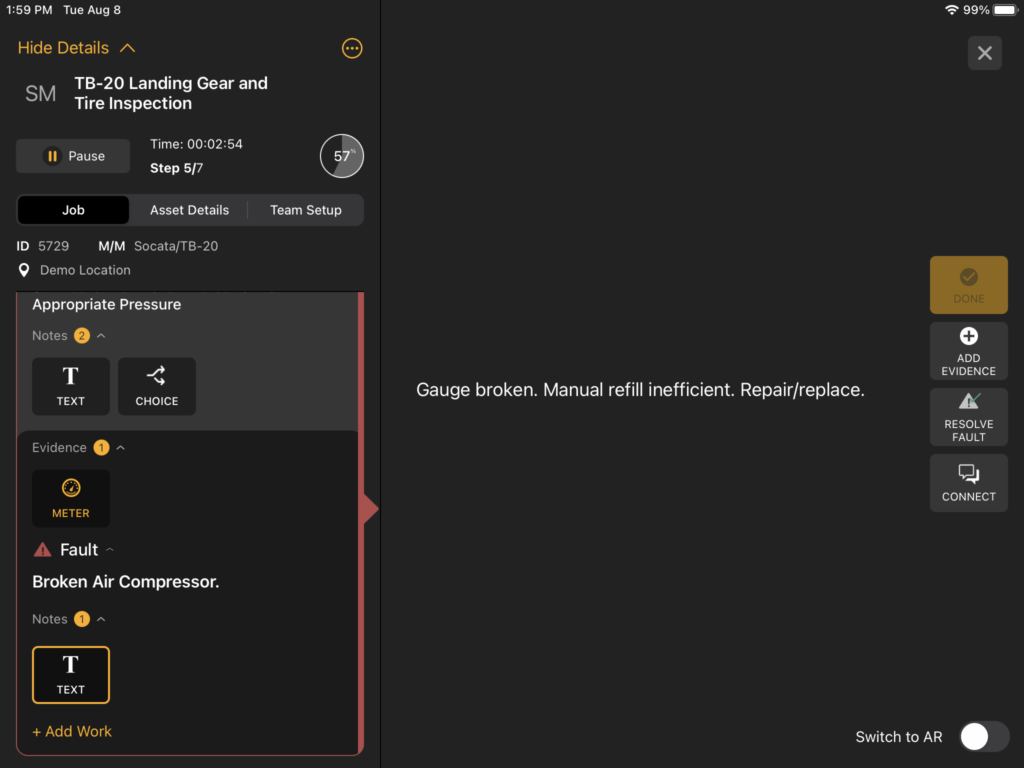
- During a Job, select the Add Fault button from the Job Step action buttons on the right-hand side of the screen. The Job ID and Job Step will automatically be recorded with the Fault and a Fault icon will be displayed on that Step in the Job Checklist.
Adding a Fault using the Manifest iPadOS application:
- Select Add Fault from the right-hand side of the Job pane
- Enter the Fault description
- Select the desired (or required) Note type and follow the instructions to save each Note
- *Note: required notes will be denoted with a yellow ‘Required’ label
- Select Save
Add Work to a Fault
- From the Fault, select + Add Work
- In a Job, from the Job Step the Fault was recorded select the Fault title to expand the Fault details
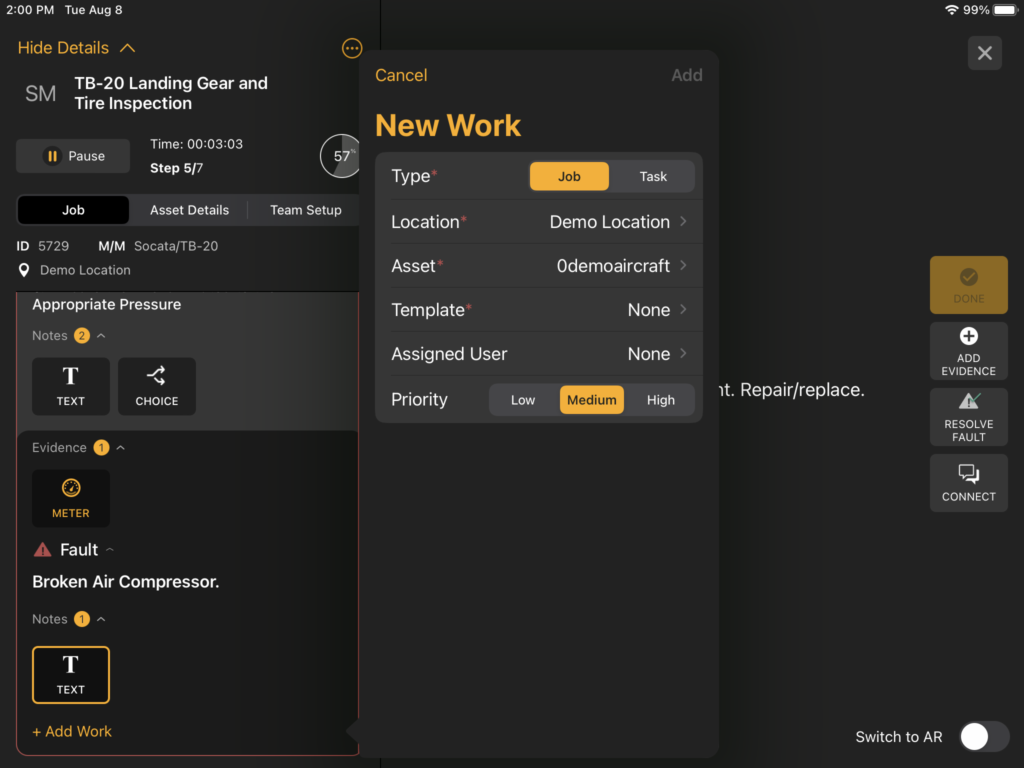
- A new window will open
- Select the desired Work item type (Job or Task) from the top tab
- Enter the required information
- Creating a Job will prompt the user to select from a list of available Templates for the related Asset
- A Task will prompt the user to enter a description
- Set the Priority of the Work item
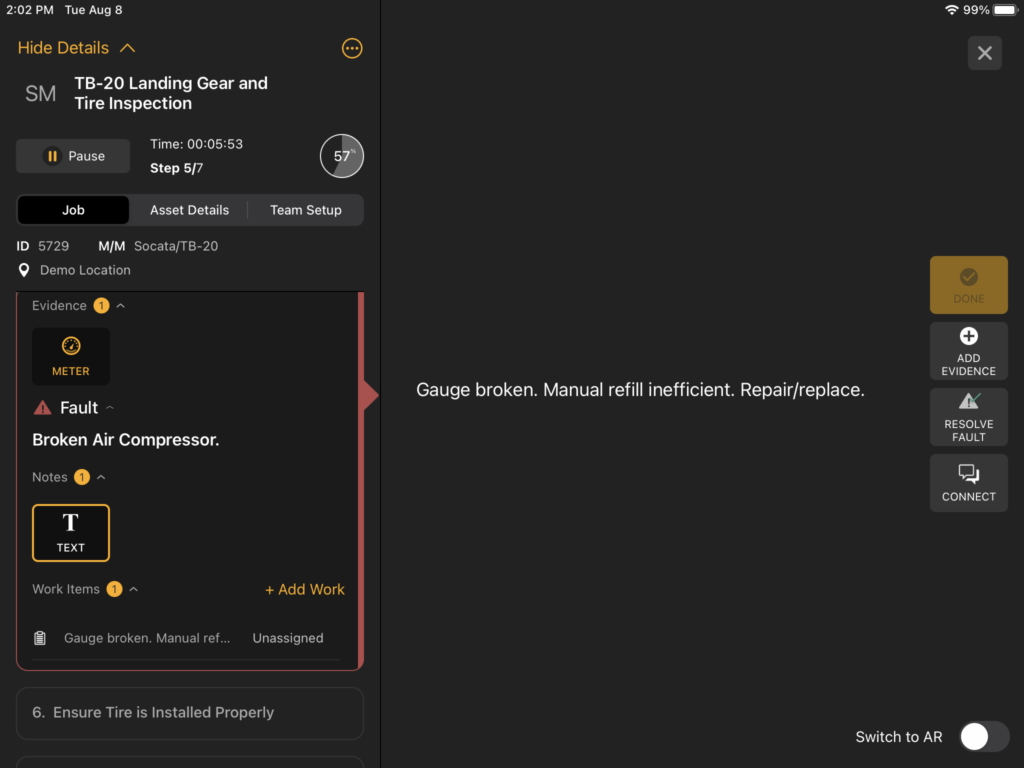
- Select Add
- The Work item has been added and will be associated with the Fault
Review Mode
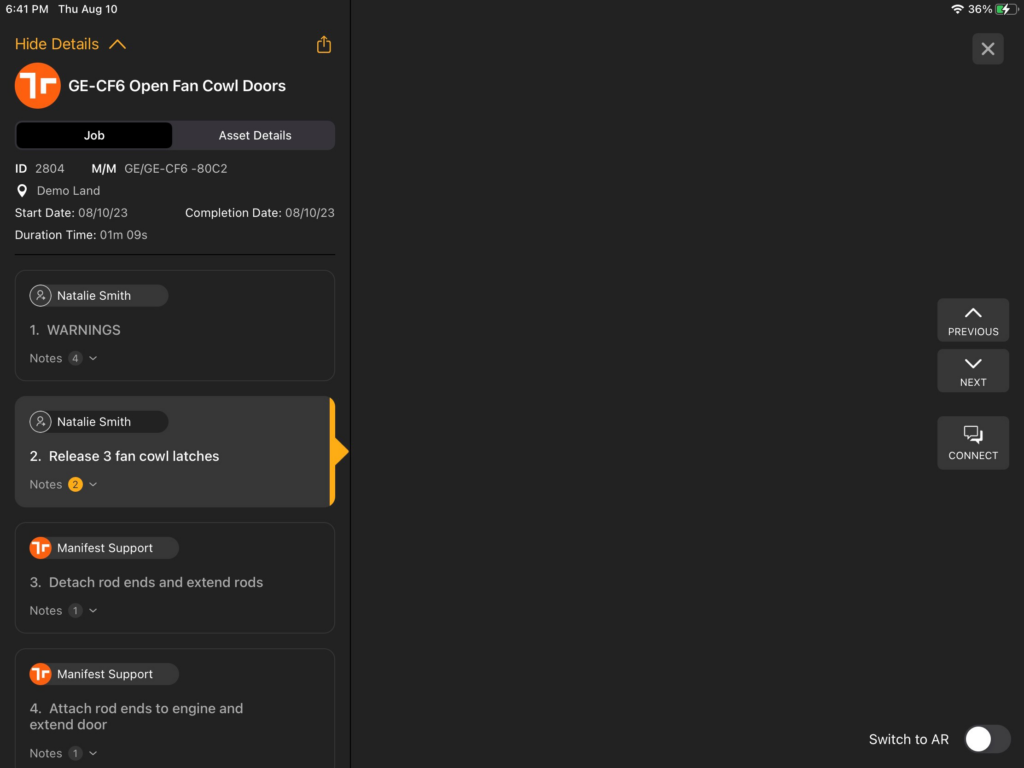
Job Review allows Manifest iPadOS Application users to access a completed Job and step through it. Users can navigate through all Steps highlighting any Evidence Notes and/or Job Faults that were logged by the Operator when completing the procedure. In Review Mode, the Steps will automatically play any Pen Notes the Operator may have logged during a Job Step.
Access a Job in Review Mode
- Find the desired completed Job through either Asset Management or the Work Board
- From the Asset Detail window select History
- From the Work Board select the appropriate Location and refer to the Completed Work column
- Select the Job Card to open the completed Job in the Job View
- Navigate through the Steps using the ‘Previous’ and ‘Next’ buttons, and review any Evidence left by the Operator (in Job Review mode, the Steps will automatically be expanded to display any Evidence added for each Job Step)
- Use the ‘Switch to AR’ toggle to view any spatially authored Steps or Evidence
Alignment Action
With any procedure that spans over a large asset or area, spatially anchored content may lose accuracy the further it is from the scanned Asset Tag. Alignment Actions allow Authors to realign Steps to an Alignment Tag at any stage in a procedure. If a procedure has been authored with one or more Alignment Actions and the Operator is working in AR mode, the User will be prompted to scan an Alignment Tag when arriving to a Step with an associated Alignment Action. The app will render an arrow to point Operators in the direction of the next Step and Alignment Action.
If a Job Step has an ‘Alignment Action’ associated, the Operator will be prompted to ‘Scan Alignment Tag’ when they are using AR mode.
- Locate the Alignment Tag for the Step (it is a QR code with the word “align” printed underneath)
- Select Scan Alignment Tag from the window prompt to initiate the scanner
- Scan Alignment Tag
- Confirm the scan is precise (if necessary, select Re-align Tag to scan that Alignment Tag again)
- Continue the Job
Team Jobs
Team Jobs allow multiple Manifest Operators to plan and collaborate on the same Job by dividing up the Step assignments among two or more Operators for a single Job. The Operator who initiates the Team Job will act as the Team owner.
Once a Job is created and assigned, Steps can be self-assigned by Team Members, or the Team Owner can assign Steps to other Team Members. Only the Team Owner can assign Steps to other Team Members and Lock or Unlock the Job. The Start Job button will be disabled until Step Assignments are complete and the Team Owner has locked the Job.
Create a Team Job
Team Jobs can be created at the assignment stage of a Job by selecting multiple contacts in the Assign window, or an existing Job can be updated to a Team Job through the Team Setup tab.
From an unassigned Job
- In Job View, select the yellow Assign button in the upper left-hand portion of the screen. This will open a new window listing all users with Operator permissions who may be assigned a Job.
- Select the desired users to invite to join the Team Job by tapping on the circle to the left of the name
- Once all contacts have been selected, select Invite in the upper right-hand corner
- This will transition the Job to a Team Job, and send individual Job Invites to each contact via Manifest Connect Chat
- Note: The Operator who initiated the Team Job will be the ‘Team Owner’

From Job view
- Select the Team Setup tab in the Job Details section of the Job
- This tab will only be displayed to the Job owner once the Job is assigned. If the Job is not yet assigned, follow the above instructions to create a Team Job from the Assign window.
- Select + Add Team Members
- Select the desired users to invite to join the Team Job by tapping on the circle to the left of the name
- Once all contacts have been selected, select Invite in the upper right-hand corner
- This will transition the Job to a Team Job, and send individual Job Invites to each contact via Manifest Connect Chat
- *Note: The Operator who initiated the Team Job will be the ‘Team Owner’
Team Job Setup
Steps can be self-assigned by Team Members, or the Team Owner can assign Steps to other Team Members. Only the Team Owner can assign Steps to other Team Members and Lock or Unlock the Job. The Start Job button will be disabled until Step Assignments are complete and the Team Owner has locked the Job.
- Select the Team Setup tab in the Job Details section of the Job
- All invited contacts will be displayed along with their Invitation Status. Those who have accepted the Team Job Invite will be added to the Team, and any members who are still Pending or Declined the invite will be listed under the respective sections.
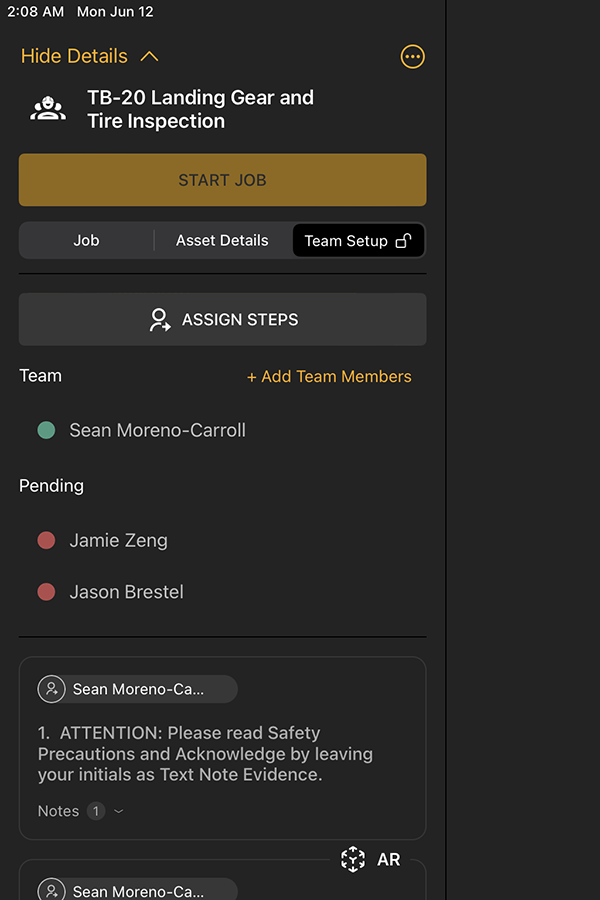
- Select Assign Steps
- The Assign Steps window is a simplified Job Checklist with an assigned user dropdown available for each Step
- Assign Steps
- As a Team Owner, select the assigned user dropdown to open a list of Team Members to choose from (only users who have accepted the Team Job invite will be available in the dropdown list)
- To assign multiple Steps to the same user, select the checkboxes for the relevant Steps and then select the contact from the assigned user dropdown. This will apply the assignment to all checked Job Steps at once.
-
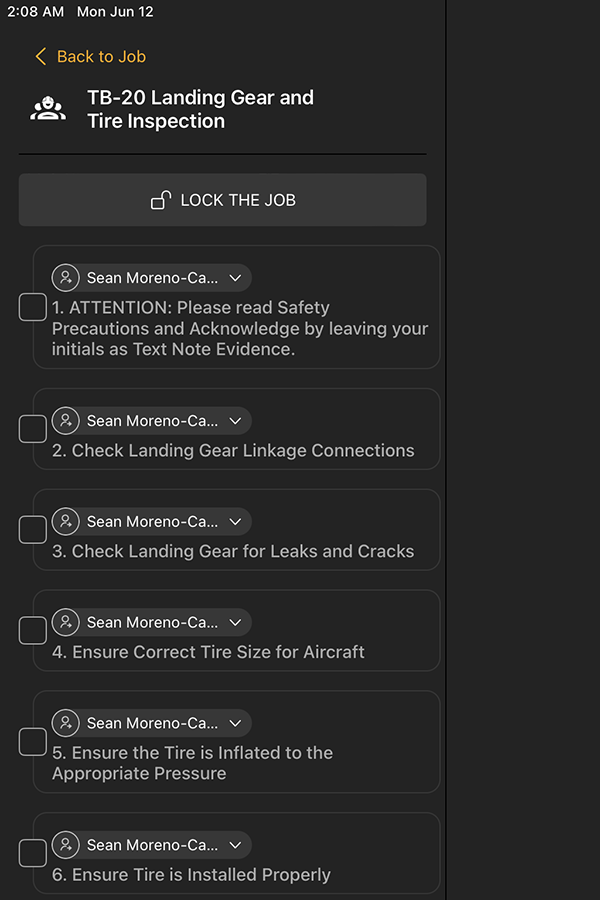
- As a Team Member, tap Assign to me on the relevant Job Steps
- Step assignments can be updated and reassigned until the Job is Locked
- As a Team Owner, select the assigned user dropdown to open a list of Team Members to choose from (only users who have accepted the Team Job invite will be available in the dropdown list)
- Select Lock the Job (available to Team Owner only) once satisfied that all Job Step assignments are complete
- A prompt will confirm ‘Are you sure you want to complete Team Setup?’, confirm Yes to continue
- Select Back to Job to return to the Job
Performing a Team Job
- A Team Job can only be started by Operators assigned to the first Step in a Job
- The Start Job button will remain disabled for users not assigned to the first Step in a Team Job, as all steps must be completed chronologically
- The Job actions will only be enabled for the Operator assigned to the current Step, e.g. If Step 1 is assigned to Betsy Smith, Betsy is the only user who will be able to Start/Resume the Job or mark that Step ‘done’
- Users will be notified via in-app notifications when it is their turn to perform a Job Step
- The Team Owner can Unlock the Team Job at any time, but this will automatically pause the Job and any Work currently in progress
- When a Job is Unlocked, Steps may be reassigned and updated until the Job is Locked again
- A Group Chat in Manifest Connect will be automatically generated and associated with the Job Title / ID for Team Members to communicate and collaborate throughout the procedure
- Once the last Job Step has been completed, the Job checklist will update to display the final logged Job time and completion date, the Group Chat will be archived, and that/those final Team Member(s) will receive the “Congratulations!” prompt
Offline Work
If a Job must be performed in an area with limited to no network connectivity the Job make be downloaded to an Offline Work Package to take offline. Once connectivity is available again, the updates will sync back to the server to update any completed Work recorded for that Job.
Taking Jobs offline
Jobs can be saved to an Offline Work Package from the Work Board (only while online and with network connectivity).
- *Note: Team Jobs cannot be taken offline
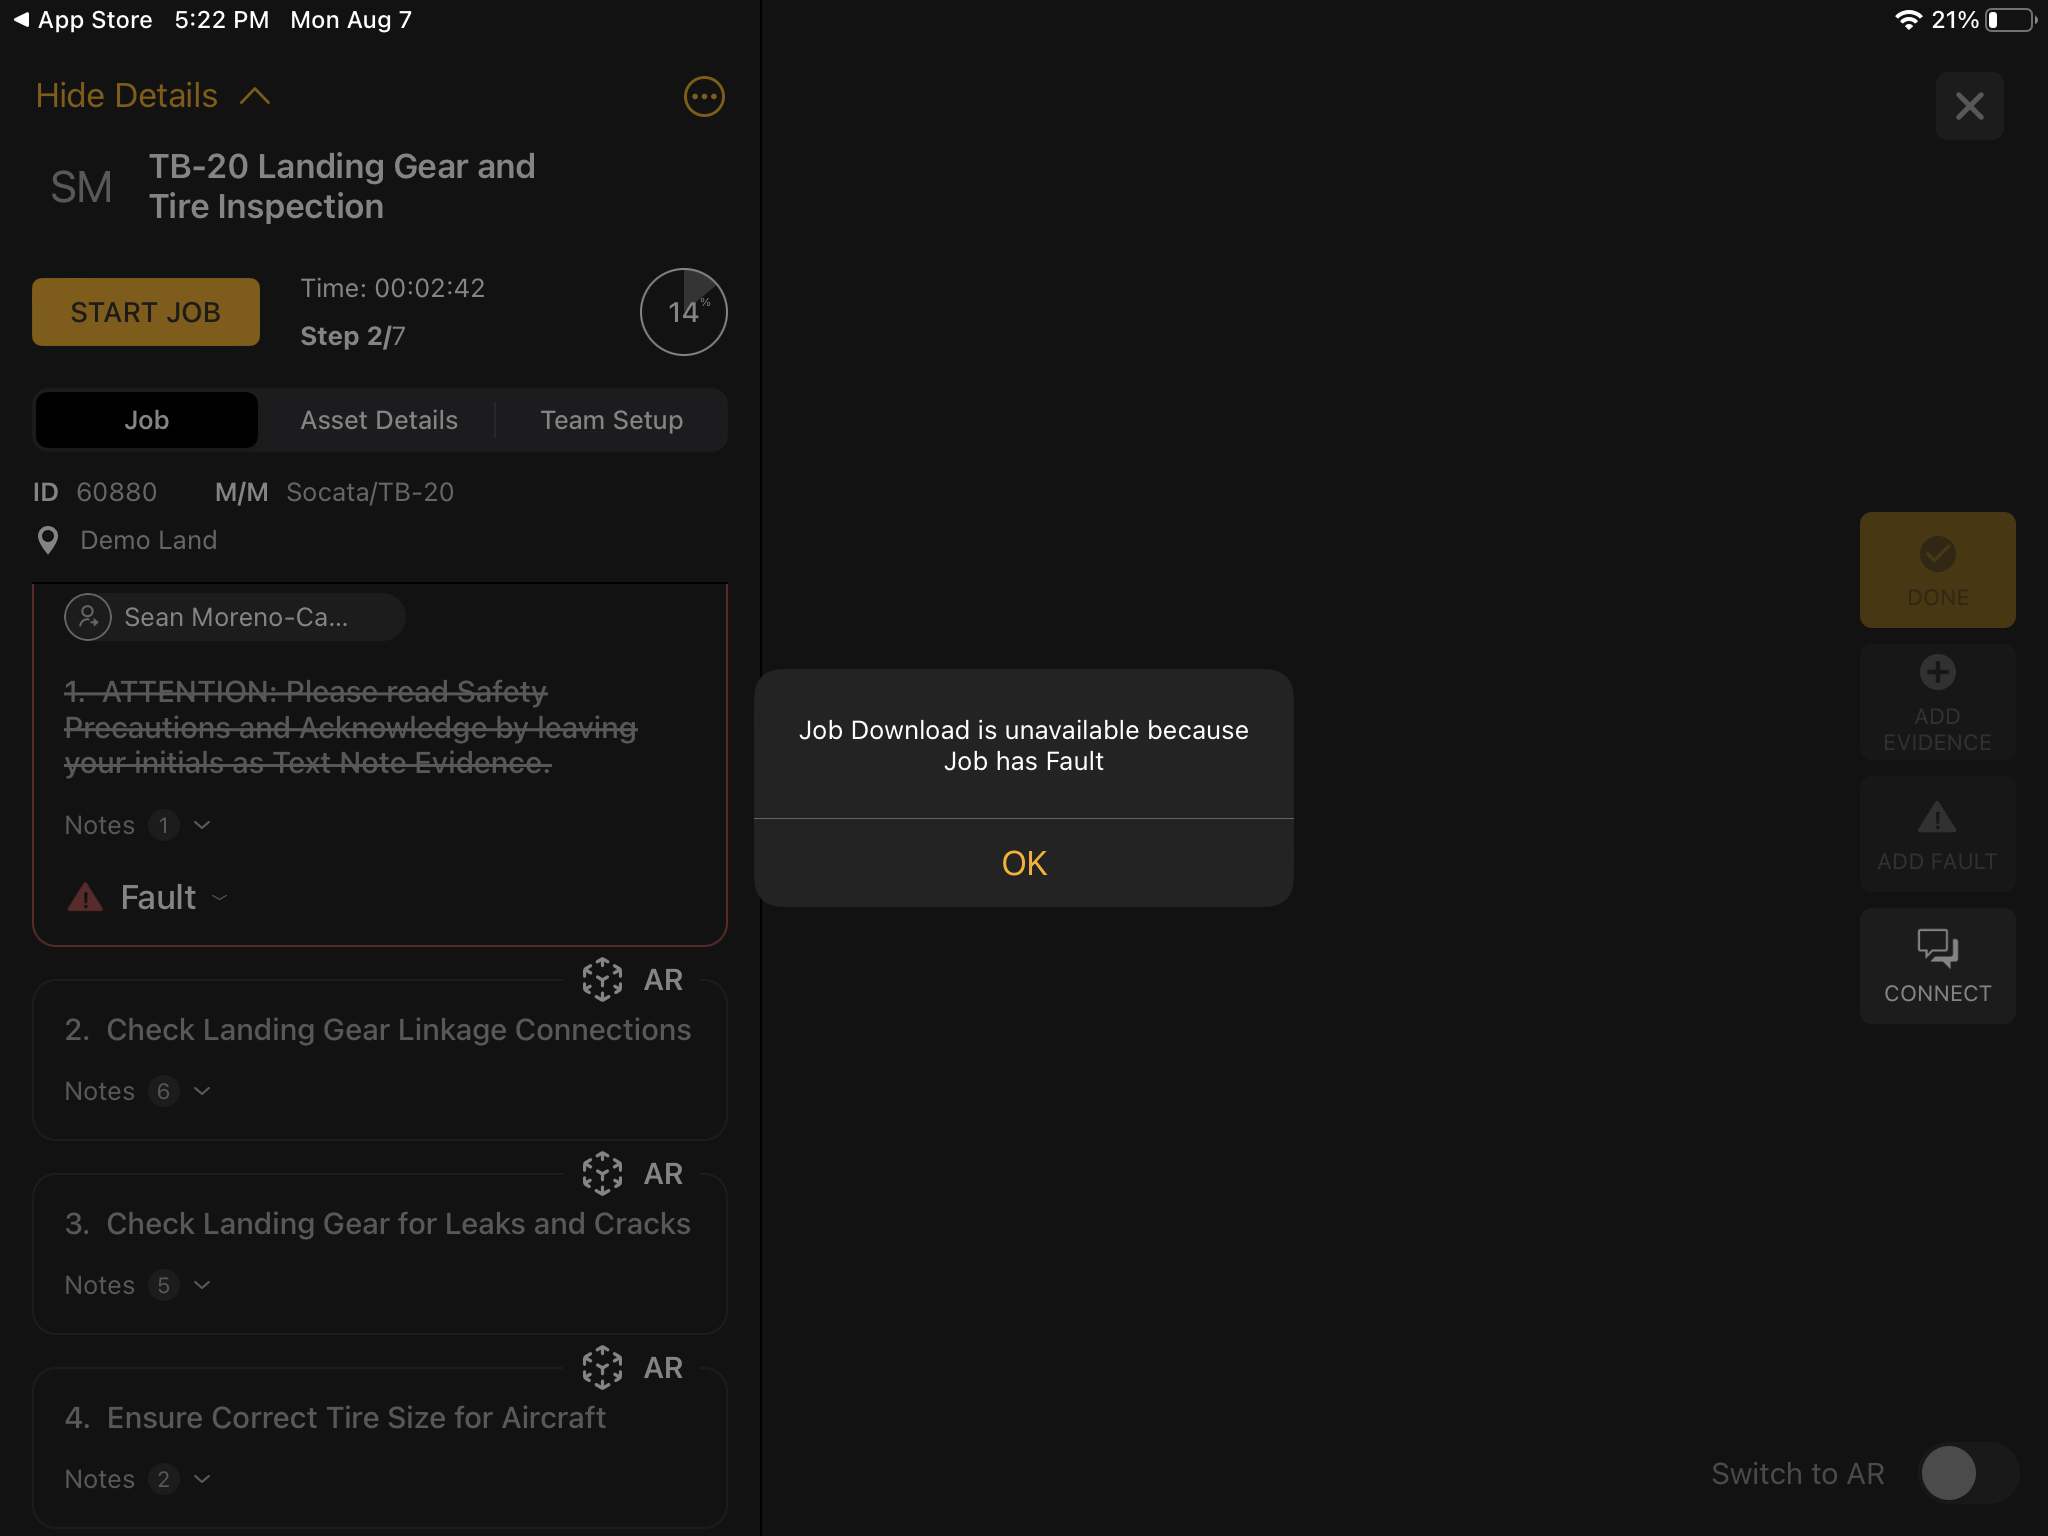
- *Note: Jobs must be clear of Faults to be taken offline
From Work Board
Jobs can only be saved to an Offline Work Package while the iPad still has network connectivity.
- To begin, the user should navigate to the Work Board and select a Job already assigned to them or otherwise create and subsequently self-assign a new one
- The Work Board will auto-filter to My Work when the user opens the Work Board
- In Job View, select the yellow Options icon in the top-right of the Step Frame, above the Job title
- Select Save Job to Offline
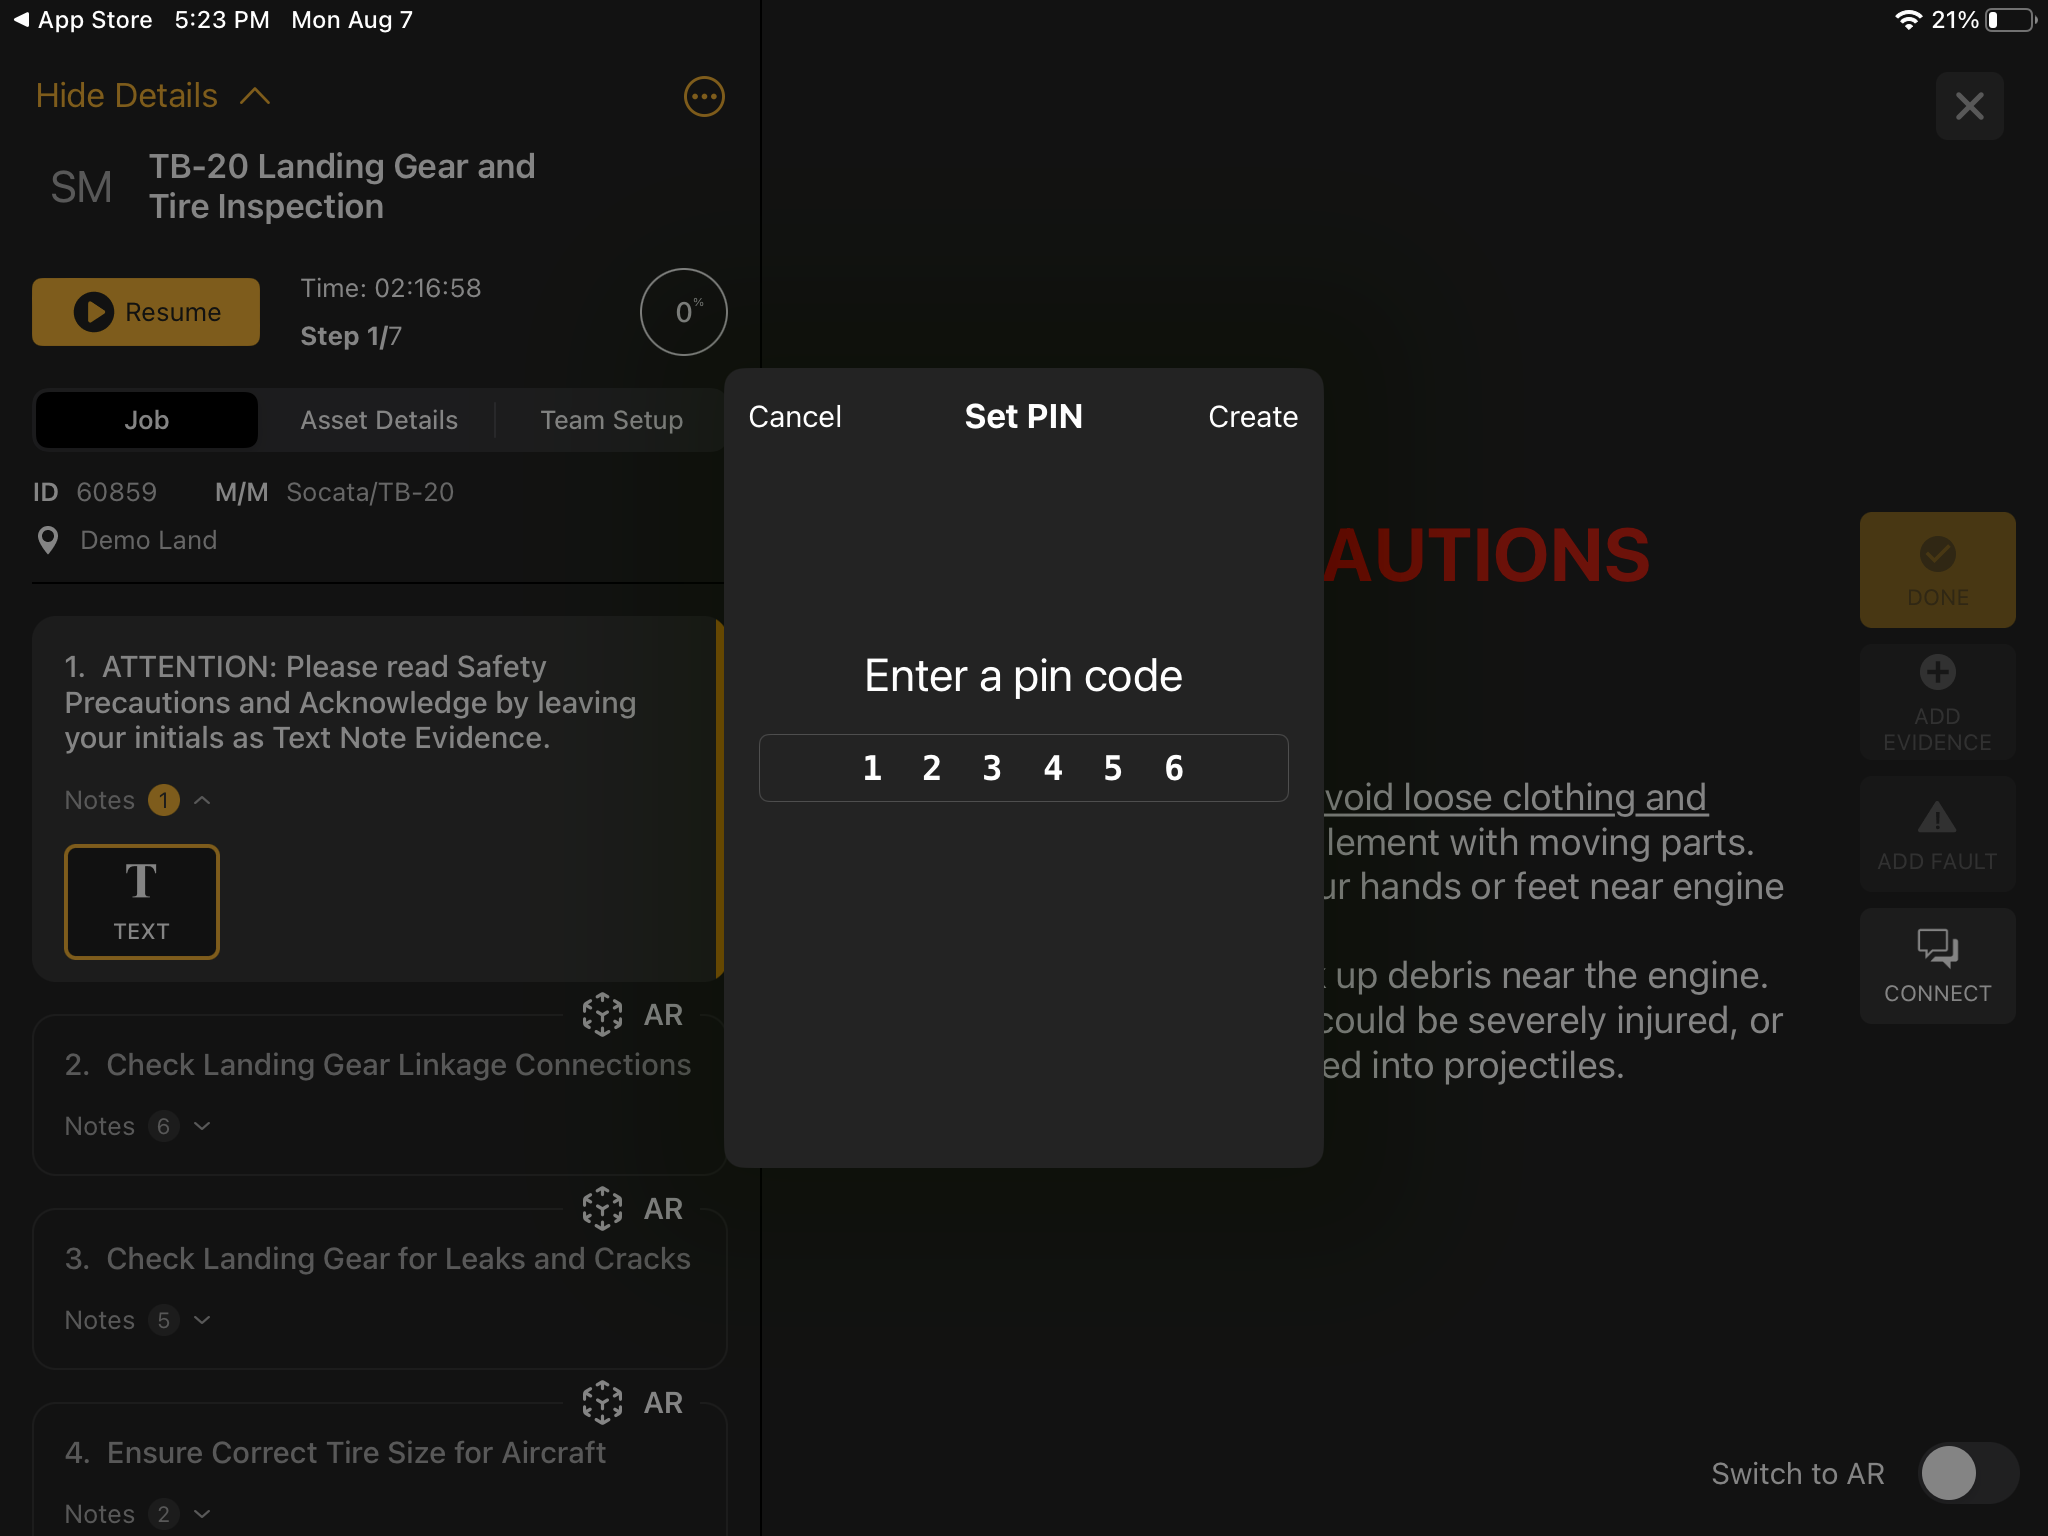
- If this is the first occasion the user has had to taking Work offline or otherwise complete this process, they will be prompted to create a 6-digit security PIN that be required to access any jobs offline
- Once saved, the user should navigate back to the Work Board, and select Work Package in the far, top-right of the screen, which will open the Saved Jobs pop-up
- From the Saved Jobs pop-up, the user should first check that their desired Job(s) are, in fact, saved and ready to be accessed offline, then, once confirmed, select the yellow GO OFFLINE button in the bottom of the Saved Jobs pop-up
- The system is now offline, and the user’s saved Jobs should now be accessible regardless of connection
Working Offline
- Assuming the Offline Work Package and the associated Job(s) are successfully saved, Operators may abandon connectivity by whatever means required
- Either via the previously mentioned GO OFFLINE button in the Saved Jobs pop-up, or by selecting Work Offline from the login screen and subsequently entering their email and 6-digit security PIN, the user may now access their desired Job(s) at their leisure
- Continuing as normal via Asset Management, the user may either search for the desired Asset or scan the Asset Tag for the desired Asset, or otherwise navigate directly to the required, previously saved Job in the Work Board, and, regardless of path, then begin it from Job View by selecting Start Job
- Select Start or Resume, add Evidence or Faults, and complete steps and the Job as normal
- Once connectivity is restored and the user has logged back into the system, all data generated while offline will be synchronized to the server, and the Job will be removed from the Offline Work Package to free up memory
- To resume an In Progress Job offline again later, the Operator must resync the Job to their Offline Work Package
- *Note: If the connection is not strong enough to successfully synchronize the offline data, Manifest will reattempt to synchronize after future logins
