About
To use the Manifest 3D application, it’s helpful to understand the basic navigation, input, and user interface (UI) tools. Familiarizing yourself with these fundamentals will help you operate Manifest with ease and help you to complete tutorials as you learn about more advanced features.
Device Navigation
Before you get started, you’ll want to acquaint yourself with the available navigation and input tools for your device and how they are used to interact with the Manifest 3D application.
HoloLens interactions
To navigate Manifest on the HoloLens 2, you will need to know these basic interactions:
- Hand ray: to use a hand ray, hold your hand in front of you, with your palm facing away. A laser pointer (hand ray) appears. You can use this to target an item to select.
- Air Tap: hold your hand straight out in front of you in a loose fist, point your index finger straight up toward the ceiling, tap your finger down, and then quickly raise it back up again.
- Air Tap to select: point your hand ray at the object to target it and then air tap to select.
- Air tap and hold: start by air tapping but keep your finger down instead of raising it back up.
- Gaze: gaze is a way of interacting with the UI by looking at an item. When you gaze, turn your whole head, not just your eyes.
- Gaze to select: you’ll see that gazing at an icon will typically display the tool tip to indicate what action it will trigger when selected. Enabling ‘gaze to select’ (see Manifest Settings), will allow you to select something ‘hands-free’ simply by gazing at an item and waiting for it to trigger the action.
- After dwelling your gaze on an item for 2 seconds, you’ll see a loading animation indicating that your gaze has activated the button. This takes approximately 3 seconds before a selection is complete.
- To stop the selection, move your gaze before the selection animation loading completes.
To enable ‘Gaze to select’, go to Manifest Settings. Under the Controls tab, select the “Gaze to select’ toggle. This setting will be saved in your local device user preferences.
To learn more about HoloLens gestures, please visit https://docs.microsoft.com/en-us/hololens/hololens2-basic-usage
Magic Leap interactions
With Magic Leap input is facilitated through the use of a single-handed controller. Rather than using gestures, users will use the hand control to navigate, select, and work within the application. To learn more about how to use the Magic Leap 1 Control, visit their guide on this tool here: https://developer.magicleap.com/en-us/learn/guides/design-magic-leap-one-control[MM3]
Application Navigation
Below is an overview of basic Manifest 3D application navigation tools.
The Dock
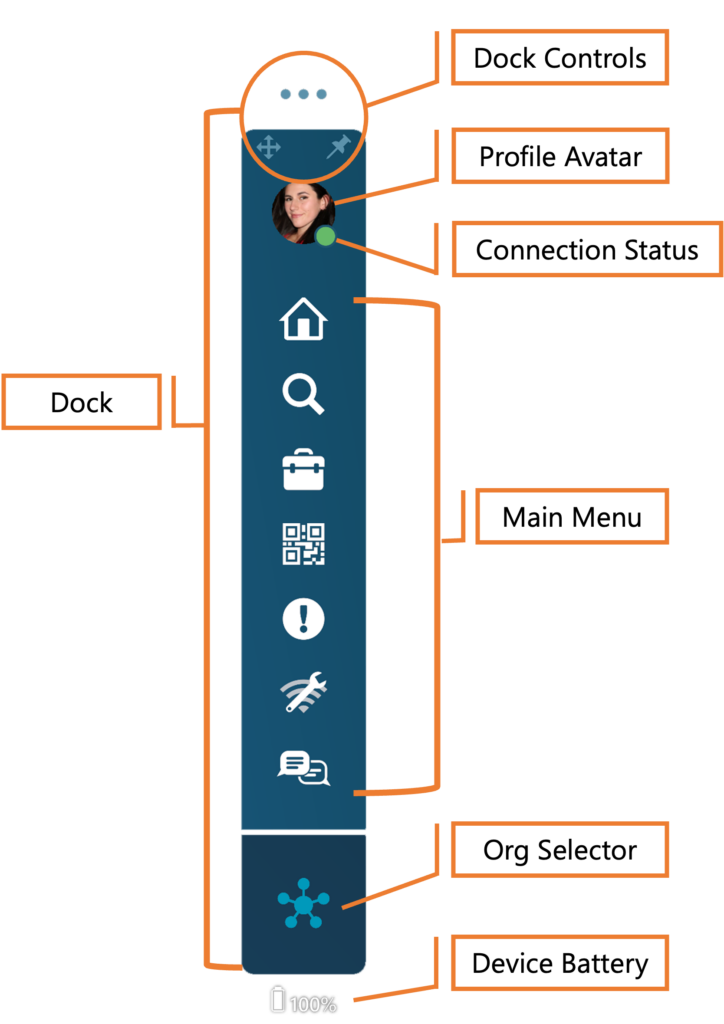
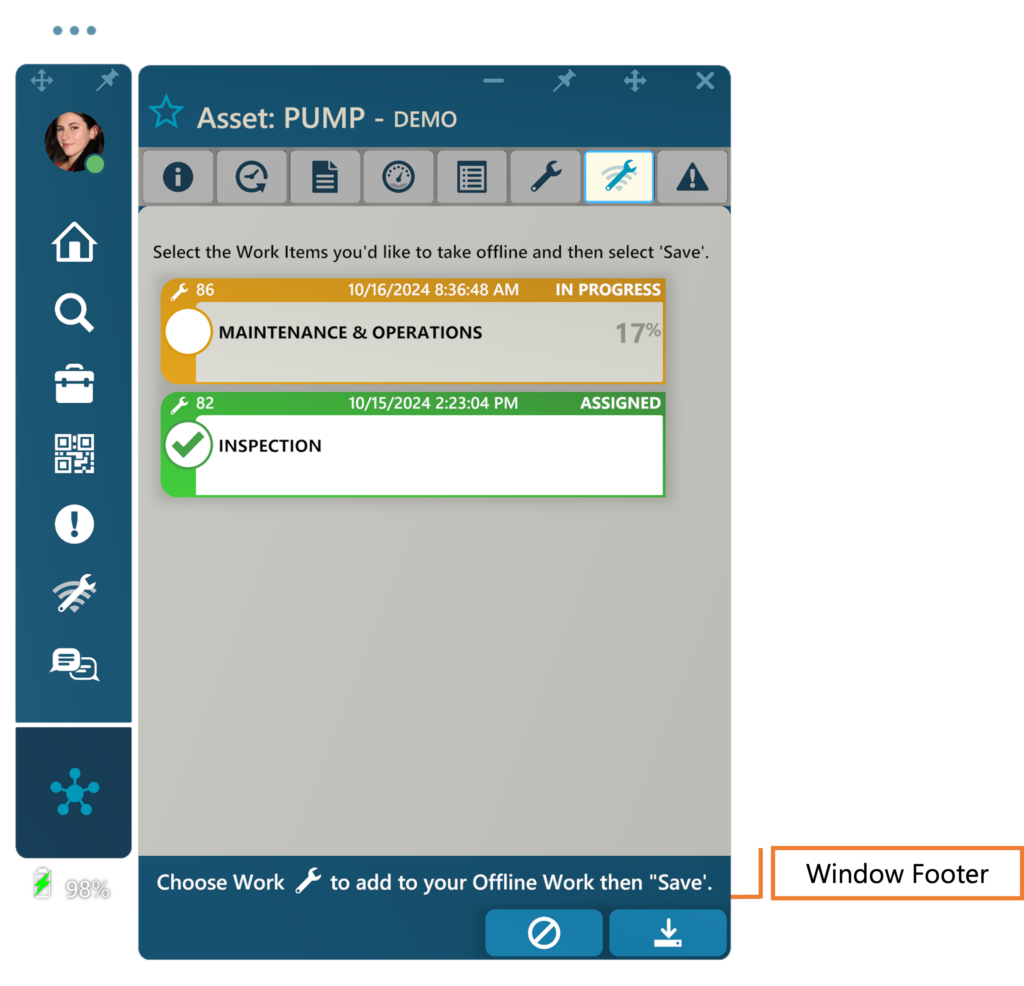
The Dock contains the main navigation menu and serves as the central area for all the Manifest application windows. By default, all windows open at the Dock. Users may undock, move, and pin windows as needed and then redock again at any time. Alternatively, users may also move the dock (along with any docked windows), pin it in a set location, and then minimize windows as desired, or minimize the entire dock to remove it from their field of view. Here are some additional tips and notes about working with the dock:
- Gazing over any menu icon will display the menu label.
- Selecting any menu icon or using ‘gaze to select’ will open that window.
- All windows open at the Dock. Any window can be undocked and then redocked.
- Selecting the Options icon (three dots) directly above the Dock will open additional Dock Control options.
- Your Profile Avatar or initials will show at the top of the Dock. The green dot on your Profile Avatar indicates you have a persistent connection to the server and will be able to receive messages and make calls; a Red dot indicates that you are not connected to the server. If this stays red and you have an internet connection, you may need to contact your system administrator about your network permissions or may need to force close the app and re-open to attempt to reset the connection.
- Selecting the Org icon will open the Org Selector (only available if you are on a domain with Orgs configured)
Working with Manifest Windows
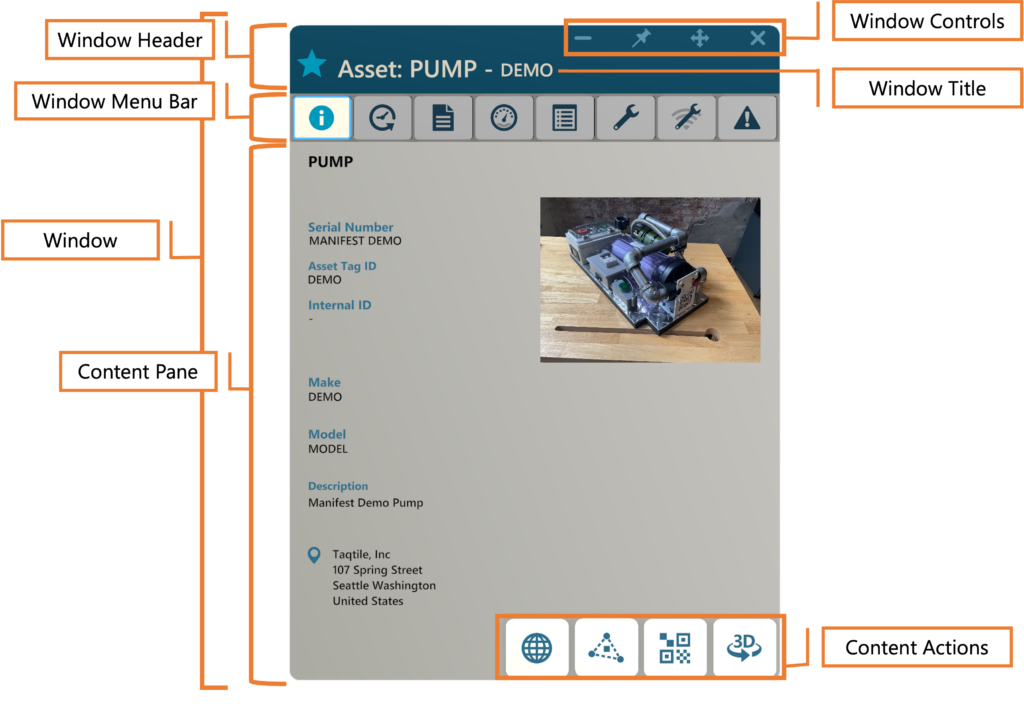
The Manifest 3D application displays all content and tools using ‘windows’. Windows will always first open from the Dock, consolidating the UI into a central location. But then the user has a great amount of flexibility to set-up the UI in a way that works best for them or their environment.
Setting up your Windows
By default, the Dock or any undocked window will ‘tag-along’ with you, following your gaze unless ‘pinned’. Pinning the Dock or any window will stick it to that location in your environment until unpinned. Windows can also be minimized and undocked, giving the user tremendous freedom on how the content and tools are positioned in their field of view for the most optimal work experience.
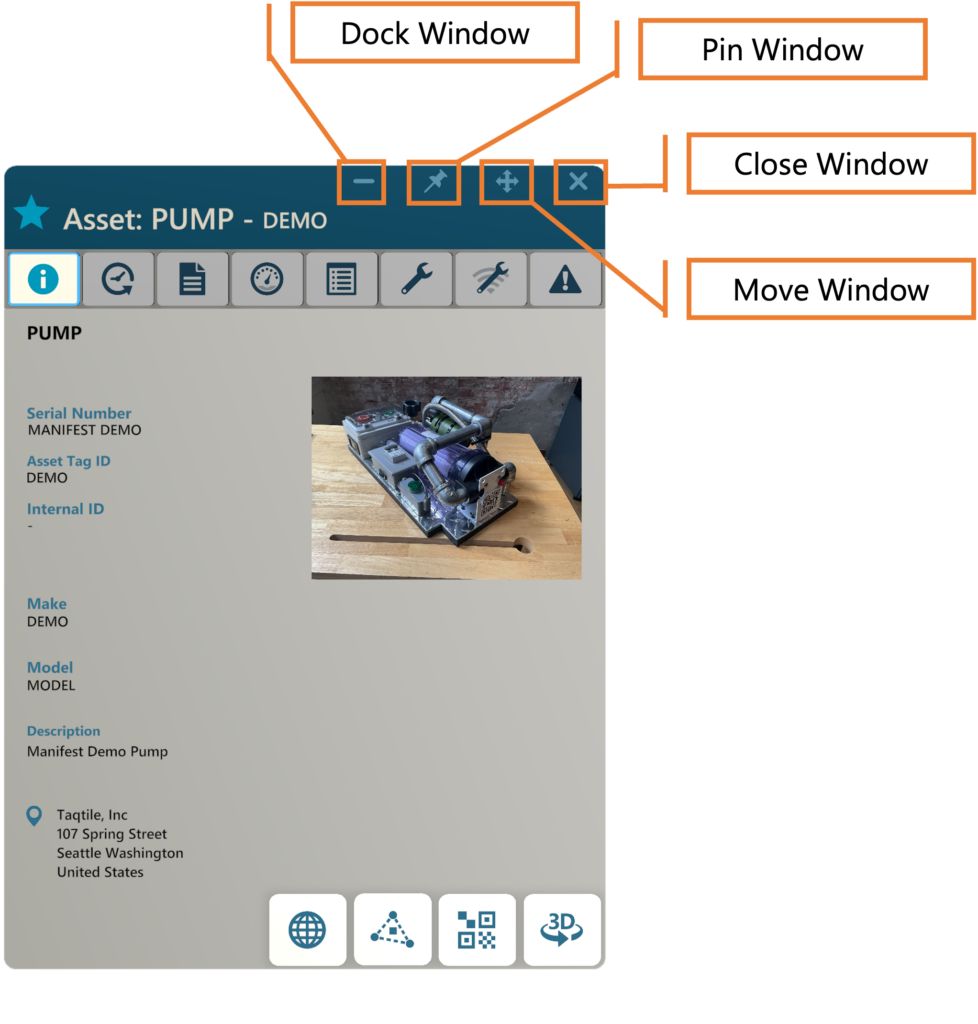
Window Controls
- Minimize: collapse the window. A vertical pane with the title remains present and can be selected again to maximize.
- Pin: use “pin” to lock the location of a window. When pinned, it will no longer tag-along with you and follow your gaze.
- Move: moves the window if the user selects, holds, and drags to the desired location. If the window was at the dock, this action will undock it.
- Close: closes the window
- Dock: redocks the window at the Dock
Icon Glossary
Below are the key icons you’ll encounter throughout the Manifest 3D application and what they do.
| Minimize | Collapse the window or element. Tap again to maximize. | |
| Pin | Use the ‘pin’ to lock an element in place. When pinned, it will no longer tag-along with you and follow your gaze | |
| Adjust/Move | Adjust the position of a window or element. | |
| Close | Closes window or element. | |
| Dock | Redocks the window to the Dock or the step marker. | |
| Resize | Resize window or element. |
