Creating and Managing Templates
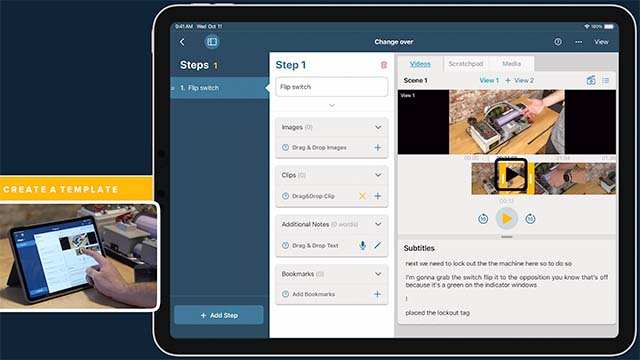
Authoring templates in the Manifest 3D application allows users to work hands-free while creating step-by-step instructions. If you plan to spatially anchor 3D content (step markers, leader lines, pen notes, or meters) – these must be authored using the 3D application.
IMPORTANT! Before authoring any 3D content, be sure you have established a fixed position for the Asset Tag. The Asset Tag also serves as the primary point of reference for all spatially anchored content. For this reason – it’s critical that the placement of the QR code on an asset is consistent for all assets of that same class.
Create a new template
- ‘Search’ for your asset or ‘Scan’ the Asset Tag
- From the Asset Window Menu Bar, select “Templates”
- The window will display a list of all existing templates for this asset
- In the lower left-hand corner, select the green circle with a ‘+’ icon
- This will generate a new template window and prompt you to first give your template a title
- Tap the title input text box to bring up the keyboard and enter a template title
- Once your template is created, you will be able to start adding steps
Edit a template
- ‘Search’ for your asset or ‘Scan’ the Asset Tag
- From the Asset Window Menu Bar, select “Templates”
- The window will display a list of all existing templates for this asset
- Select the template you wish to edit; the template will load in a new window
- In the upper right-hand corner, underneath the menu bar, select the pencil icon to go into edit mode. The below edit options are available:
- Edit template title: select the pencil icon next to the title
- Re-order steps: select the up or down arrows to change the step order
- Edit a step: select the pencil icon for that step. You will be dropped into the 3D marker authoring wizard for that step
- Delete a step: select the trash can icon to delete any step
- Add a new step: select the green plus icon in the lower-left corner
- Delete template: select the trash can icon in the lower right-hand corner of the authoring template to delete the template
Add a template step
- ‘Search’ for your asset or ‘Scan’ the Asset Tag
- From the Asset Window Menu Bar, select “Templates”
- Create a new / or select an existing template
- From the template window, select the green circle with a ‘+’ icon the lower left-hand corner
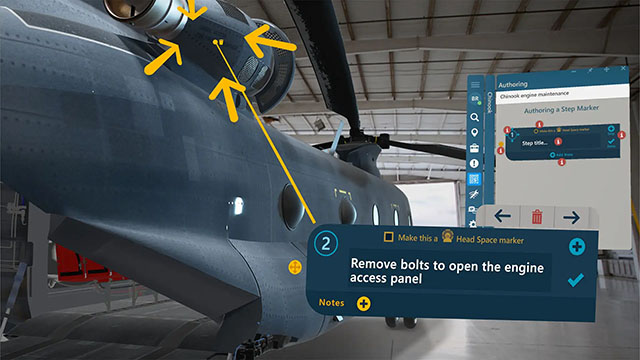
- The application will generate a new 3D step marker placed directly in front of you
- The template window will load step authoring instructions with tool tips for each area of the step marker (indicated by a red circle with an ‘i’). To review the tool tip, tap on the red info icons and instructions will display below the step marker image in the window
- See “Authoring a step” for more details on each option
- When you have completed the step authoring, you may either select “Done” to return to the template window, or ‘+’ Step to add the next step
- The step note content will save as you author. To cancel your work, select the trash can icon to delete the step
Authoring a step
When authoring a step, the Step title is the primary text that displays on the step. There is no character limit as the step marker height will expand to fit the full step title, but it is recommended to keep this instruction concise and easy for an Operator to follow. Manifest provides an array of tools to provide Operators additional guidance.
Below are the step authoring options:
- Edit / enter step title: selecting the center of the step will bring up the keyboard and allow you to enter a step title or edit the existing one
- Make step a ‘Head Space’ marker: to make the step marker a Head Space marker, select the checkbox at the top. This will make it so the step marker has no fixed spatial position and will tag-along with the operator during a job unless pinned. By default, any steps authored in the Manifest Web Application are head space markers until / unless they are spatially positioned using the 3D app
- Position step: aim at the step number (you will see an adjust icon), select + hold + drag to move the step marker to your desired position. When positioning a spatially anchored step marker, the application will drop the mesh to read nearby surfaces and render cross-hairs indicating where these each hit a surface. This is intended to give authors a better gauge of depth and position when placing a step marker, especially at a distance. Note that the orange circles will indicate where a surface is like a wall, ceiling, or floor
- Add Leader Lines: (Not available for Head Space markers) Select the yellow dot on the left side of the marker + hold + drag leader line from the step marker to the desired point
- Add Step Notes: To add a step note, select “Add Note” and select note type
- Add a new step: select the blue plus icon to add your next step
- Delete step: select the trash can icon on the top of the step to delete a step
- Back and Forth: to navigate to the step before or after, use the forward and backward arrows on the top of the step
Creating and Managing Step Notes
Adding a Step Note
- From the step marker, select “+ Add Note”
- The list of note types that can be added from the Manifest 3D application will display
- If notes are associated with the step, you will see a yellow number next to the note type, indicating how many notes of that type have been created for that step
- Select the desired note type
- Follow the displayed instructions for each note type. Detailed instructions are also included below.
Managing a Step Note
To edit or delete a Step Note
- From the step marker, select “+Add Note”
- Find the note type you wish to edit (you should see a yellow number next to the note type indicating how many notes of that type have been created for that step)
- Select the desired note type
- The previously authored notes should display in a list view. In the upper righthand corner of gray bar, select the 3 dots for “options”
- A window will slide out to the right presenting the options for that note. Options may include any of the following:
- Auto-play: turning this toggle on will make the note auto-play for an operator so they do not need to manually select the note to open it during a job.
- Edit: if the note can be edited, a pen icon will display. Selecting edit will re-open the note in author mode to be updated.
- Delete: if a note can be deleted, a trash can icon will display. Selecting this will delete the note from the step permanently.
Authoring Step Notes
Below are some additional instructions for authoring each type of step note.
Text
- Select the yellow bar “+ Add a text note”
- They keyboard will immediately open, prompting you to enter your text note
- Input the text for your note via the keyboard or using voice-to-text, then select the enter key
- Selecting the enter key from the keyboard will automatically add and save the note
- To add another note, repeat.
- Once done, select the “Add Note” button to return to the note list and again to close the dropdown
Audio
- Select the red “Record” button to begin recording. (If you are using a HoloLens, you also have the option to use the voice command “record audio”)
- Once the bar updates to display “Recording…” begin speaking to record your audio note
- When complete, select “Stop”
- To add another note, repeat
- Once done, select the “Add Note” button to return to the note list and again to close the dropdown
Video
- First, determine if you’d like the video to include the Manifest UI holograms displayed in your field of view. If yes, check the box “record holograms”
- Select the red “Record” button to begin recording. (If you are using a HoloLens, you also have the option to use the voice command “record video”)
- You will have a 5 second delay until the video records. This allows you to aim your head and device towards the area you wish to record. A transparent red box will display as a point of reference for what area is being captured in the video. IMPORTANT! The device camera follows your head and not your eyes! Remember to move your entire head and aim at the area you are filming.
- Once the yellow bar updates to display “Recording…” the video is recording. There is a maximum video time limit of 2 minutes and the yellow bar will display a countdown as you record
- When complete, select “Stop”
- The yellow bar will show you the status of uploading the video to the server with a % uploaded indicator as it saves
Pro Tip! If you gaze away from the step marker, the yellow bar with the record button will follow you (along the same plane as the step marker). You can move this yellow bar to a desired position using air tap+hold+drag and then pin it in location by selecting the pin icon. This allows users to position in an optimal location for accessing the record/stop buttons, regardless of where the step marker is.
Photo
- First, determine if you’d like the image to include the Manifest UI holograms displayed in your field of view. If yes, check the box “record holograms”
- Select the red “Capture” button to take a photo. (If you are using a HoloLens, you also have the option to use the voice command “take photo”)
- The device will immediately take a photo capturing whatever is in your field of view. IMPORTANT! The device camera follows your head and not your eyes! Remember to move your entire head and aim at the area you are filming.
- Once complete, the image note will automatically save to the step
Pro Tip! If you gaze away from the step marker, the yellow bar with the capture button will follow you (along the same plane as the step marker). You can move this yellow bar to a desired position using air tap+hold+drag and then pin it in location by selecting the pin icon. This allows users to position in an optimal location for accessing the capture buttons, regardless of where the step marker is.
Bookmark
- First, be sure the document you wish to bookmark is already uploaded for the asset class you are authoring a template on
- From the “Add bookmarks” yellow bar, select the green ‘Add’ button with the bookmark icon
- A window will open to the right of the step marker with a list of available documents (if there is more than one document); otherwise the document will open.
- Select the appropriate document
- From the document window, use the page input box to jump to a specific page or use the arrows to scroll forward and back through the pages of the document.
- Once you are on the desired page, select the bookmark icon in the lower left-hand corner
- The bookmark will automatically add and save to the step marker
Pen
Select the desired pen note type (draw, square, circle, or arrow)
Pen
When the pen tool is selected, the cursor will change into a pen and the application will scan your space and drop the mesh to find surfaces allowing you to draw 3D ink on any surface
- Select from the color palette to change the color
- Using your hand (HL) or controller (ML), aim towards the surface you’d like to draw on
- To draw using the HoloLens, use the air tap+hold+drag gesture; using the Magic Leap controller pull the trigger and hold, then release to stop
- Use ‘Undo’ to erase the previously drawn ink (select repeatedly to erase multiple inked lines)
- Once complete, select ‘Save’
Shape
- Select the shape you would like to use; it will immediately render in front of the step marker
- Select from the color palette to change the color
- To move, select the move icon and drag to the desired location
- To adjust the size, select the square corner handles and pull in or out to increase or decrease the size
- To rotate the shape in any direction, select and drag the circle handles on the respective side to rotate the shape
- Once complete, select ‘Save’
- There is no limit to the number of pen notes you can add to a step. Once you have saved all your notes, select ‘Cancel’ to close the Pen Note panel
Action
Choose the Action Note Type: 3D Model, Meter, Alignment Action
3D Model Action
- A Model Action note setup panel will display prompting you to select the Model, View, and Animation (if available); or to Hide Model
- Select the desired Model to show at this step or Hide Model
- Select ‘OK’ to save
- There is a limit of one (1) 3D model action note per step
Meter Action
- A Model Acton Note setup panel will display prompting you to select the Meter to display at this step. (A message will display if no Meters are associated to the Asset Class. Cancel to exit.)
- Select the desired Meter
- Select ‘OK’ to save
- To add another Meter Action note, repeat.
Alignment Action
- Before adding an Alignment Action be sure you have familiarized yourself with how Alignment tags work, where to print an alignment tag, and have already placed the Alignment Tag in the position it should be placed for all assets of this type
- When you select the action note “Alignment”, you will be immediately prompted to scan the Alignment Tag for this asset
- Scan the Alignment Tag
- A white Holographic Tag image will be rendered where the device has read the Alignment Tag position
- Confirm the Scan is precise (you may need to rescan or want to use the Snap Tag Angle to user to confirm the optimal scan)
- When you are satisfied with the placement of the Holographic Tag for the Alignment Tag, select “Done to save placement
- If you return to the location of the Asset Tag to author steps, you will need to add a new Alignment Action to realign to the Asset Tag
- If you resume authoring a template where the last step was aligned to an Alignment Tag, you will be prompted to either Scan the Alignment tag – OR – Align to Asset Tag.
Template
- After selecting “Template” a panel will open prompting you to select an Asset and Template to embed to this step
- The Asset Class will automatically default to the current asset you are authoring for. To link to a different asset class, select the arrow which will load all available asset classes for your domain. Select the Asset to continue
- Select the desired Template. (You cannot link to the parent template so this option will be excluded)
- Select ‘Ok’ to save
*Only (1) one template note or choice note may be authored for a step.
Choice
- After selecting “Choice Note” a panel will open prompting you to configure the Choice Note=
- Add an Option Description by tapping the option description box
- Select + Option to add more options (it will default to the minimum 2). The maximum number of options is 5
- Select the Settings icon to program what each option will do
- From the Options Settings, either determine that this option will “Proceed to the NEXT step” or select an asset and template the Operator should be directed to do
- To delete an option, select the trash can icon next to the option
- By default, all options will be labeled as A, B, C…etc.
Once complete, select OK. The OK button will not be enabled to save a Choice Note until there are at least 2 options with both option descriptions and settings configured


