A Manifest ‘domain’ represents your unique deployment of the Manifest application which can be configured by you and will hold your organizations’ data.
Domain Provisioning
When a Manifest license or package is purchased, the Manifest Support team will provision you with a unique domain for your instance of Manifest. This domain name will be used for accessing the Manifest application and your data, regardless of which platform you are using.
If you have a preferred domain name, please specify this request to your Account Manager. You will also be asked to designate a user to serve as the Security Administrator and an Administrator.
When a Manifest domain is first deployed, a system generated email will be sent to the designated Security Administrator and Administrator. The Administrator is the owner of the Manifest domain and is responsible for accepting the Master Services Agreement when setting up your user profile. Once the Security Administrator has completed the initial user set-up, they will be able to add additional users and assign roles / permissions accordingly. The Security Administrator can also elect to grant additional users with the Security Administrator role as well.
User Actions
Add a User
- In the Manifest Web application, go to the menu option ‘Users’
- Select “+ User”
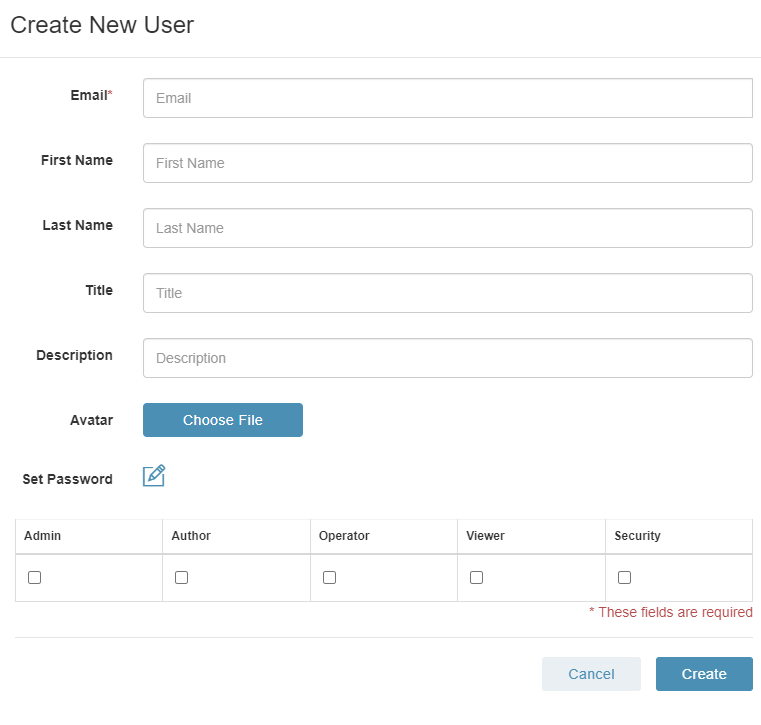
- A window will open and prompt you for the user details:
((those with an asterisk are required) - Email *: email address for the user
- First Name: if this is left blank, the user will be prompted to fill this in when setting up their user profile
- Last Name: if this is left blank, the user will be prompted to fill this in when setting up their user profile
- Title: if this is left blank, the user will be prompted to fill this in when setting up their user profile
- Description: optional user description for internal reference
- Avatar: if this is left blank, the user will be given the option to upload an avatar or profile image when setting up their user profile
- Set Password: this option can be used if the Security Admin needs to force set the password. The user will otherwise be prompted with a link to choose a password when setting up their user profile.
- Roles: check any roles that apply. Refer to the Roles and Permissions grid for guidance.
- Once complete, select ‘Create’
- Your newly created user should now appear in the list of Users and a system-generated email will be sent inviting the new user to set their password and complete their profile set-up.

Edit or Delete a User
- In the Manifest Web application, go to the menu option ‘Users’
- Search for the User you would like to edit or delete
- To the right of the users’ name, those with the necessary permission will see an edit icon or delete icon
- Select ‘edit” to open the ‘Update User’ window with options for updating the details for that user. Or Select ‘delete’ to remove the user.

Additional User Actions
The Manifest Web Application provides several additional tools for managing users via ‘Actions’. To access the ‘Actions’ options:
- In the Manifest Web application, go to the menu option ‘Users’
- Search for the desired User
- To the right of the users’ name, those with the necessary permission will see an ‘Actions’ button (three dots on the far right of any existing template)
- Select “Actions” and choose from the below:
- Reset Password: Selecting this option will send a system-generated email inviting the user to reset their password
- Deactivating User: Selecting this option will deactivate the user so they can no longer access the domain and it will free up any of the user licenses that user held. It will not permanently remove the user and they can be reactivated at any time so long as there are licenses available.
- Enable Two-Factor Authentication: Selecting this option will turn on two-factor authentication for the user. On the users’ next login, they will be prompted to set-up 2FA and the use this to sign-in going forward. (Note: Two-Factor Authentication must first be enabled for the domain under Settings)
- Diagnostics: Selecting this option will enable diagnostics to be collected using the Manifest 3D Application on the HoloLens 2 Device. For more information on Diagnostics please see this article. [LINK TO ARTICLE]
License Management
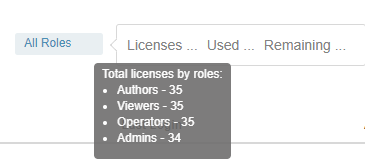
To track your available and used licenses, you may refer to the License Tracker in the upper-right corner of the User page. Hover over the label to view how many total licenses your domain has been assigned, and how many are used vs. remaining. Note that licenses are tracked by ‘role’ so one user may be assigned to more than one license if they need multiple permission types. It is important to review the Roles and Permissions grid to ensure you are assigning the appropriate permissions to each user. Additionally, please note that all roles automatically include “Viewer” privileges so there is no need to assign this in addition to another role; only use this role for “View Only” users.


