Prerequisites
- To add or edit Asset Classes, a user must be assigned an Administrator or Author role
- To delete Asset Classes a user must be assigned an Administrator role
- To restore Asset Classes a user must be assigned an Administrator or Author role
- To upload 3D models a user must be assigned an Administrator or Author role
- All roles can view Asset Classes, files (documents, etc) and 3D models
Add an asset class
- In the Manifest Web application, go to the menu option ‘Asset Classes’
- Select “+ Asset Class”
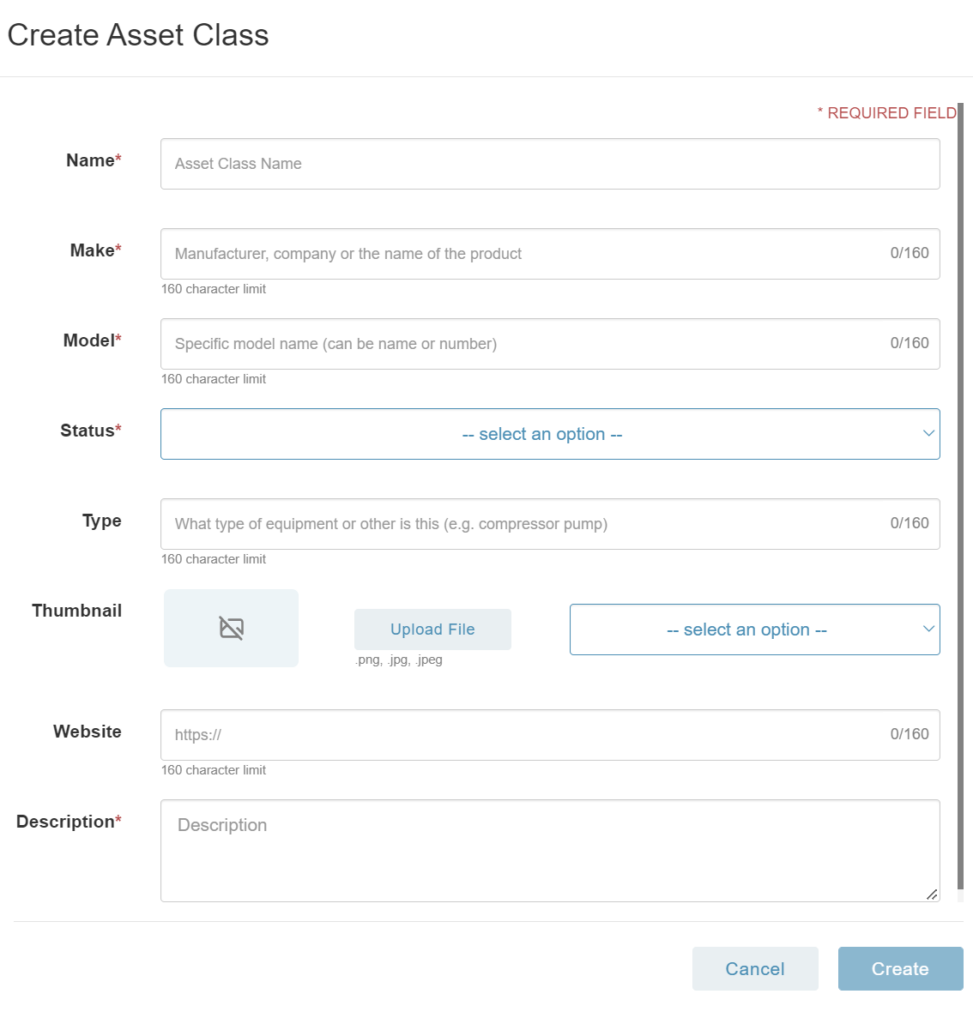
- A window will open and prompt for the details required to create a new Asset Class. Fields include the following (those with an asterisk are required):
- Name*: used as the listing and searchable name for your asset class
- Make*: typically, the company or manufacturer
- Model*: typically, the product name/number or product line
- Status*: active or inactive
- Type: describes the type of equipment
- Thumbnail: serves as a visual aid for users when working with new Assets. If a thumbnail is not uploaded, a placeholder image will display.
- Website: links to a web page for any related information
- Description*: description is displayed to users to provide additional details about this Asset Class type
- Once complete, select ‘Create’
- The newly created Asset Class will now appear in the list of Asset Classes
- By selecting the name, the Asset Class can be expanded to display details and access additional tools for configuration
Upload documents to an asset class
Documents associated with an Asset Class can be referenced when a user is working with this Asset Class or any Asset of this class. Authors can associate specific pages from a document within a procedure by creating a Bookmark Note for a step. To associate a document with an Asset Class (or any Asset of that class), the document must be uploaded to the Asset Class using the Manifest Web application.
- In the Manifest Web application, go to the menu option ‘Asset Classes’
- Search for the Asset Class to be edited
- Expand the Asset Class details by selecting the name (it will expand the details below)
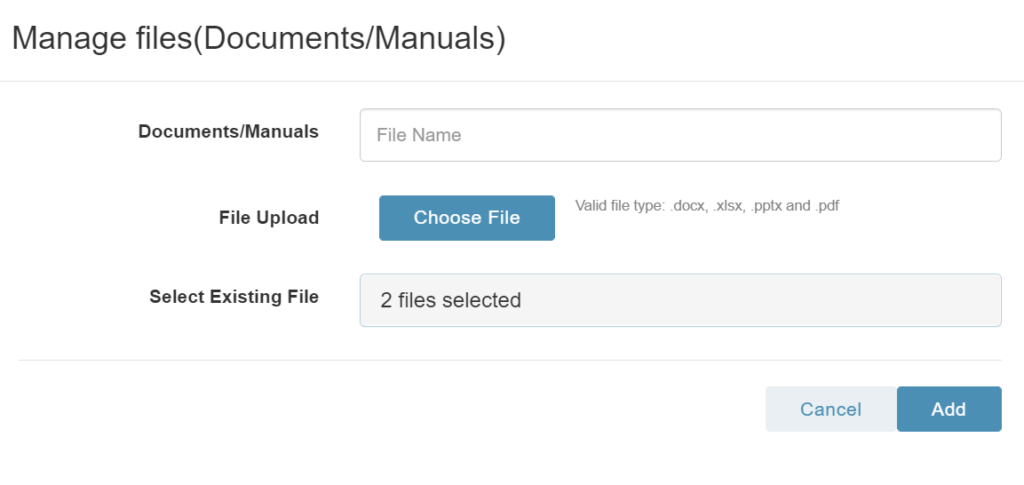
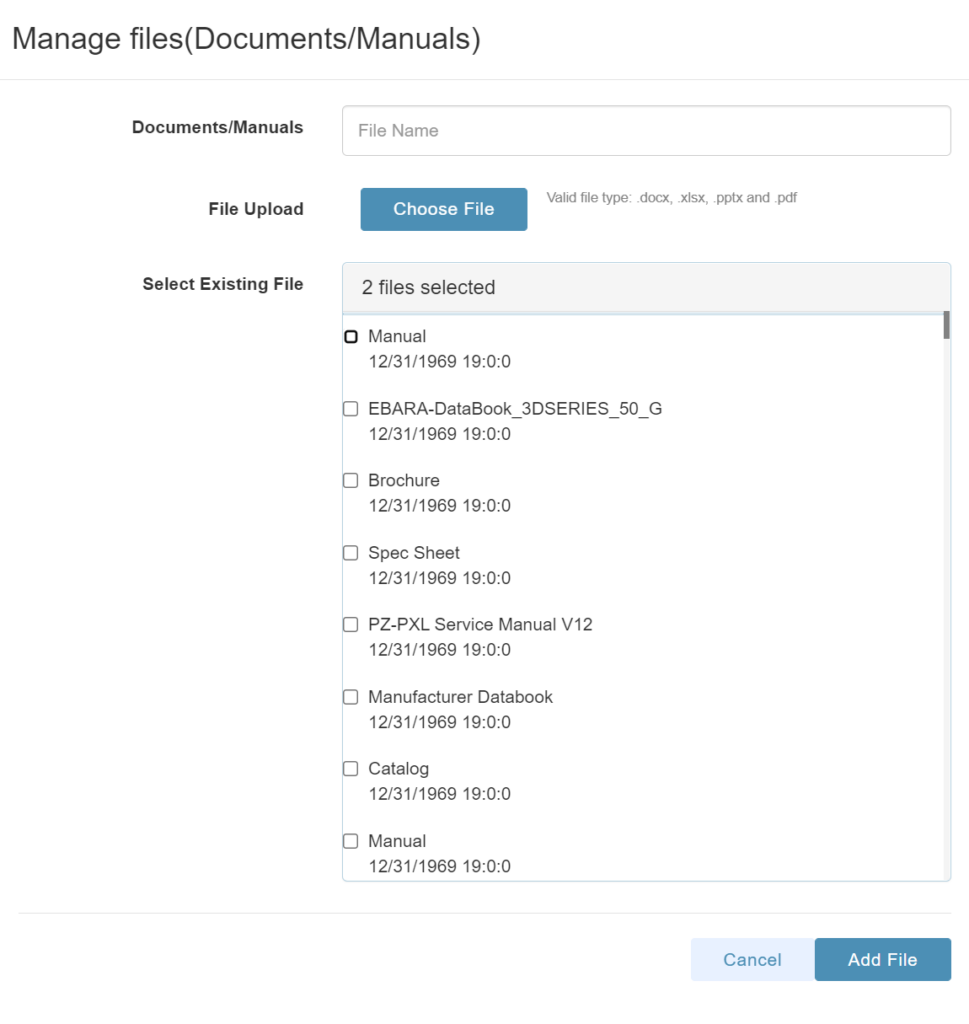
- Select the ‘pencil’ icon next to ‘Manuals’ to manage and upload documents
- Users will be prompted to upload a new file (document) or select from an existing file in the domain. Once complete, select ‘Add’.
- The file name associated with the document will automatically populate based on the uploaded or selected file name, but the name can be edited
Please note: Valid document types include .docx, .xlsx, .pptx and .pdf

Remove documents from an asset class
- In the Manifest Web Application, go to the menu option ‘Asset Classes’
- Search for the Asset Class to be edited
- Expand the Asset Class details by selecting its name (it will expand the details below)
- Hover over the number next to ‘Manuals’
- The documents will appear and the ‘trash can’ icon can be used to delete a document

Upload 3D Models to an asset class
3D models can be associated with an Asset Class and then used as a tool to either augment procedures or serve as a digital twin for remote use. Before uploading a 3D model into Manifest please be sure to review the accepted file formats, limitations of model density and texture images, and general specifications for exporting, uploading, and setting up 3D Models for Manifest. (https://community.taqtile.com/user-guides/3d-models/about-3d-models-in-manifest/)
- In the Manifest Web application, go to the menu option ‘Asset Classes’
- Search for the Asset Class to be edited
- Expand the Asset Class details by selecting its name (it will expand the details below)
- Select the ‘pencil’ icon next to ‘Models’ to manage models
- Select ‘+ Model’
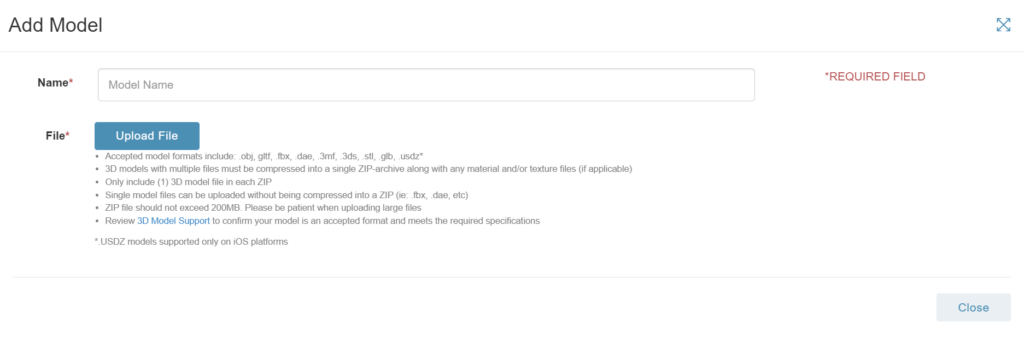
- A prompt will display to upload a 3D model file
- Note: Accepted model formats include: .obj, gltf, .fbx, .dae, .3mf, .3ds, .stl, .glb, .usdz (usdz models are only viewable on the iPad )
- Each 3D model file must be compressed into a single ZIP-archived file along with any associated material and/or texture files (if applicable)
- Note: do not include more than one 3D model file in each ZIP.
- The ZIP file should not exceed 200MB
- Please be patient when uploading large files, it can take some time
- Once the model file is successfully uploaded, the window will refresh with a view of the model in the Model Viewer
- Make any adjustments and select ‘Create’ to save the model

Adding Meters to an asset class
- In the Manifest Web application, go to the menu In the Manifest Web application, go to the menu option ‘Asset Classes’
- Search for the Asset Class to be edited
- Expand the Asset Class details by selecting its name (it will expand the details below)
- Select the ‘+ Meter’
- A prompt will be displayed to create a new Meter
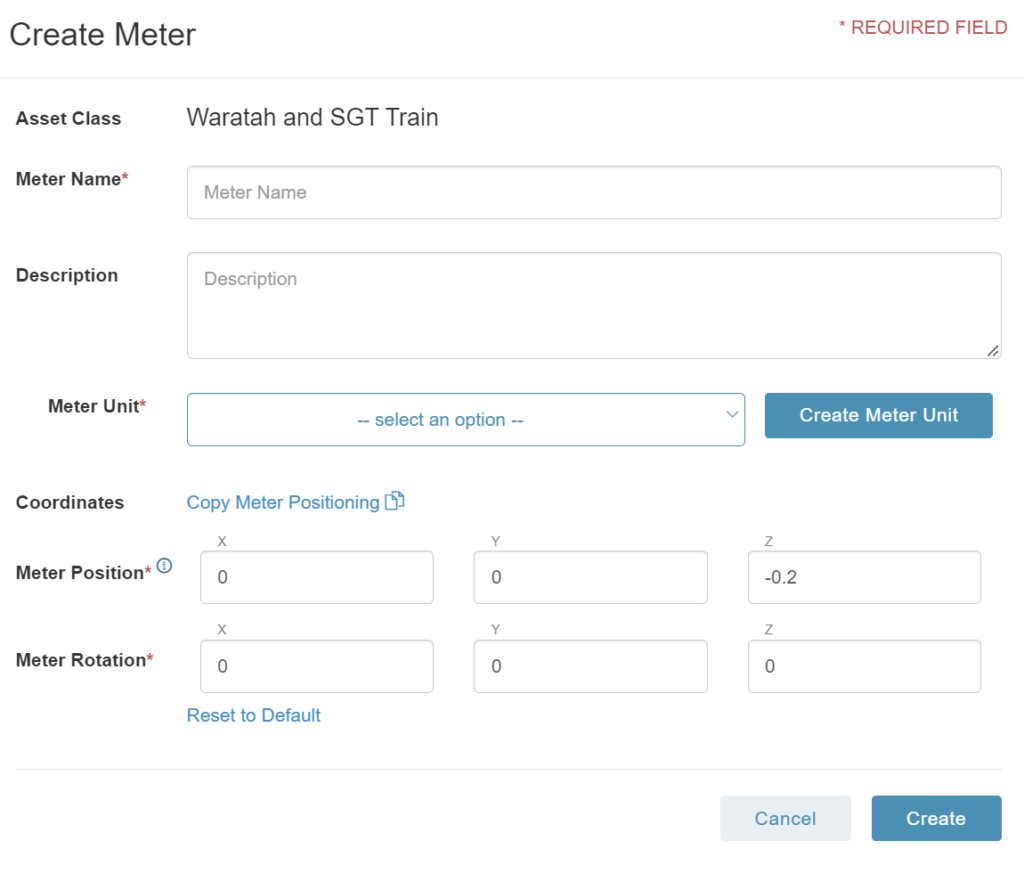
- Fields to be configured to create a new Meter include the following (those with an asterisk are required):
- Meter Name*: descriptive name for the Meter
- Description: a more detailed text field to provide details about the Meter
- Meter Unit*: the unit of measurement associated with the meter. A new unit can be created, or an existing unit can be selected
- Meter Position*: x,y,z coordinates where the Meter will be displayed
- Meter Rotation*: angle of rotation of the Meter
- Select ‘Create’
Note: Meters are displayed in 3D containers in all Manifest applications using AR. Meter positions are typically configured using the Manifest 3D application (Author or Admin permissions required) . However, values can also be added or edited here in the Manifest Web Application. The Meter position coordinates are the offset in meters from the Asset Tag position. The default -0.2 in the Z position is purposely set to not overlap with the Asset Tag.
Edit or Delete an asset class
- In the Manifest Web application, go to the menu option ‘Asset Classes’
- Search for the Asset Class to be edited
- To the right of the Asset Class name in the list, those with the necessary permissions will see an edit or delete icon
- Selecting ‘edit’ will open the original Asset Class creation window allowing information to be edited and updated
- Selecting ‘delete’ will delete the selected Asset Class.
Note: Only those with Administrator permissions can delete an Asset Class. Deleting an Asset Class will delete all related Assets. If Jobs have been created and are associated with the Asset Class, it will not be possible to delete the class or associated Asset


