3D Models are associated and added to Manifest through the entity type: Asset Class. Uploading a 3D Model to an Asset Class may only be done in the Manifest Web Application. This article will explain how to add and setup 3D Models in Manifest.
Uploading & Editing 3D Models in the Web application
Add a 3D Model
From the Manifest Web Application:
- From the Main Menu, select Asset Classes
- Select the desired Asset Class to expand the Asset Class details and options
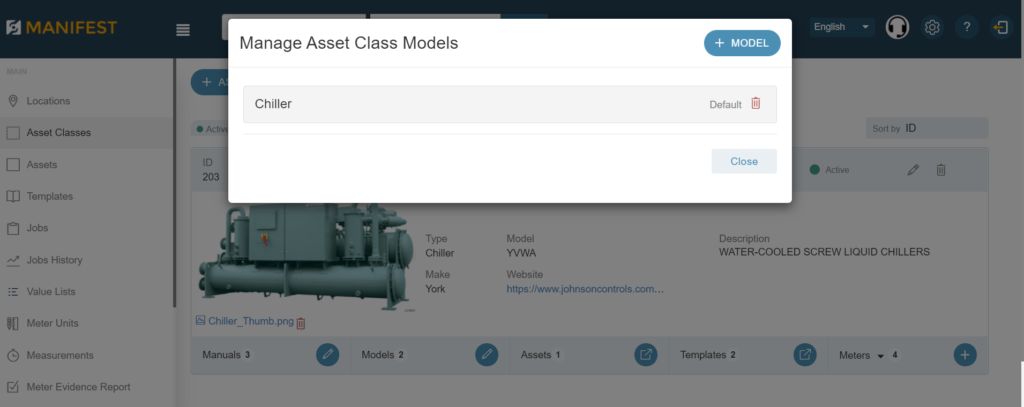
- Next to the label Models, select Manage Models
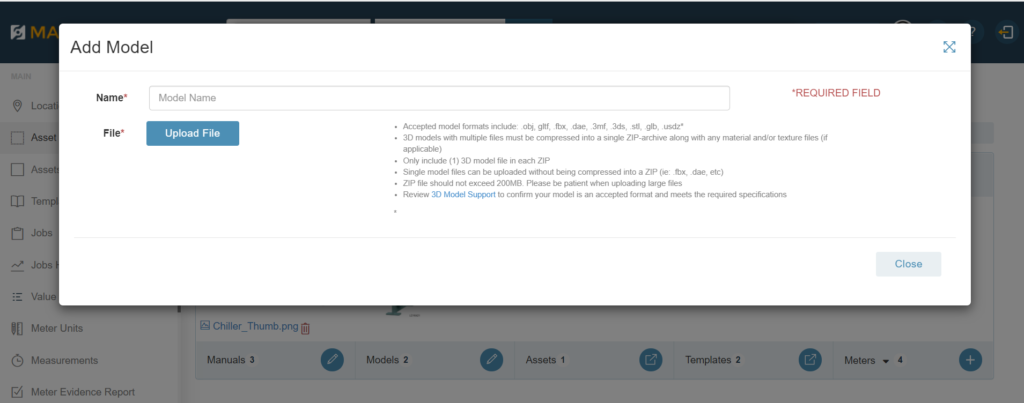
- A modal window will appear for managing Asset Class models
- Select + Model
- Carefully review the guidance on how to prepare a 3D Model file for upload in the Manifest Web application and save the compressed single ZIP-archive to the local device.
- Select Upload
- Select the Model file from the local device (the Model name will be automatically set as the file name unless edited)
- Once the file has successfully uploaded the 3D Model will render in the model viewer
- Edit as desired or select Save
Edit a 3D Model
From the Manifest Web Application:
- From the Main Menu, select Asset Classes
- Select the desired Asset Class to expand the Asset Class details and options
- Next to the label Models, select Manage Models
- A modal window will appear for managing Asset Class models
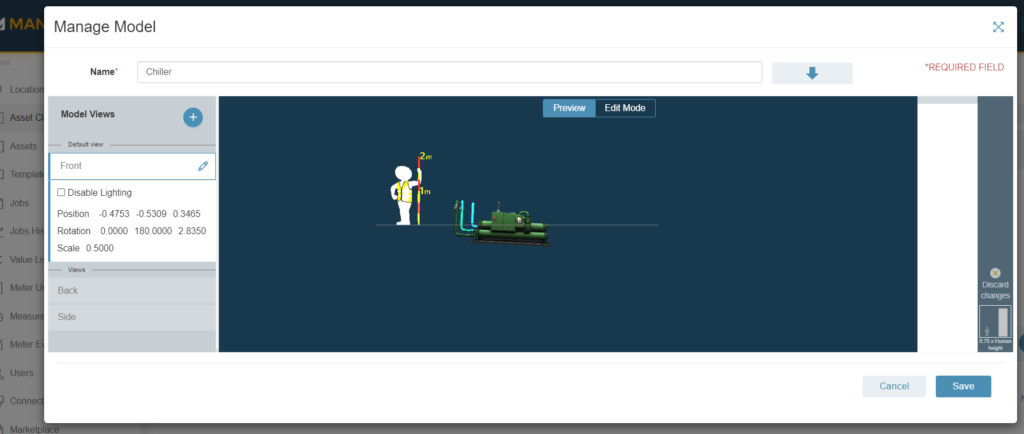
- Select the desired Model to edit
- Select the top tab Edit
- A menu of edit options will be available on the right-side of the Model Viewer when in edit mode
- Once all adjustments have been made, select Save
Viewing & Editing 3D Models in the 3D application
3D Models are associated to Manifest through the entity type Asset Class and can be viewed or edited either through an Asset Class or Asset.
Model Info Window
If an Asset Class has a 3D Model associated, all Assets will include an option to view 3D Model Info. This window includes drop down menus to select and view any available Models, Views, and Animations. Authors will also be able to access 3D Model and View setup from this window.
To access the 3D Model Info:
- Search for the Asset OR scan the Asset Tag for the desired Asset and go to the Asset Detail window.
- From the Asset Detail window, select the Info tab
- If a 3D Model is associate to the Asset, a 3D Model Info button will display
- Select 3D Model Info to open
Model Setup
Once a 3D Model is added to an Asset Class- the Author should complete the setup using the 3D application. A model is considered setup once the Author has validated that the scale and position are rendering correctly on the 3D device, and that the Asset Tag placement on the 3D model is consistent to where it would be located on the physical asset. This ensures that any spatially placed content will be positioned on the 3D Model in the same location it appears over the physical asset.
To run the setup for a 3D Model:
- Search for the Asset OR scan the Asset Tag for the desired Asset and go to the Asset Detail window.
- From the Asset Detail window, select the Info tab
- If a 3D Model is associate to the Asset, a 3D Model Info button will display
- Select 3D Model Info to open
- Select the desired Model from the Model dropdown list
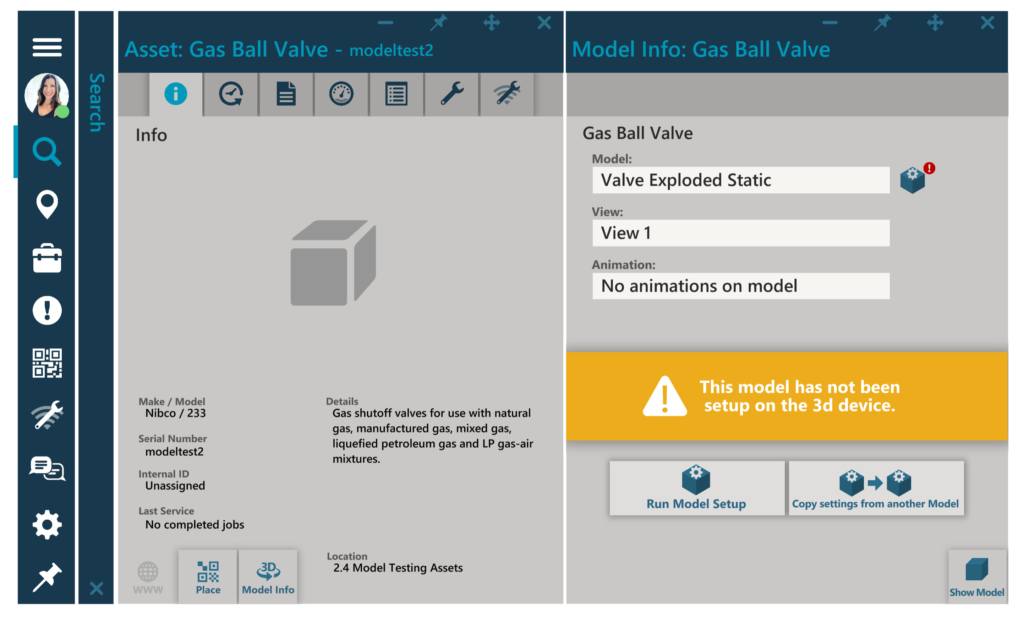
- If the 3D model has never been setup, a yellow warning banner will appear indicating the model has not been setup with two setup options below. If the model has previously been setup, these setup options are available to the right of the Model value list.
- Select from the following options:
- To complete the full model setup, select Run Model Setup.
- To copy the position and rotation settings from another 3D model for the same Asset Class, select “Copy settings from another model”
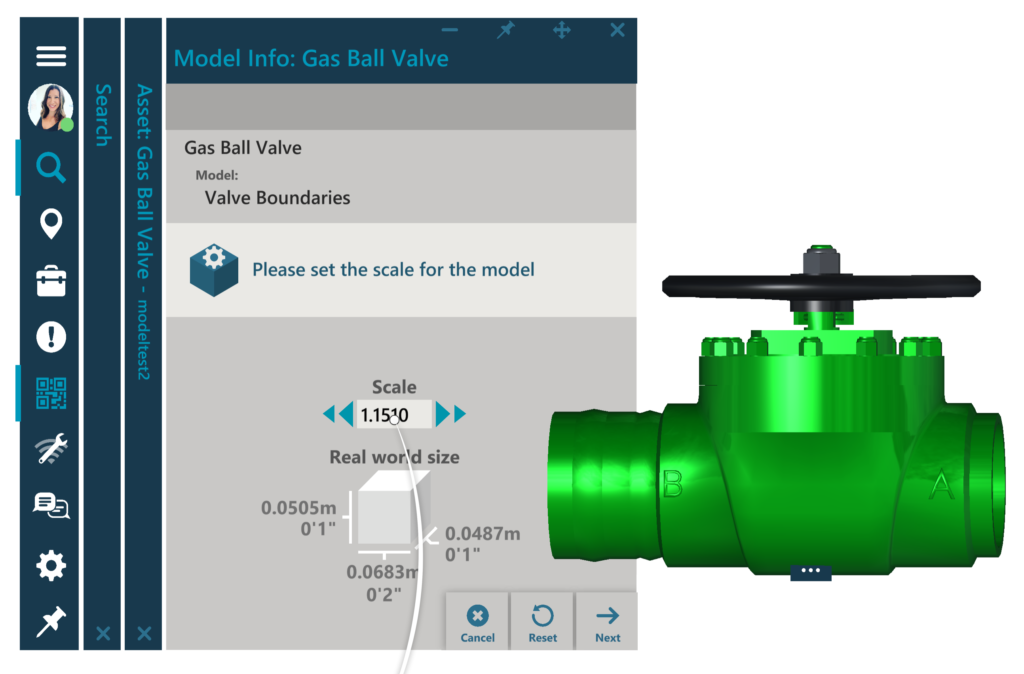
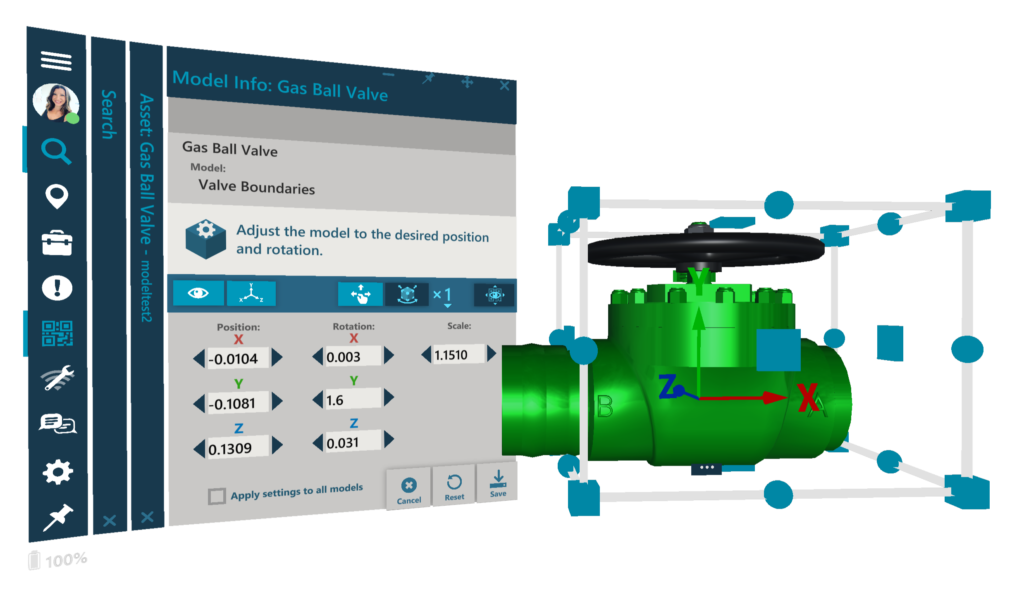
- Adjust the model scale using the input box (keyboard entry, tap arrows, or sliders) or select Next (Real world measurements are denoted for reference)
- Adjust the model position and rotation (instructions on each available tool below)
- Position the model in relation to the Asset Tag to match the real-world placement on the physical Asset, or use Aim Gaze to place that Asset Tag directly on the model
- To automatically copy the same settings to all other models for the Asset Class, check Apply Settings to all models; leave blank otherwise
- Select Save
- The model position and rotation settings will be updated to the server and saved for any other related Assets using this 3D Model
Data input fields and slider tools
Model setup tools display the precise scale value and position and rotation coordinates. These input boxes include several editing options.
- Keyboard input: Select the data field to open the keyboard and directly input the desired value
- Arrows: Select the left or right arrow to increase or decrease the value
- Slider: Select, hold and drag the input field left or right to automatically increase or decrease the value
Model Origin
This tool turns on an indicator that shows the origin point of the model. This is the position which the model will use at the central pivot point when rotating the model and is defined in the model’s 3D file.
Direct Adjust
The Direct Adjust tool turns on a bounding box enabling users to manipulate and interact directly with the model using handles located around the box.
- Direct Adjust the Scale: Select and hold any of the squares on the corners of the bounding box and then drag out to scale up or push in to scale down
- Direct Adjust the Position: Select and hold any of the rectangular boxes on the faces of the bounding box and then drag to the desired position
- Direct Adjust the Rotation: Select and hold the sphere handles on any of the bounding box edges and drag to rotate the model to the desired position
Proxy Adjust
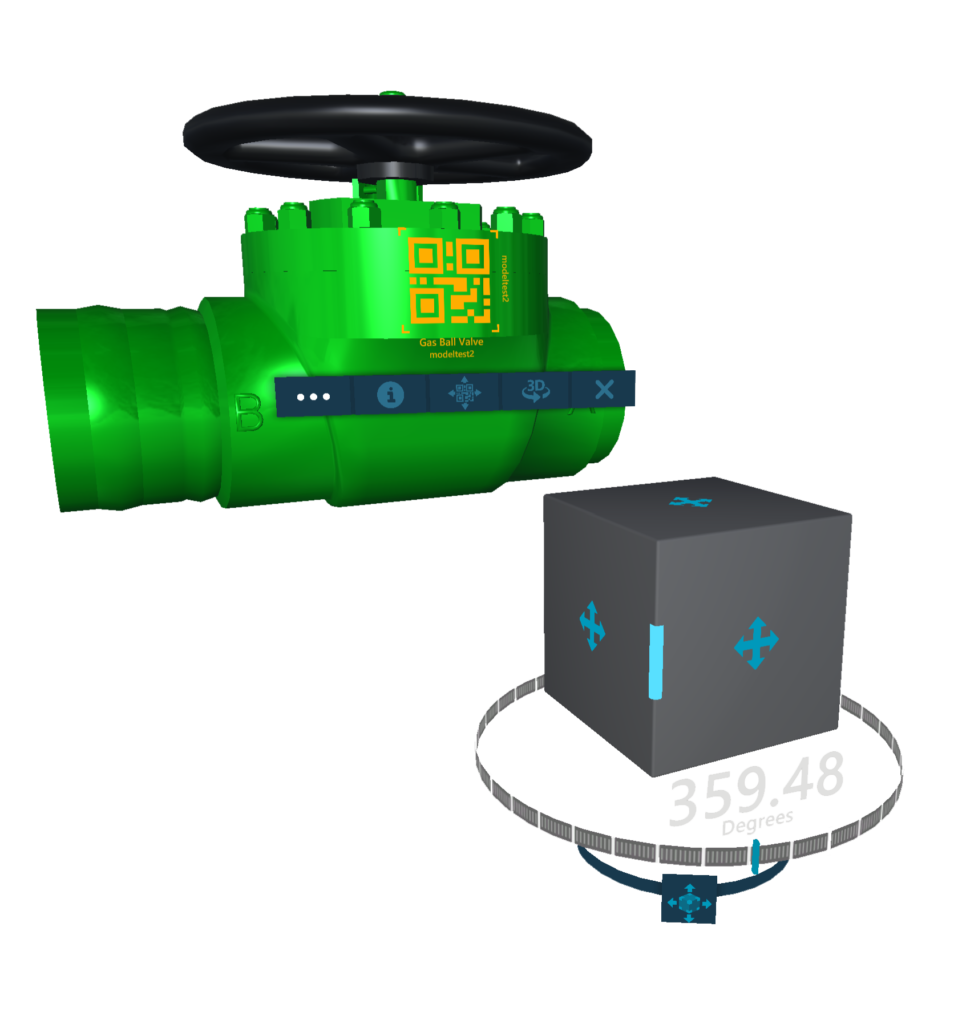
Selecting the Proxy Adjust tool allows users to interact with a smaller representation of the model – the Proxy Cube. The cube will render in front of the user, can be repositioned to the desired location, and then serves as the proxy for manipulating and interacting with the model. This is an ideal tool for working with larger models where accessing the bounding box tools may not be as practical.
- Reposition the Proxy Cube: Select and hold the move button at the base of the Proxy Cube and drag to the desired location
- Proxy Adjust the Scale: Select and hold any of the squares on the corners of the Proxy Cube and then drag out to scale up or push in to scale down
- Proxy Adjust the Position: Select and hold the move icon on any face of the Proxy Cube and then drag to the desired position
- Proxy Adjust the Rotation: Select and hold the handles on any of the Proxy Cube edges and drag to rotate the model to the desired position
Aim Gaze
The Asset Tag position can be set by either positioning the model to where it should be in relation to the tag, or by using the Aim Gaze tool. Selecting Aim Gaze will attach the tag to the end of the users’ ray and collide with surfaces on the model, until the user reselects and release the tag in place.
To place a tag on a model using Aim Gaze:
- Select Aim Gaze
- Point aim fingers towards the location the Asset Tag should be placed
- When the Asset Tag is positioned, use the select gesture to place the tag and turn off Aim Gaze
Manifest Views
About Views
Model Views provide a way for an Author to adjust the model’s scale or rotation and then save and name as an additional view of that model. This provides users with preset Model Views which can be scrolled between or programmed to automatically load a specific view of a piece of equipment on specific Job Steps. The Asset Tag and any spatially anchored content, like Steps, will rotate to the new orientation when a new Model View is loaded.
Managing Model Views in the Web application
Add a View
- From the Manage Models window,select the desired Model to open the Model Viewer
- Under Model Views select the + button
- Enter a name for the Model View
- Update the scale or positional coordinates manually and select Save, or select Save to edit the position and scale in the Model Viewer
- Select the top tab Edit
- A menu of edit options will be available on the right-side of the Model Viewer when in edit mode
- Once all adjustments have been made, select Save
Edit a View
- From the Manage Modelswindow,select the desired Model to open the Model Viewer
- Under Model Views select and highlight the Model View to edit
- Select the pencil icon next to the Viewto update the Model View name or update the scale or positional coordinates manually and select Save
- Select the top tab Edit to use the model adjustment tools
- Once all adjustments have been made, select Save
Delete a View
- From the ManageModelswindow,select the desired Model to open the Model Viewer
- Under Model Views select the Delete option next to the Model View name (Default models cannot be deleted)
- Select Save
Managing Model Views in the in the 3D application
Add a new View
- Select 3D Model Info from the Asset Detail Info tab
- Next to the Model View list, select Add
- The view name will default to ‘View #’, select the name field to edit
- Select the preferred model tools to adjust the model orientation or scale
- To update the new view to the Default view, check the Default View box
- Select Save
Edit a View
- Select 3D Model Info from the Asset Detail Info tab
- Next to the Model View list, select Edit
- Select the name field to edit
- Select the preferred model tools to adjust the model orientation or scale
- To update the new view to the Default view, check the Default View box
- Select Save
Delete a View
- Select 3D Model Info from the Asset Detail Info tab
- Next to the Model View list, select Delete (Default models cannot be deleted)
- A prompt will appear “Are you sure you want to delete this view?”; select OK to confirm
